Wild Game Appetizers

Elk Reaper Summer Sausage

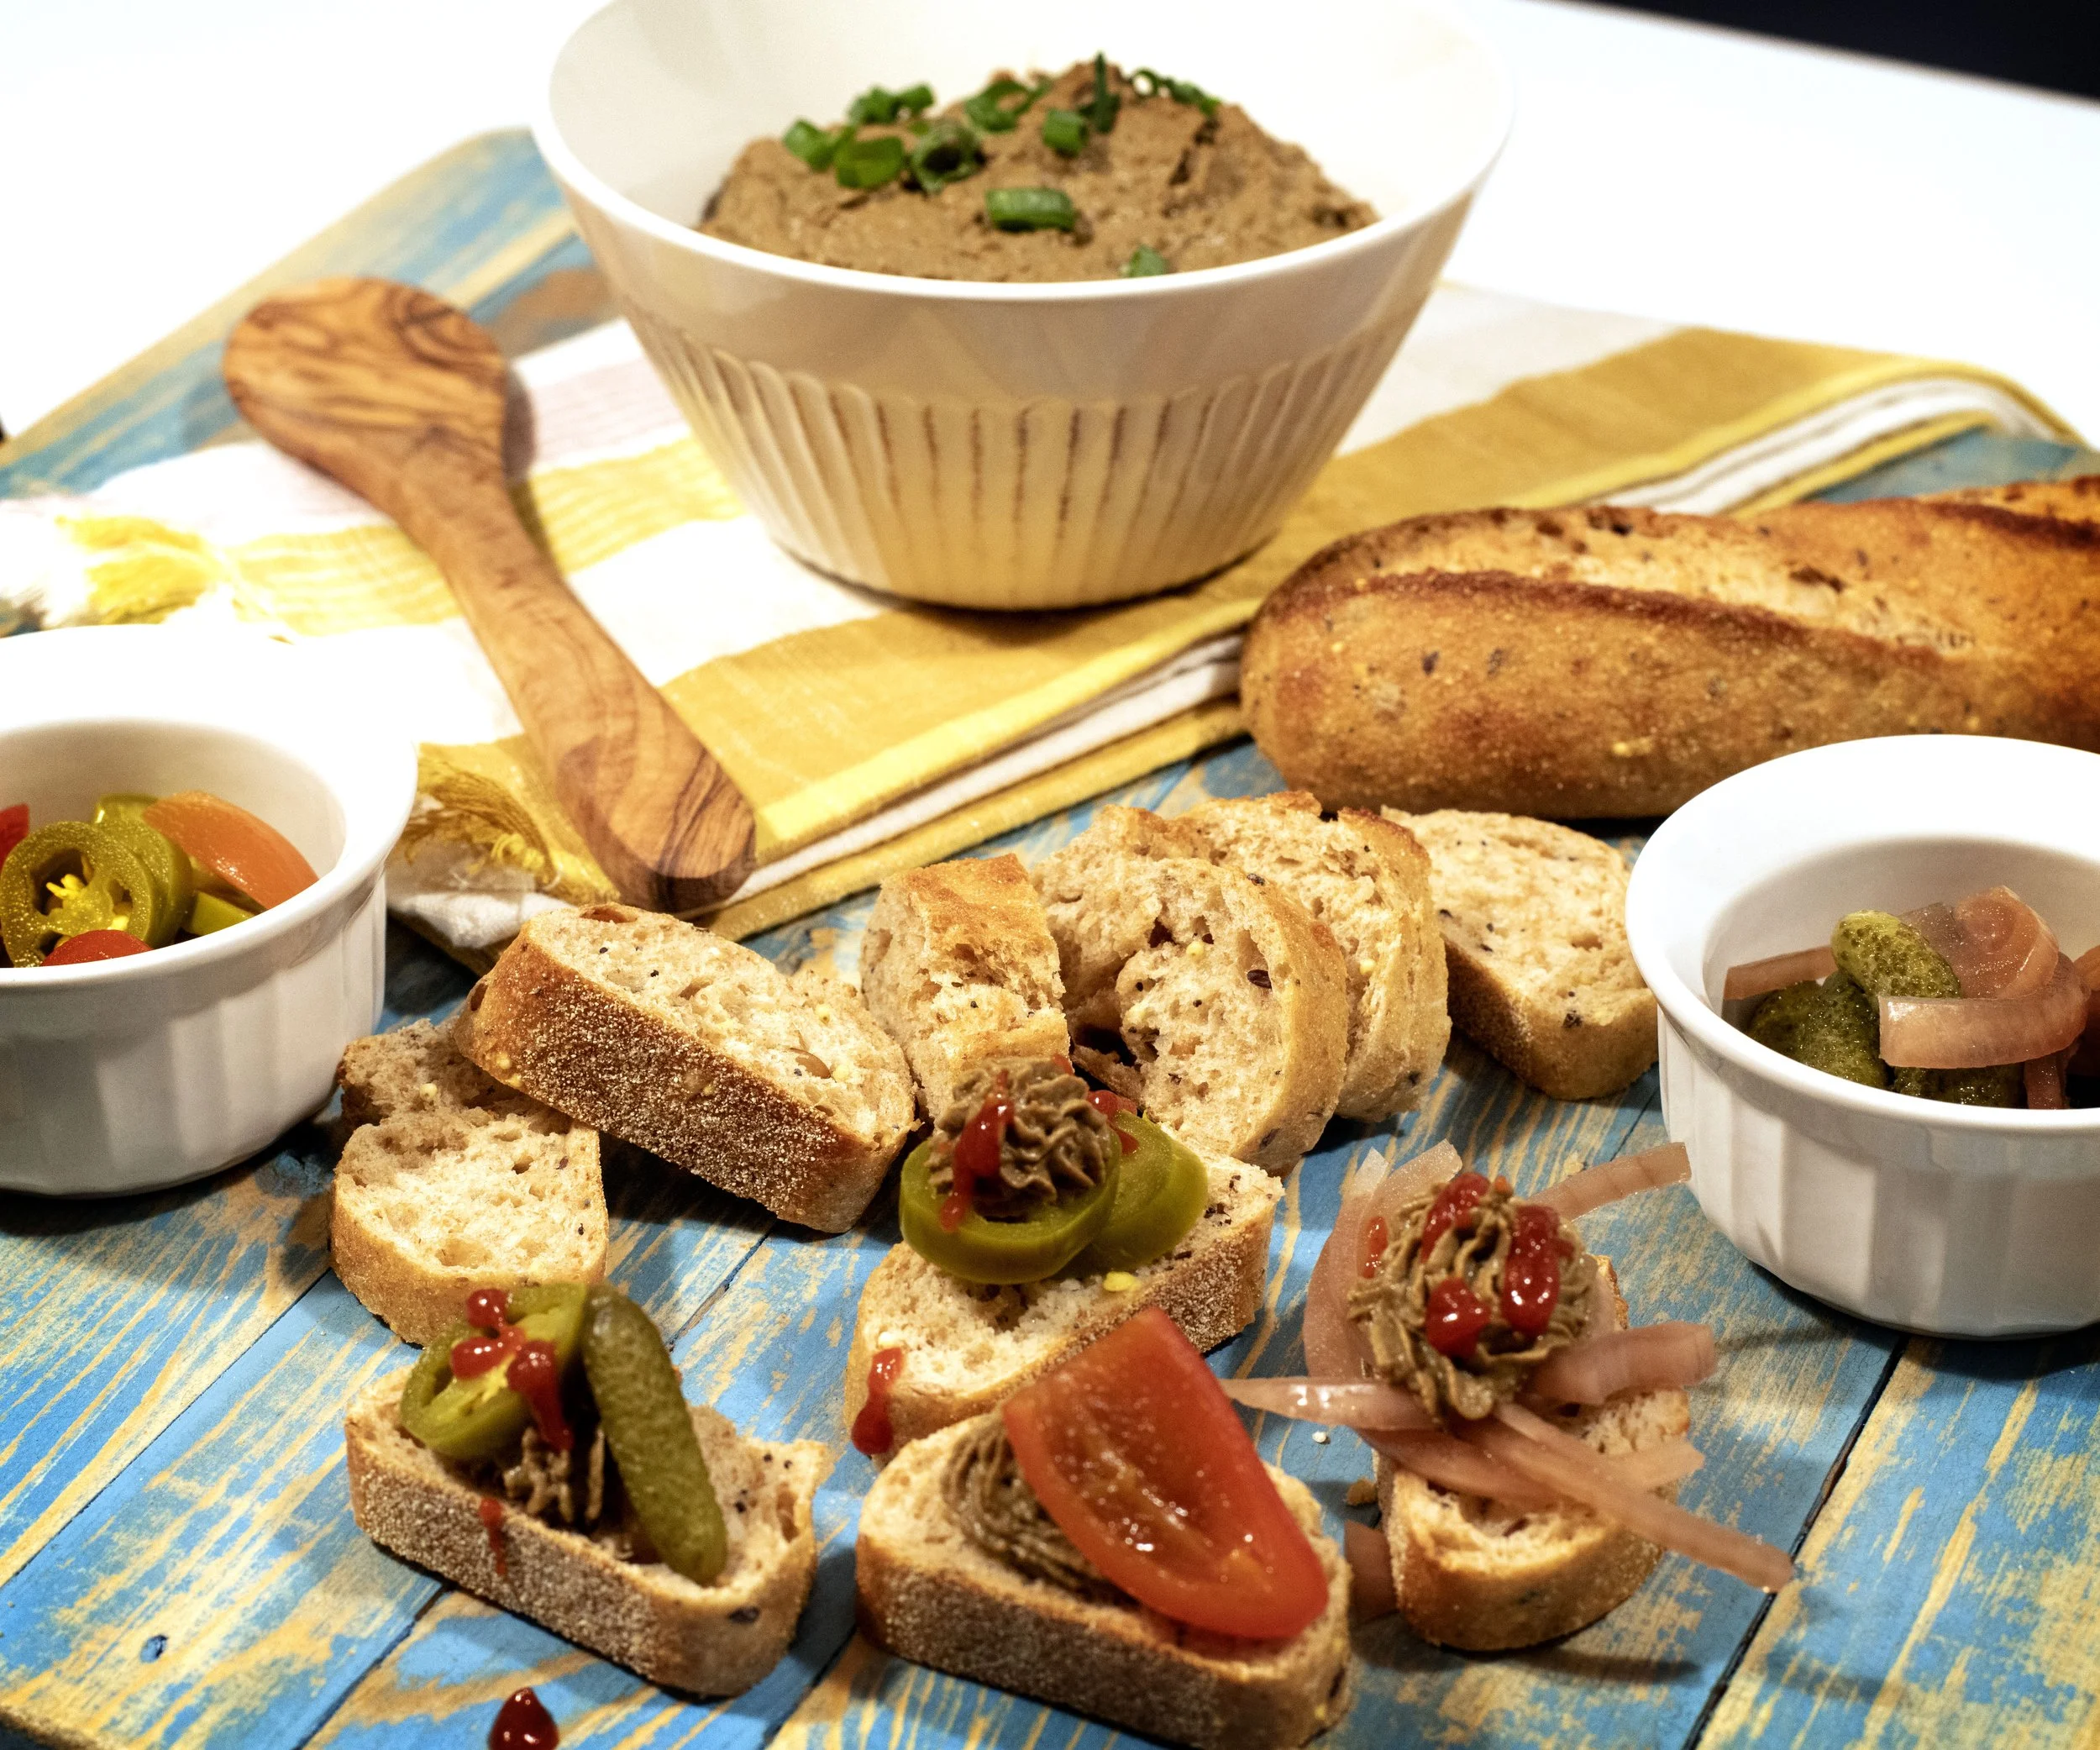
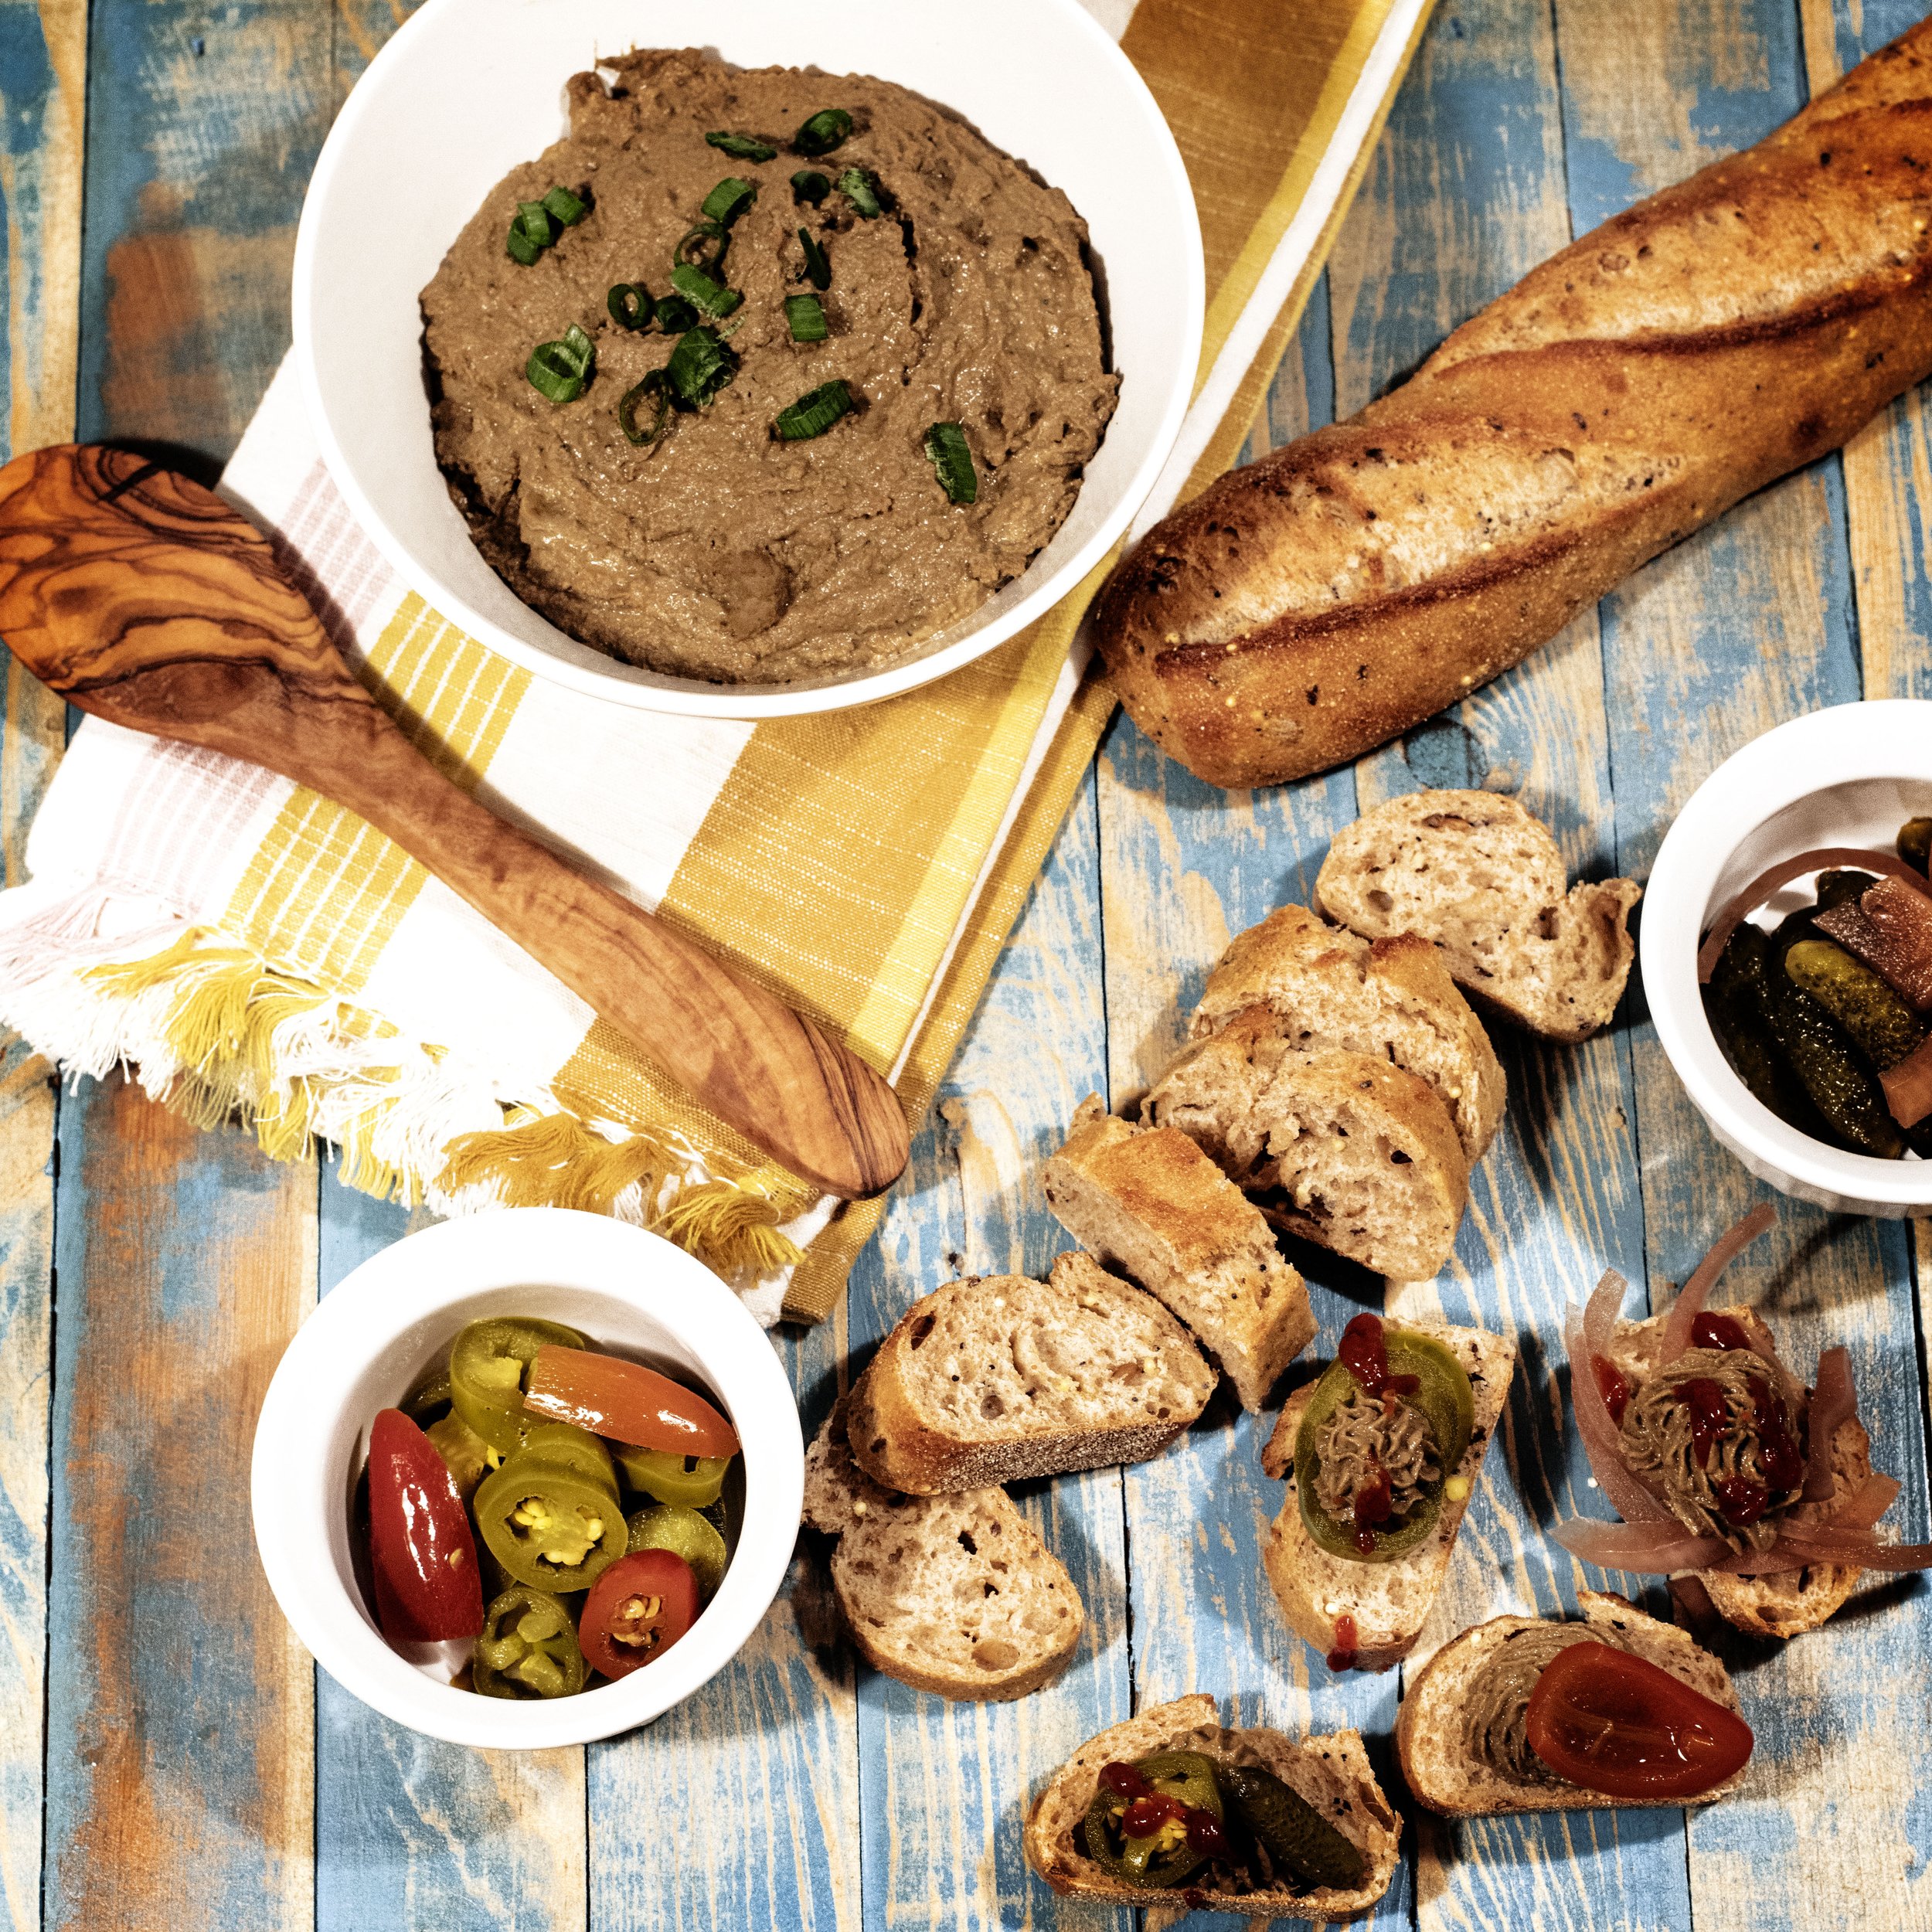
My favorite boating snack is definitely summer sausage, Ritz cracker, and a slice of cheddar cheese. It’s actually my favorite hiking snack. And fishing snack. And hunting snack. And sitting on the porch at the end of the day snack. And bored at home snack. It’s just the best snack. It’s even better when it’s made from your own harvested wild game too! And it’s even better than that when you add home grown Carolina Reaper peppers for Reaper Elk Summer Sausage.

I started making my own summer sausage about a year ago. Store bought is okay. Getting it from a butcher is better than store bought. Having a butcher that processes wild game make you some from your own meat is even better than that. But the best is absolutely making it yourself. You get to control the salt level, the cuts of meat that go into it, the fat content, and the spices.

I feared the summer sausage process to begin. It seemed daunting. I also had a really difficult time finding a solid recipe online. And smoke times and temperatures? Almost impossible to find. I got incredibly lucky that a person on Instagram reached out to me and shared smoke times and temperatures.

So, after a few practice runs and some recipe perfecting, I am ready to share my Reaper Elk Summer Sausage recipe.

Homemade summer sausage is pretty easy to pull off, but there are a few tricks that make it turn out fantastic instead of just good. First tip: keep your meat and fat very cold! This is one of the most important steps for making summer sausage. If things get to warm while you are working the fat will separate and ruin the texture of your final product. So, between each step of mixing and grinding I stick the meat into the fridge for about thirty minutes.

Okay, let’s start making some Reaper Elk Summer Sausage. Following the first tip of summer sausage making, start with cold meat and cold fat. This recipe will make four summer sausage sticks that are two and a half pounds each. I do a ratio of 20% fat to 80% meat. So, for this recipe you need eight pounds of wild game meat of your choosing and 2 pounds of fat.

For the fat, most people prefer pork fat. I have never had the opportunity to work with pork fat as it seems nearly impossible to acquire. I have asked the local supermarkets and butcher, and all that is ever available is beef fat. So, I have only used beef fat, but it works great in my opinion.

For this recipe, I used elk for the meat. I have also done deer, bear, and pronghorn. They all turned out amazing. So, use whatever is in your freezer and you won’t be disappointed.

Run your meat and fat through a grinder using a coarse plate first. I used an 8mm grind plate. I also have a very inexpensive meat grinder. I love it. It didn’t break the bank, doesn’t take up much space, and is convenient enough to use I can just pull it off the shelf and grind up fresh burger meat at a moment’s notice. The grinder I am currently using, and have for quite a few years, is just this one: Cabelas Deluxe Meat Grinder.

Give the meat a quick mix to get the fat and meat incorporated. It is also time to add the spices now! I love the spice mixture for this Reaper Elk Summer Sausage. It obviously is spicy. The Carolina Reapers add a slow building heat to sausage that definitely lights your mouth up for a bit, but if you like a little kick you will thoroughly enjoy the reapers.

The allspice and cloves add a little sweetness and a slight touch of bitter, which pairs wonderfully with the heat from the Carolina Reapers. Pair that heat, sweet, and touch of bitter with the tang from the fermenting agent for summer sausage and you have one tasty snack on your hands.

Continuing on, to your meat and fat mixture add six tablespoons of kosher salt, 4 tablespoons of dextrose, and two teaspoons of pink salt #1. The pink salt extends the shelf life of cured meats, gives everything that pretty red hue, and assists in the prevention of spoilage from bacteria. Dextrose is added to cured meats to feed the lactic acid organisms that create that wonderfully tangy fermented flavor.

Once you have your salts and dextrose mixed in add your seasoning agents: 1 tablespoon of dry yellow mustard, 3 teaspoons of garlic powder, two teaspoons of ground ginger, 2 teaspoons of coriander, one tablespoon of allspice, and two teaspoons of ground cloves.

Next add your mustard seeds. Most people put in about two tablespoons. I eyeball it because I love the texture the seeds add to the summer sausage. I do more like three tablespoons. I also add more freshly cracked black pepper for the same reason. You don’t want to completely over-do it with the pepper because it can change the flavor of the summer sausage, but I do more like a tablespoon while others recommend less.  

Finally, it’s time to add your heat! The Carolina Reapers I used for this recipe were from my home garden. I dried them in a window for two months and then ground them into a powder. This recipe used three dried Carolina Reapers, which worked out to one pepper per 3.33 pounds of meat. This is equated to a teaspoon of powder for the entire recipe.  I would recommend some gloves at this point.

This recipe is for lovers of the heat! You can adjust the level of heat to fit your personal preference. To drop the heat level, you could add less of the Carolina reapers or use a different type of pepper, such as a habanero, serrano, or jalapeno. If you aren’t a fan of heat at all you can omit the pepper completely.

Get everything mixed really well. If you use your hands, I suggest wearing gloves because of the peppers.

Alright, time for the final steps before we place our meat back in the fridge: the fermenter. There are lots of different types of fermenting agents available. One of the more popular ones is Fermento. I used pediococcus culture. I ordered it online. It is a little spendy, but you can make pounds and pounds of summer sausage from one bag.

There are lots of different options for pediococcus culture. All of them provide protection against listeria and such; however, they all produce different results as far as the sourness of your finished product. There are some that will make your summer sausage very sour and tangy, and others that are much less so. I used a one that created a little less sour flavor since I was adding so many other spices to this summer sausage.

The pediococcus culture needs to be kept in the freezer to survive. You also shouldn’t handle it with bare hands. For ten pounds of summer sausage, I mixed ¾ cup of water with 3 teaspoons of dextrose. I then mixed in 3/8 a teaspoon of the pediococcus culture. Stir until the dextrose is dissolved and then pour over your meat mixture. Mix everything together.

Now that the spices have been added and the fermenting agent, place the meat mixture back in the fridge for thirty minutes to cool the meat back down.

After the meat has cooled, run the entire batch through the grinder a second time on a smaller grind plate. I used a 4.5mm plate. Place the meat back in the fridge to cool once again. I let it sit another thirty minutes even though the meat hadn’t warmed up too much this time. I wanted everything to be nice and cool for packaging the summer sausage.

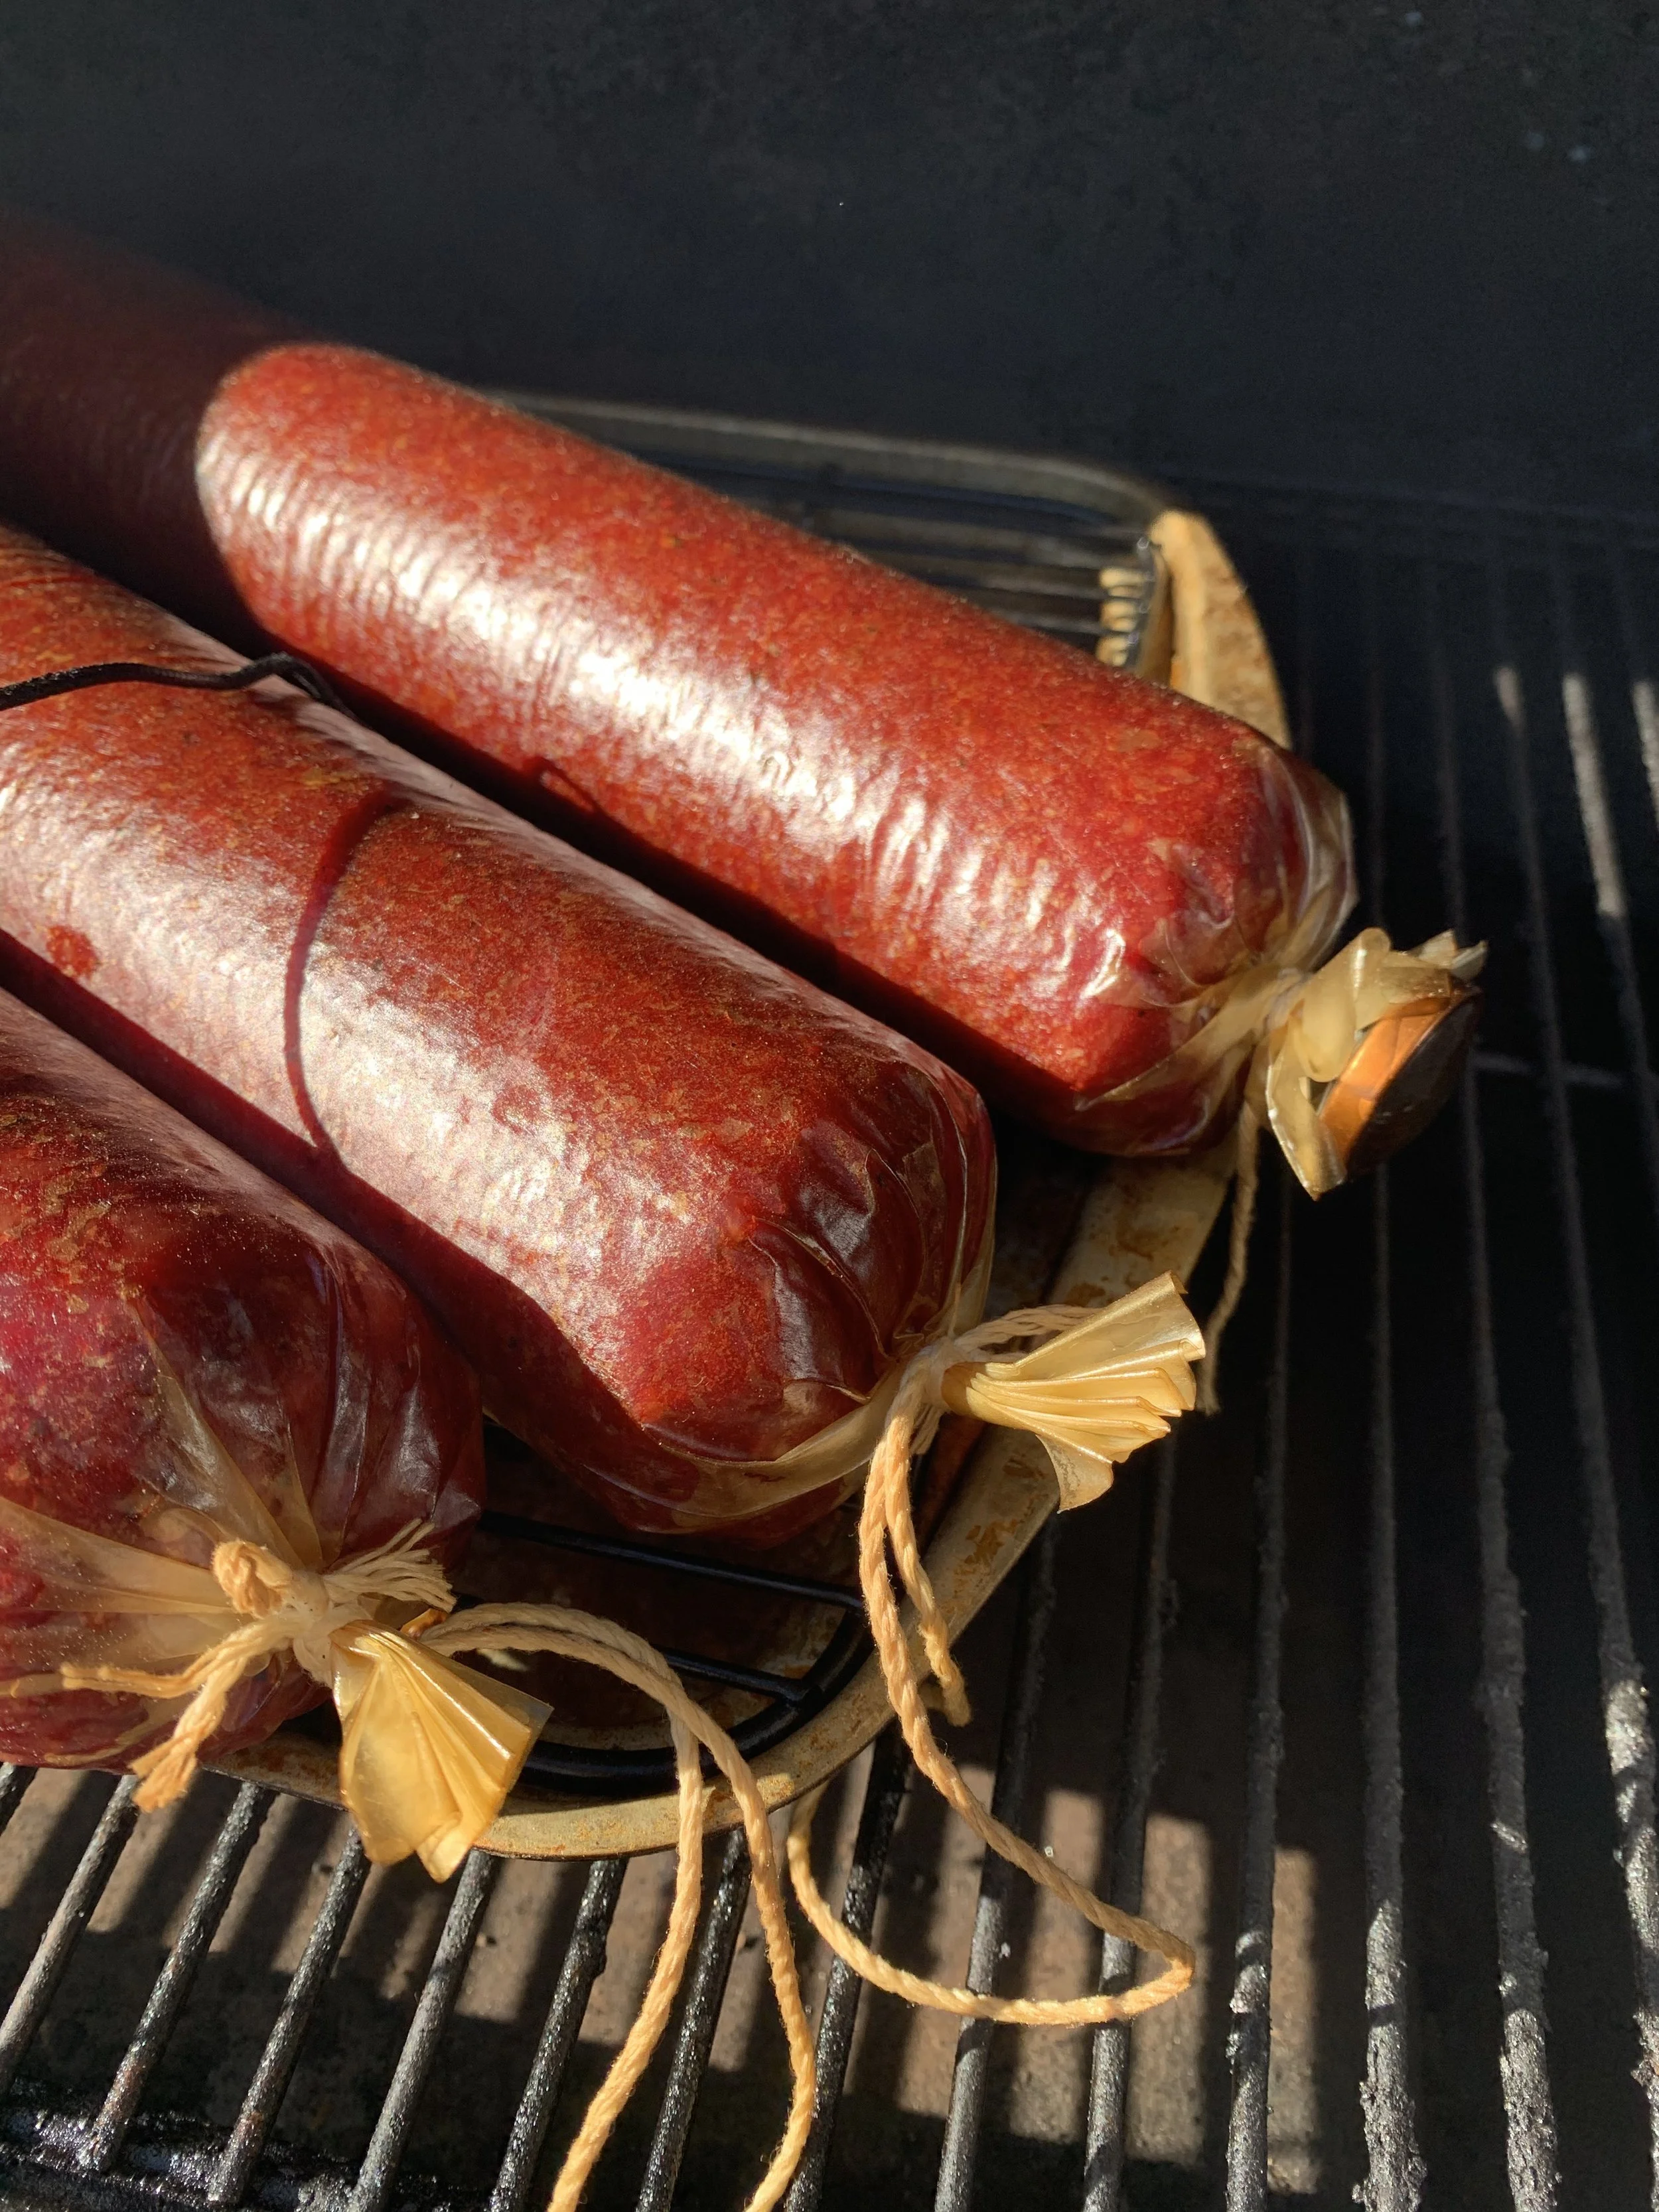
Switch the grinding plate out for the stuffing accessories. You also need to let your summer sausage casing soak for ten minutes in the sink. This recipe makes basically logs of summer sausage and I then cut them down into smaller blocks before vacuum packing, but the actual casings are quite large. I used the 2 and ½ by 18-inch collagen casings.

It’s time to stuff casings, which leads us to our second tip: pack the casing very tight. Like as tight as you possibly can! The tighter the better.

Once all the summer sausage is packaged, place the logs in the fridge to relax overnight. I didn’t want overly sour summer sausage, so I let mine sit for one evening. If you like sourer flavor, let them sit for two nights before smoking.

So, once you have let the summer sausage ferment and do its thing, it’s time to smoke! Finally!

Preheat the smoker to 135 to 145 Fahrenheit and add your wood of choice. I have a pellet smoker and used applewood to smoke the summer sausage. The third tip for summer sausage success is to use a meat thermometer throughout the smoking process. You want to know the internal temperature of your sausage, so you know when you increase the heat of the smoker and when to pull the meat.

This is a cool temperature smoke for a pellet smoker.   I ended up placing tin foil on the rack to direct all the smoke directly at the temperature control probe and then added a rack about an inch off of the tinfoil to create an insulating air layer to prevent the heat from the fire box directly going at the sausage.  I then used the probes to monitor the air temperature at each end of the sausage.  This ended up working perfect as the control probe is at the opposite end of the stack, so it ended up blowing the smoke across the sausage lengthwise.  I know this is confusing.  If you need help, email me and I can walk you through it.  This was also done in the winter.  I do not know that a pellet grill would work in the summer.

Keep the smoker at 140 degrees Fahrenheit for about an hour. This is essentially the “drying” stage of summer sausage. The meat temperature should not raise a lot during this stage of cooking.  Keep at this until the internal sausage temp is 80 to 85 degrees.

After about an hour, kick the heat up to 160 degrees Fahrenheit. This is when you will start to get a lot more of the smoke saturation. I let the sausage smoke at 160 degrees for about an hour.  The internal temperature should be 140 at the end of this cycle.

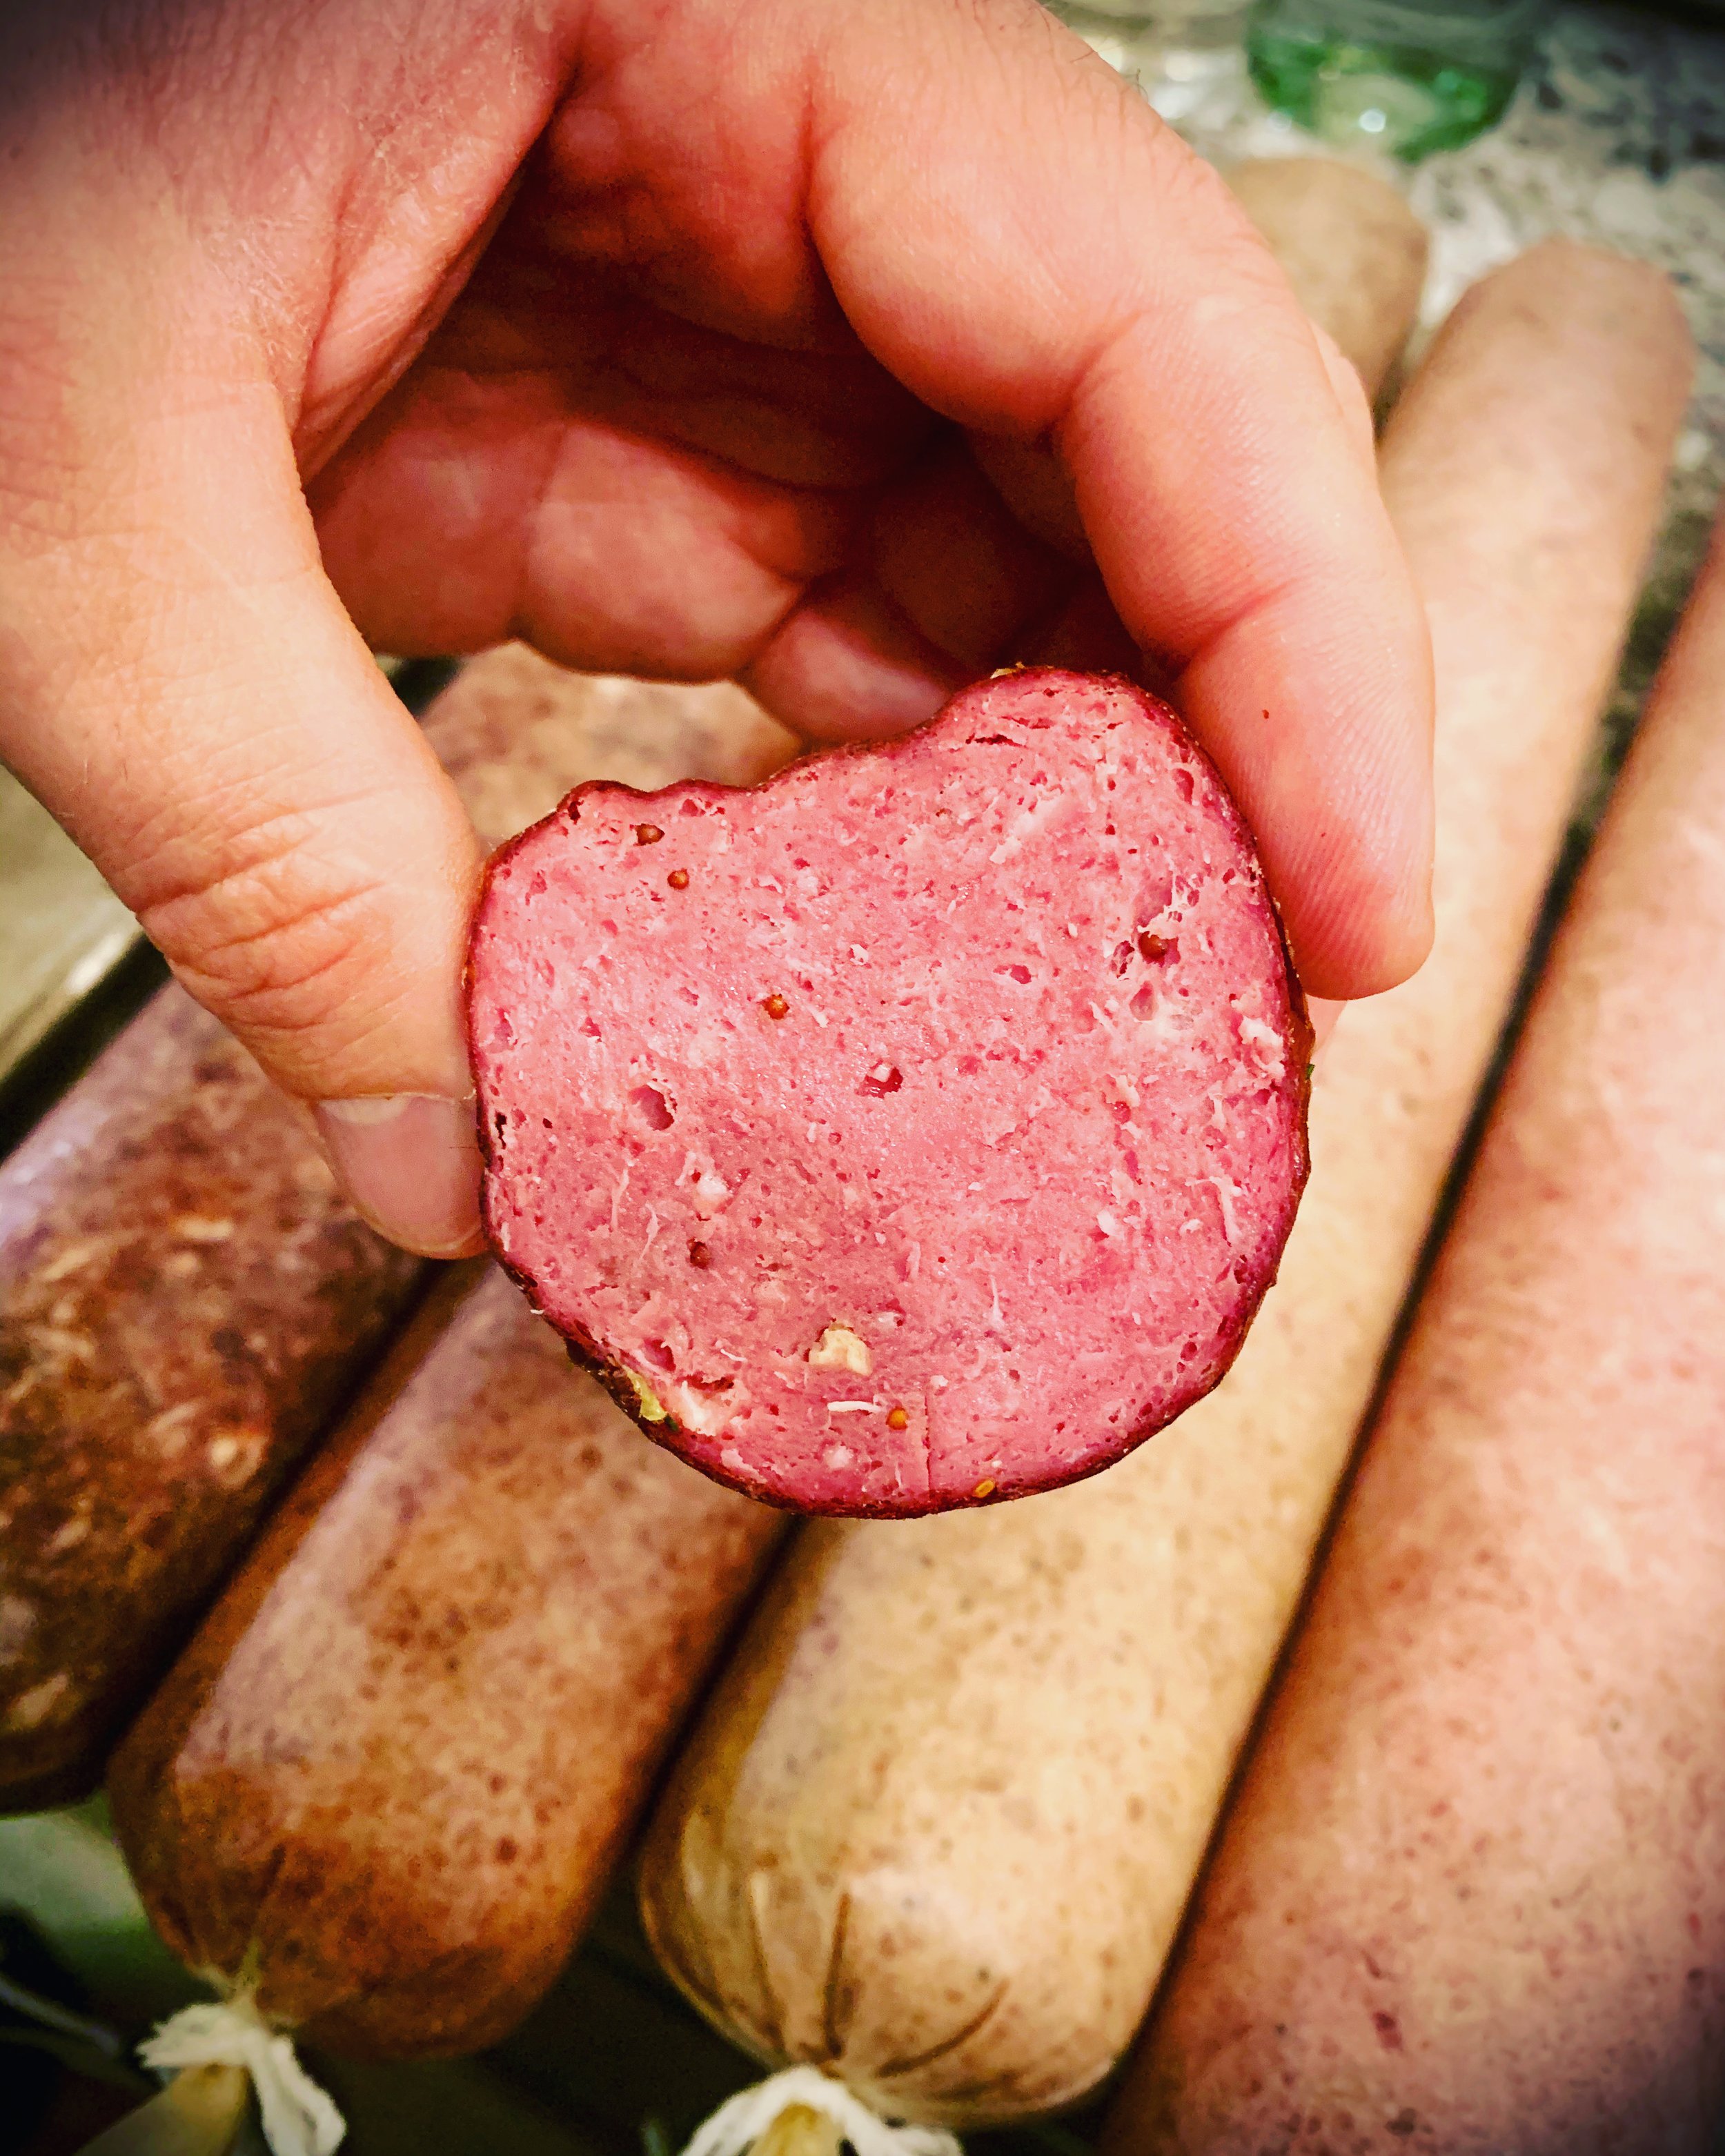
Finally, kick the heat up to 180 degrees Fahrenheit and finish cooking the summer sausage. This is where watching the internal temperature is most important. Pull the sausages from the cooker once the internal temperature reaches 154 degrees. This step can take a few hours, anywhere from two to three. A lot of factors affect the cooking time, such as how tightly packed the casing are, the type of meat used, moisture content of the meat, and I’m sure so many other things we don’t even realize. That is why it is important to pull the summer sausage by internal temperature and not cooking time.

Alright, time for the final tip! Immediately upon removing the summer sausage from the smoker, plunge the sausages into cold water. This will help set the meat, resulting in a much better final texture, and makes removing the casings easier.

You don’t have to keep the sausages in the water long, a few minutes is good enough. Before packaging the sausage for storage, let them cool completely, which takes about an hour. To store, I cut them into chunks that I would use for taking on a hike or serving at a party, which is about six-inch-long pieces. I then vacuum package the chunks for freezing. I started vacuum packing the sausage because the first time I made them I just loosely wrapped them in plastic wrap and stuck them in the freezer and they freezer burned after a month. I didn’t take into consideration that the casings are permeable, which I felt I should have thought about because I knew the sausage absorbed smoke so well during the cooking process. Anyway, they freezer burned, which I hate, so I started vacuum packing them after that experience.

Anyway, that is my recipe and process for creating this Reaper Elk Summer Sausage.

Happy Hunting!

Serrano Margarita Oyster Shots

Oysters. They’re a lot. They’re not for everyone. But I think this recipe for a serrano margarita oyster shot definitely helps make oyster eating a little easier on everyone.

Not growing up near a coastline definitely made oysters seem like a completely foreign food item. The only time I saw oysters growing up was the oblong shaped cans of smoked oysters on the tuna shelf in the supermarket. I never ate them. Just saw them.

The first time I tried an oyster was at a Chinese buffet off the highway in Delaware. I definitely made it into a big deal. It was very dramatic. I needed the other restaurant patrons to hear how this was my very first oyster, and how skeptical I was about eating it. It was a lot like when young children try a food for the first time and need everyone to know the importance of the monumental occasion.

After filling my buffet plate with chilled crab pieces and shrimp cocktail, I took a single shucked oyster from its icy bed and placed it almost ceremoniously in the center of the plate. Back at the table, I picked the lone oyster from the plate, clinked it with a quick “cheers” with friends, and attempted to slurp it down.

In the movies, everyone always looks good eating an oyster. It’s almost equivalent to how people make smoking look cool in movies. They take a long, slow drag from their cigarette, roll the smoke around in their mouth, close their eyes in a small moment of bliss, and puff out beautiful smoke rings. Watch people smoke in real life and there is a lot of coughing and smoke kind of billows randomly about. Oyster eating is just like this.

In the movies, oysters are picked up delicately with the thumb and a single finger and then effortlessly, and more importantly cleanly, and quickly slurped, and mind you it is a soundless slurp, from their shell. They disappear quickly with a small swallow and then are followed by that closed eye small moment of bliss.

Real life oyster eating, especially the first time, is not at all like that. First, figuring out how to hold the oyster is a challenge. Every grip feels awkward. Do you clutch it? Do you palm it like a ball? Cradle it? And how do you keep your fingers out of the way of the meat?

After you get your grip, it’s time to slurp. It’s loud. And it’s actually a little embarrassing. Getting the meat out of the shell isn’t as easy as it looks. So you slurp harder and louder. All the liquid usually comes out first, and you choke on that a bit, and then the meat will break loose suddenly. It’s kind of like when you are trying to get the last bit of an icy drink from the bottom of a cup. You shake the cup a few times and eventually the entire block of ice breaks loose and unexpectedly falls all over your face.

My first oyster eating experience was very textbook. I couldn’t find my grip on the shell, and once I did the rest of was loud, a little embarrassing, and awkward. Things only got worse from there. Once I finally got the oyster out of the shell and started swallowing things went from bad to worse. The oyster hit the back of my throat and the texture was just all wrong.

All I could think about was how big, and gooey, and flat-out booger-esque the whole experience was. My mind kept thinking: “Just get it over with. Swallow faster.” Swallowing faster didn’t help. The foreign blob started working its way back up.

So the entire swallowing ordeal started all over. There was more gulping, a little bit of gasping, possibly some swearing. And it finally went down.

It took years for me to eat an oyster again. My second experience corrected all the mistakes I had made with my first oyster and I actually started to even like them a little bit. I learned you have to make sure the oyster meat is completely separated from the shell. Even the littlest section still attached makes that slurping part much more difficult. Second, the mignonette is everything. Don’t go dry oyster. Spice it up. You can make a single oyster into a complete and full flavor experience with the right mignonette. And it’s delicious! Finally, be brave and confident. Slurp like you’ve been slurping oysters all your life!

So, now that I feel like an accomplished oyster shooter, I am ready to share with you some of my favorite mignonettes. Today I am going to start with a serrano margarita themed oyster shot. This mignonette is spicy, tangy, and has a little kick from the tequila.

There isn’t really much to making the mignonette. In a small bowl, add about a tablespoon of finely minced shallot, a finely diced up serrano pepper, a shot of good tequila, a tablespoon of champagne vinegar, and ¾ cup of lime juice. Zest in some of the lime to get that pinch of freshness.

If you aren’t much for the heat, remove the seeds from the serrano before dicing it up. If you are someone who LOVES the heat, leave the seeds in.

I had to play around a bit with the ratio for the tequila and lime juice. So after adding my initial shot of tequila I drizzled in a bit more until it cut the tartness of the lime to a level of my liking.

This recipe makes a lot of mignonette. You could easily serve it on a dozen or even two dozen oysters. You should properly shuck the oysters and rest them on ice before serving. Here is a great video for properly shucking oysters: Oyster Shucking by America’s Test Kitchen.

Well, Happy Oyster Eating!

Deer Liver Whiskey Apple Pate

So, I did an offal thing. It was completely out of character for me. I made deer liver pate. Every year while people are cleaning their deer I comment how “someday” I am going to use the organs from a harvest and make…something.

JUMP TO RECIPE

“When the blood in your veins returns to the sea, and the earth in your bones returns to the ground, perhaps then you will remember that this land does not belong to you, it is you who belongs to this land.” ~ Native American quote

I have had deer heart once before. But it wasn’t mine. And I didn’t prepare it. It was surprisingly good. That is about all of the adventure I have embarked on when it comes to organ meat, but I have read a lot about keeping organs and the benefits of their consumption.

Traditionally, hunters never discarded the organs. Organs were harvested and prepared for their nutritional benefits. They are excellent sources of minerals and vitamins. But don’t take my word for it. Here’s an article with lots of information about the benefits of organs.

I heard this thing recently, and this could all be rumor but I am going to share it anyway, that James Blunt, you know the celebrity, went on an all meat diet and ended up developing scurvy, the “sailor’s disease.” Scurvy is incredibly rare, but one way to develop it is to become a carnivore.

Scurvy is basically when your body becomes depleted of Vitamin C and you develop a vast collection of issues such as weakness, fatigue, wounds that don’t heal up properly, and other stuff. It doesn’t sound fun. James Blunt cured his scurvy by consuming orange juice until he developed acid reflux.

So, the moral of the story seems to be that being a carnivore doesn’t work if you’re a human. Or does it? Historically, there are groups of humans who survived solely eating meat. The best example is the Arctic Native American tribes the Inuit. The arctic tundra is not a suitable landscape for growing crops, so the Inuit diet consisted of fish and the mammals they hunt, including seals, walruses, and whales.

Obviously they do not develop scurvy or the other illnesses associated with being a carnivore. How is this possible? While many things most likely factor into the equation, there are two habits the Inuit engage in that researchers believe keep them healthy and able to survive of a solely meat-based diet.

First, the Inuit eat most of their meat raw, both mammals and fish, and this is thought to sustain more of the vitamins and minerals contained within the meat. Second, they eat the organs.  If you want to know more about the Inuit and their all meat diet, this is a great book: My Life with the Eskimo.

So, in conclusion, I would like to send a message out to James Blunt. Next time you go full carnivore eat your organs!

Now that’s out of the way, let’s make this venison liver pate.

Pate was much easier to make than I initially thought. There are lots of different ways to make your liver concoction. You can vary which type of liver you use, what type of spices or vegetables you mix in, and even the fat you add at the end can be different. It’s basically a choose your own adventure with pate.

The key to a successful pate is to remove some of the rich “bloody” taste that liver is known for. Just to give you an idea if you haven’t tried liver, it has a strong iron taste.  It is very distinct and lies somewhere between metal and blood.  It is so distinct, you will always recognize it in a dish no matter how little is used.  If you asked me what iron tasted like, I don’t know that I could find the words to accurately describe it, but if you had me taste something that is rich in iron, like liver, I could immediately pick that flavor out. While you can’t fully remove this definable characteristic of liver, you can lighten it. You want a pate that is reminiscent of the liver flavor. Achieving this is quite easy. I soaked the liver overnight in a mixture of salt and water. I used four cups of water and two tablespoons of salt.

In the morning, the liver had a more muted color. I thoroughly washed the liver, removing any access blood from it, and then cleaned off any thing that didn’t look edible, such as arteries or connective tissues. Just make it pretty.

Heat up a large, heavy bottomed skillet or a dutch oven. I used a very large cast iron skillet for my pate. Cook up five or six slices of bacon until crispy. Pull the bacon and set aside, but reserve the fat in the pan to use for sautéing your vegetables.

To your hot bacon grease, add one diced onion, four diced carrots, and 4 diced celery stalks. Also add in one chopped apple. It isn’t important the size you dice up your vegetables to, since you will ultimately puree everything, but try to keep the size uniform so your vegetables will cook evenly.

Cook the vegetables for about five minutes and then add the chopped liver. Season with salt, pepper, and oregano. Cook until the liver is cooked through, about ten to fifteen more minutes.

Drizzle in the cup of whiskey at this point and let things reduce for five to ten minutes. The mixture should be thick and the wine along with the starches from the vegetables should create a creamy coating over everything.

Alright, it’s time to turn this pile of vegetables and liver into pate! Be careful with this next step, as things tend to be hot and steamy. Fill a food processor with the liver mixture. I had to add about half the mixture, blend until it broke down into a paste, and then add the second half. If you have a larger food processor you may be able to fit the entire pan in one large batch.

Don’t forget to add your bacon back into the pate mixture at this point. I just dropped the pieces in whole and let them blend down, much to the dismay of the dogs who were very certain the bacon was going to be theirs’.

Grind until things are smooth. Slowly drizzle in your cup of heavy cream. If you are looking for a dairy free option you can use a can of coconut cream and it works nicely too. The cream really changes the consistency of the entire dish. It creates a beautifully smooth, creamy texture that almost melts in your mouth.

Afterwards, put the pate in the fridge to cool for at least two hours. It tastes best cold. You can preserve it if you aren’t going to use it immediately, like say you are making it for your party tomorrow, by pouring melted butter over the top. This creates a nice seal on top.

Alright, let’s serve this pate up! This was my first time eating pate. It was actually my first time eating liver ever. I will admit, it took me a few bites to wrap my head around it. It is rich! It is earthy! It is…a lot.

One thing I learned is how you serve pate can change everything. Just pate on a little slice of bread isn’t my most favorite presentation. It just tasted like liver. Which isn’t a bad thing if you are a liver fan. My parents, having grown up on liver and onions, loved it just plain. I needed a little more bling for my pate.

So, to plate up your pate, first toast a thin slice of baguette. Add a little butter to your slice. Smother some pate on top. Finally, garnish with a pickled vegetable of your choice. The most popular is a cornichon pickle. My favorite was pickled red onion. Other options are pickled jalapenos, capers, cucumbers, pickled beets, or radish slices.  Another item that made it that much better was to add a drop of a mustard based hot sauce like my all-time favorite from the Caribbean island of Grenada.

I am curious, what do you like to top your pate with? And what is your favorite liver to use?

Anyway,

Happy Hunting!