wildgame recipes

Sweet and Savory: Apricot Venison Tacos with Pineapple Salsa

I am a huge fan of barbacoa tacos. Switching from the spicy, earthy flavor of traditionally seasoned taco meat to the sweet and tangy profile of barbacoa always makes for a wildly different taco eating endeavor. 

JUMP TO RECIPE

I am also a huge fan of pairing apricot with venison. Something about the fruit's tart, sweet, and floral notes perfectly complements the meat. Venison’s natural qualities as a lean, pure meat create a culinary scenario where the meat absorbs bold, distinct flavors, like apricot or other fruits, without losing its own rich, signature identity in the dish.  

So, since I like the pairing of apricot with venison and also enjoy a sweet, tangy taco recipe, I decided to marry the two ideas and make an Apricot Venison Taco with Pineapple Salsa dish. And instead of engaging in a lot of mindless talk with things like a history lesson about apricots or something like that, let’s just jump right into this recipe!

A plate of four tacos filled with apricot venison and served with a side of pineapple salsa

Pressure cooking the venison

Since this recipe calls for shredded meat, it is preferable to use a tougher cut of meat and break it down through slow cooking, or in this case pressure cooking, into a more tender, shredable form. I used a chuck roast, which comes from the heavily worked neck or shoulder region of the animal, and it is perfect shredded taco recipes.

Pressure cooking a large cut of meat is also an opportune time to engage in a little weekly meal prep. You can easily double the amount of meat and save plenty of venison for a second taco night with different toppings, a soup, or even some type of pulled venison sandwich. 

While there are many great pressure cookers on the market, I use a very basic model. I like it because there aren’t a ton of ways to screw things up. The settings are incredibly straightforward: sauté, high or low pressure cook, and warm. That’s it! If you want to check out the exact model I use, you can find it at this link: Pressure Cooker.

Cooking Instructions

  1. Prep the meat: Roughly cut the roast into two-inch chunks. Consistency ensures the pieces cook evenly, but perfection is not required. Season the chunks with salt and pepper, then add them to the pressure cooker.

  2. Build the pressure: Pour a quart of vegetable stock over the meat. Close the lid and verify that the pressure release valve is securely set to the "sealing" position.

  3. Cook: Set the cooker to high pressure for 45 minutes.

  4. Release pressure: Once the timer goes off, allow the machine to naturally release its pressure for 15 minutes before manually opening the venting valve.

  5. Shred: After the cooker has fully depressurized, carefully open the lid and transfer the meat to a cutting board. Use two forks to shred the incredibly tender chunks into bite-sized pieces, then set them aside

Whipping Up the Apricot Venison Taco Meat

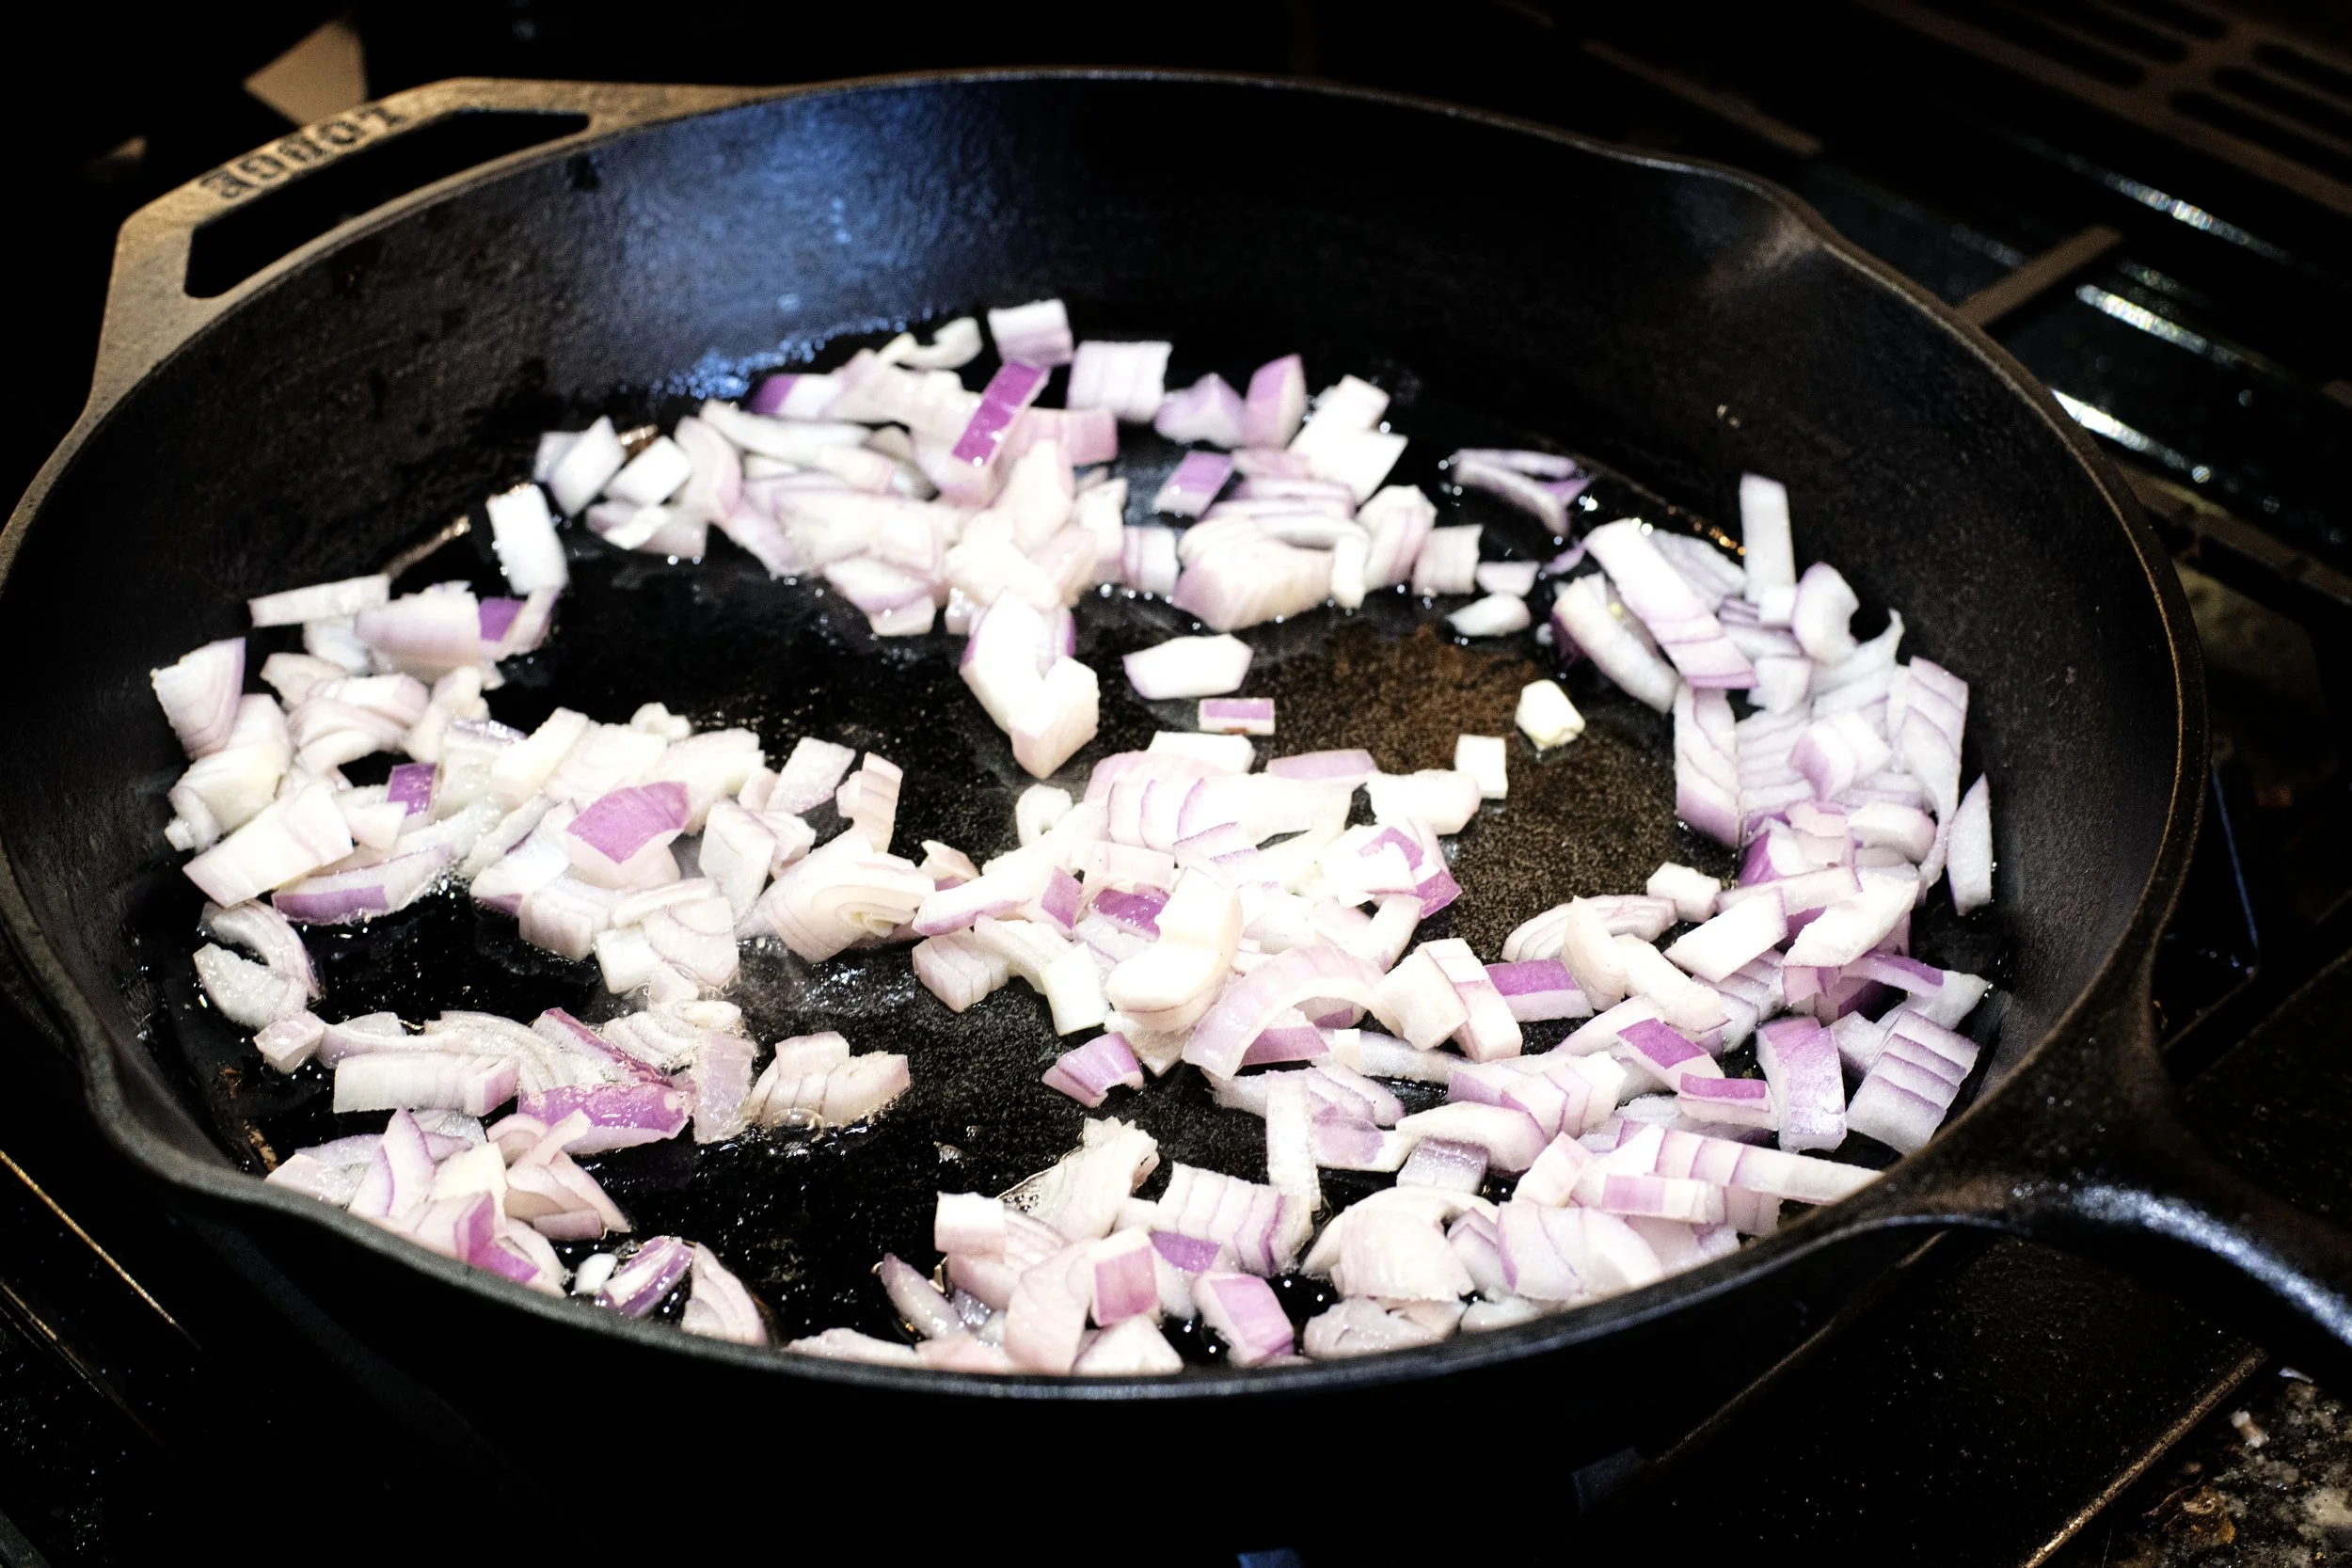
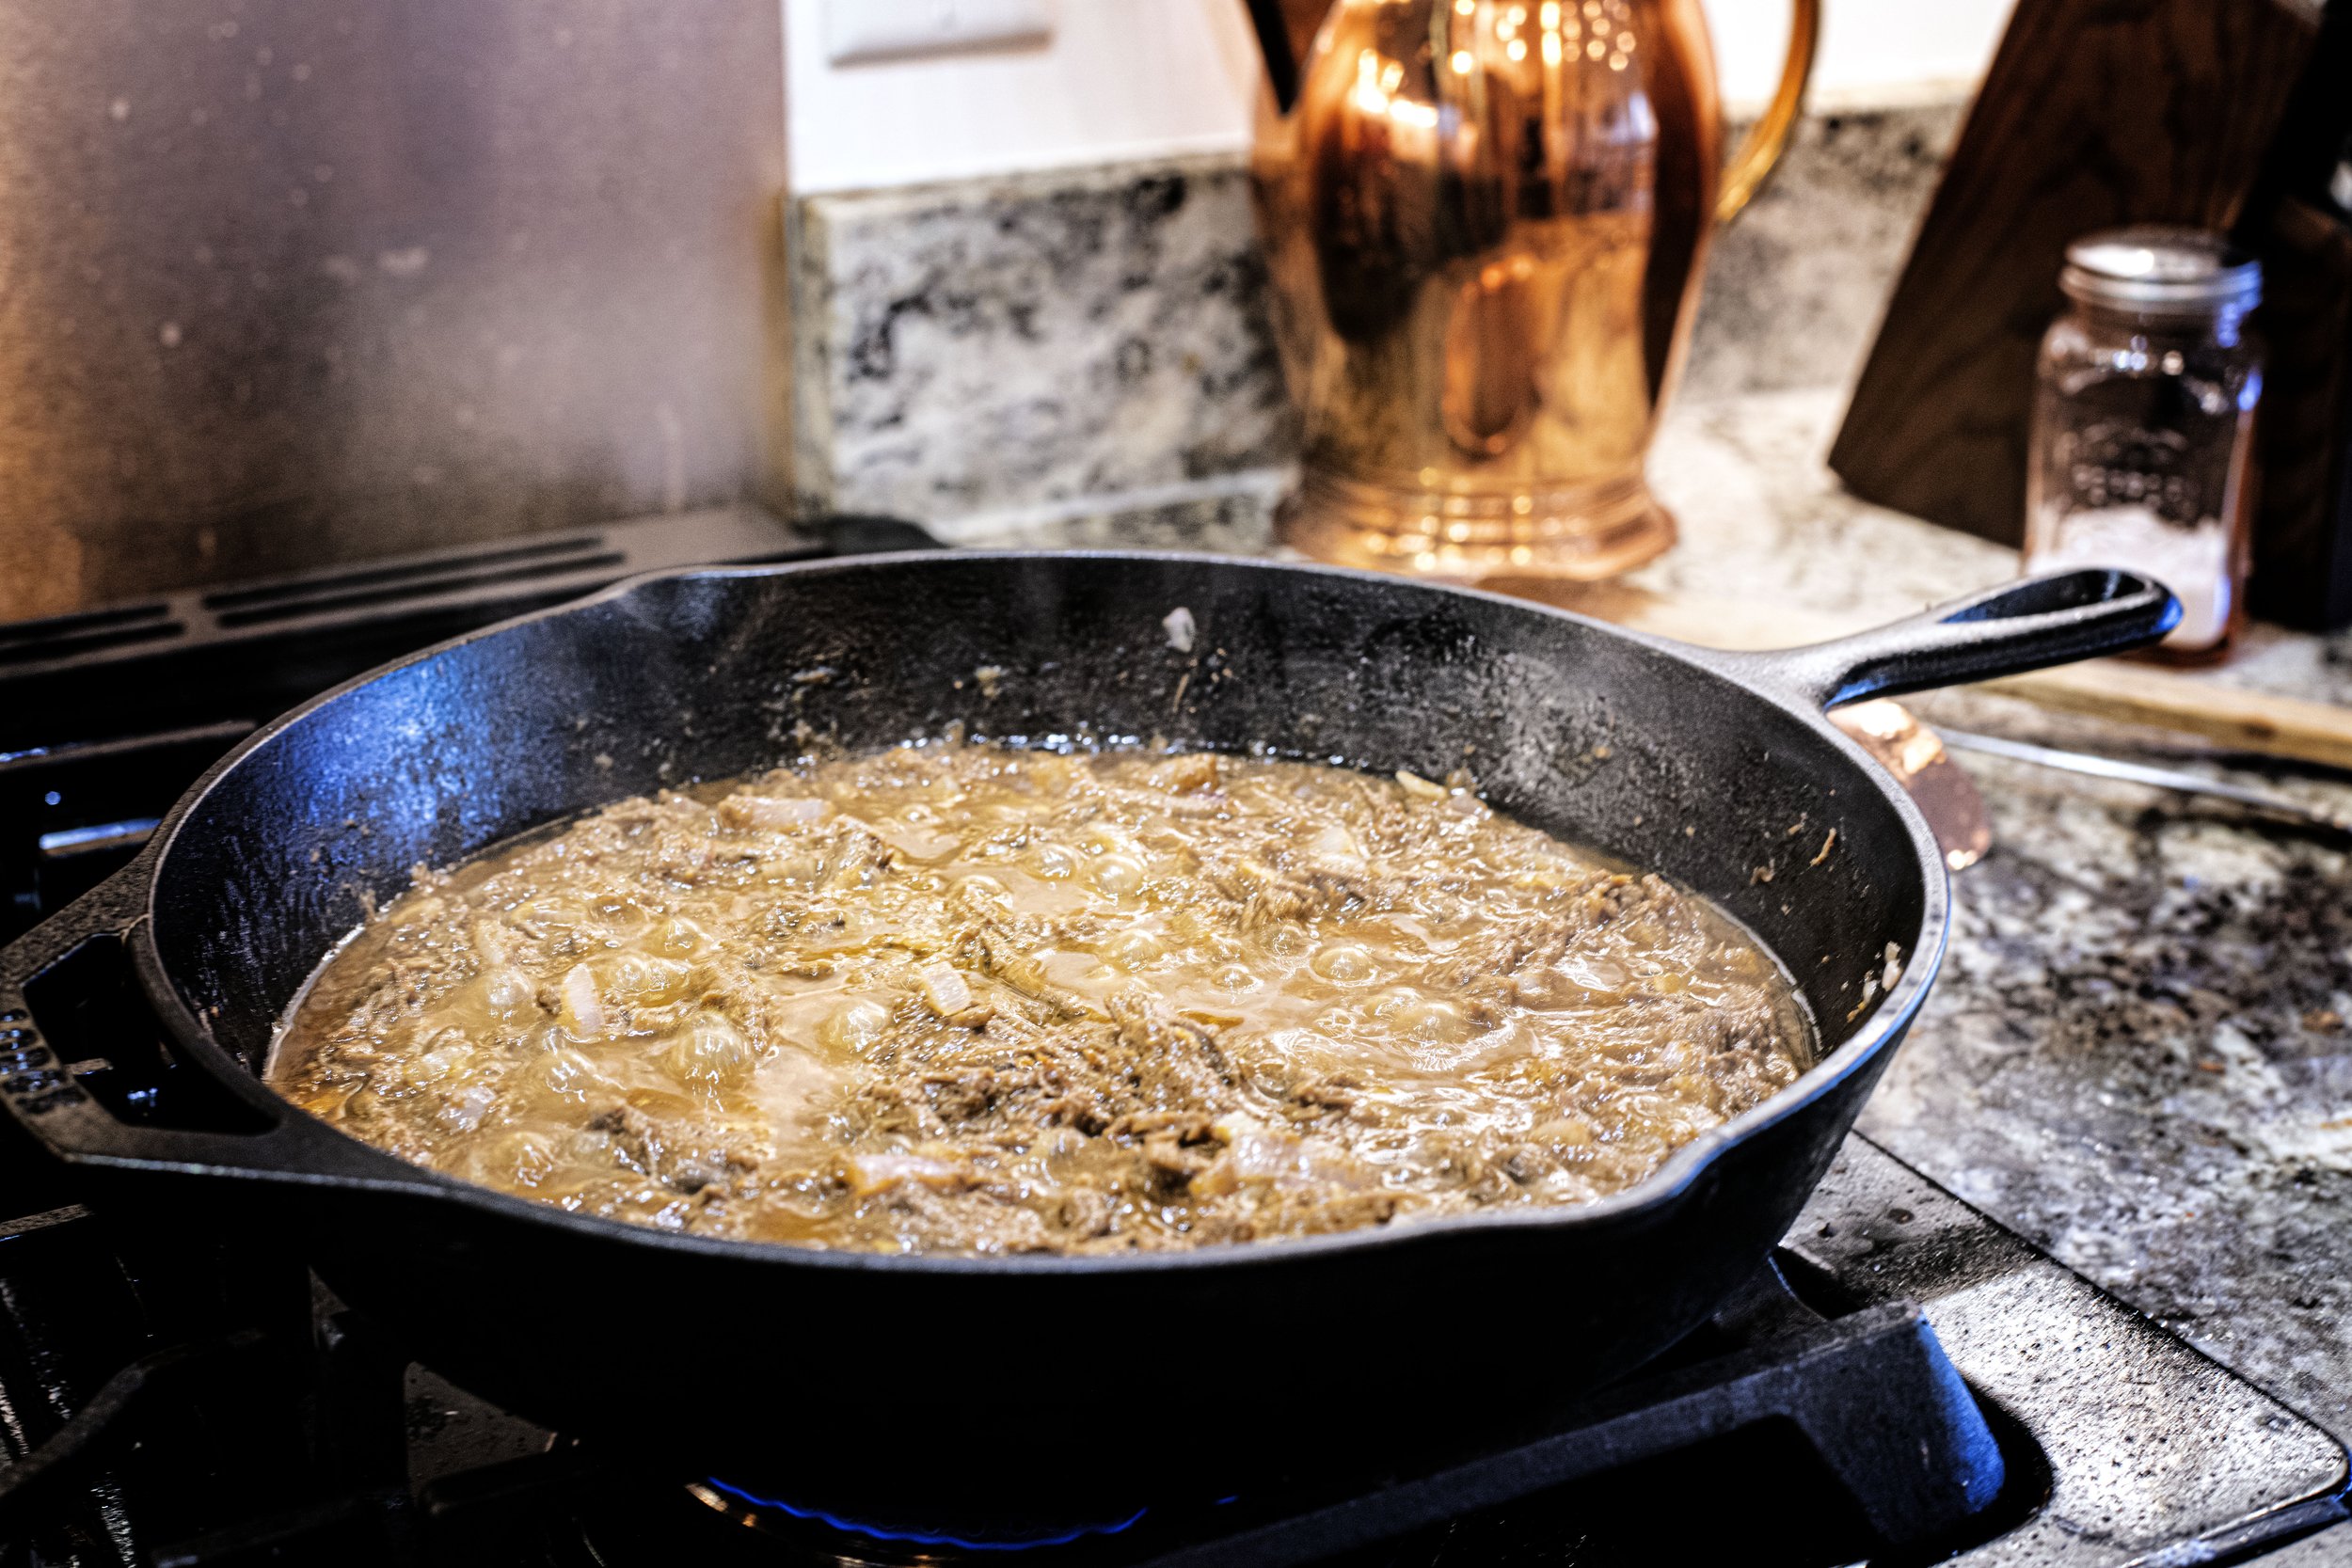
This taco meat concoction is best managed in a cast iron skillet. The heat is evenly distributed and the side walls are deep enough so mixing isn’t messy. Heat a tablespoon of cooking oil over medium high heat. I used an avocado oil because it can handle being heated to a higher temperature, but any high temperature oil will work. Great options include canola, vegetable, peanut, or coconut oil.

Add the diced red onion and minced shallot to the pan and saute for three minutes. The onions should start to soften. The shredded venison can make its entrance to the skillet at this point. Let the meat warm up a little and then pour the apricot juice into the pan.

Red Onions cooking in a cast iron skillet

I harvest my own apricots for the juice in this recipe. Each summer, I pick bucketfuls of the vibrant round balls and process them through a juicer. I do a very quick and simple fruit processing with the following juicer: Breville Juicer

Quick Steps for Apricot Juicing

  1. Wash the fruit and remove all the pits.

  2. Run fruit through home juice processors. The fruit will be separated into juice and pulp. I reserve the pulp and use it to make breads or ice creams.

  3. Transfer the juice to quart mason jars and freeze for later use.

If you don’t have access to apricots for juicing, there are plenty of viable options at the supermarket. The juice will most likely be labeled as a nectar and be thinned with water, so it may require a little more time to use in the recipe, but it is still a great option. I would check for added sugar and try to find a product that doesn’t have any. 

Thoroughly stir the mixture once the juice has been added, scraping the bottom of the pan to remove any browned bits that have developed so far, and also coat the meat completely. Let the mixture simmer for five minutes.

Prepping the Pineapple Salsa

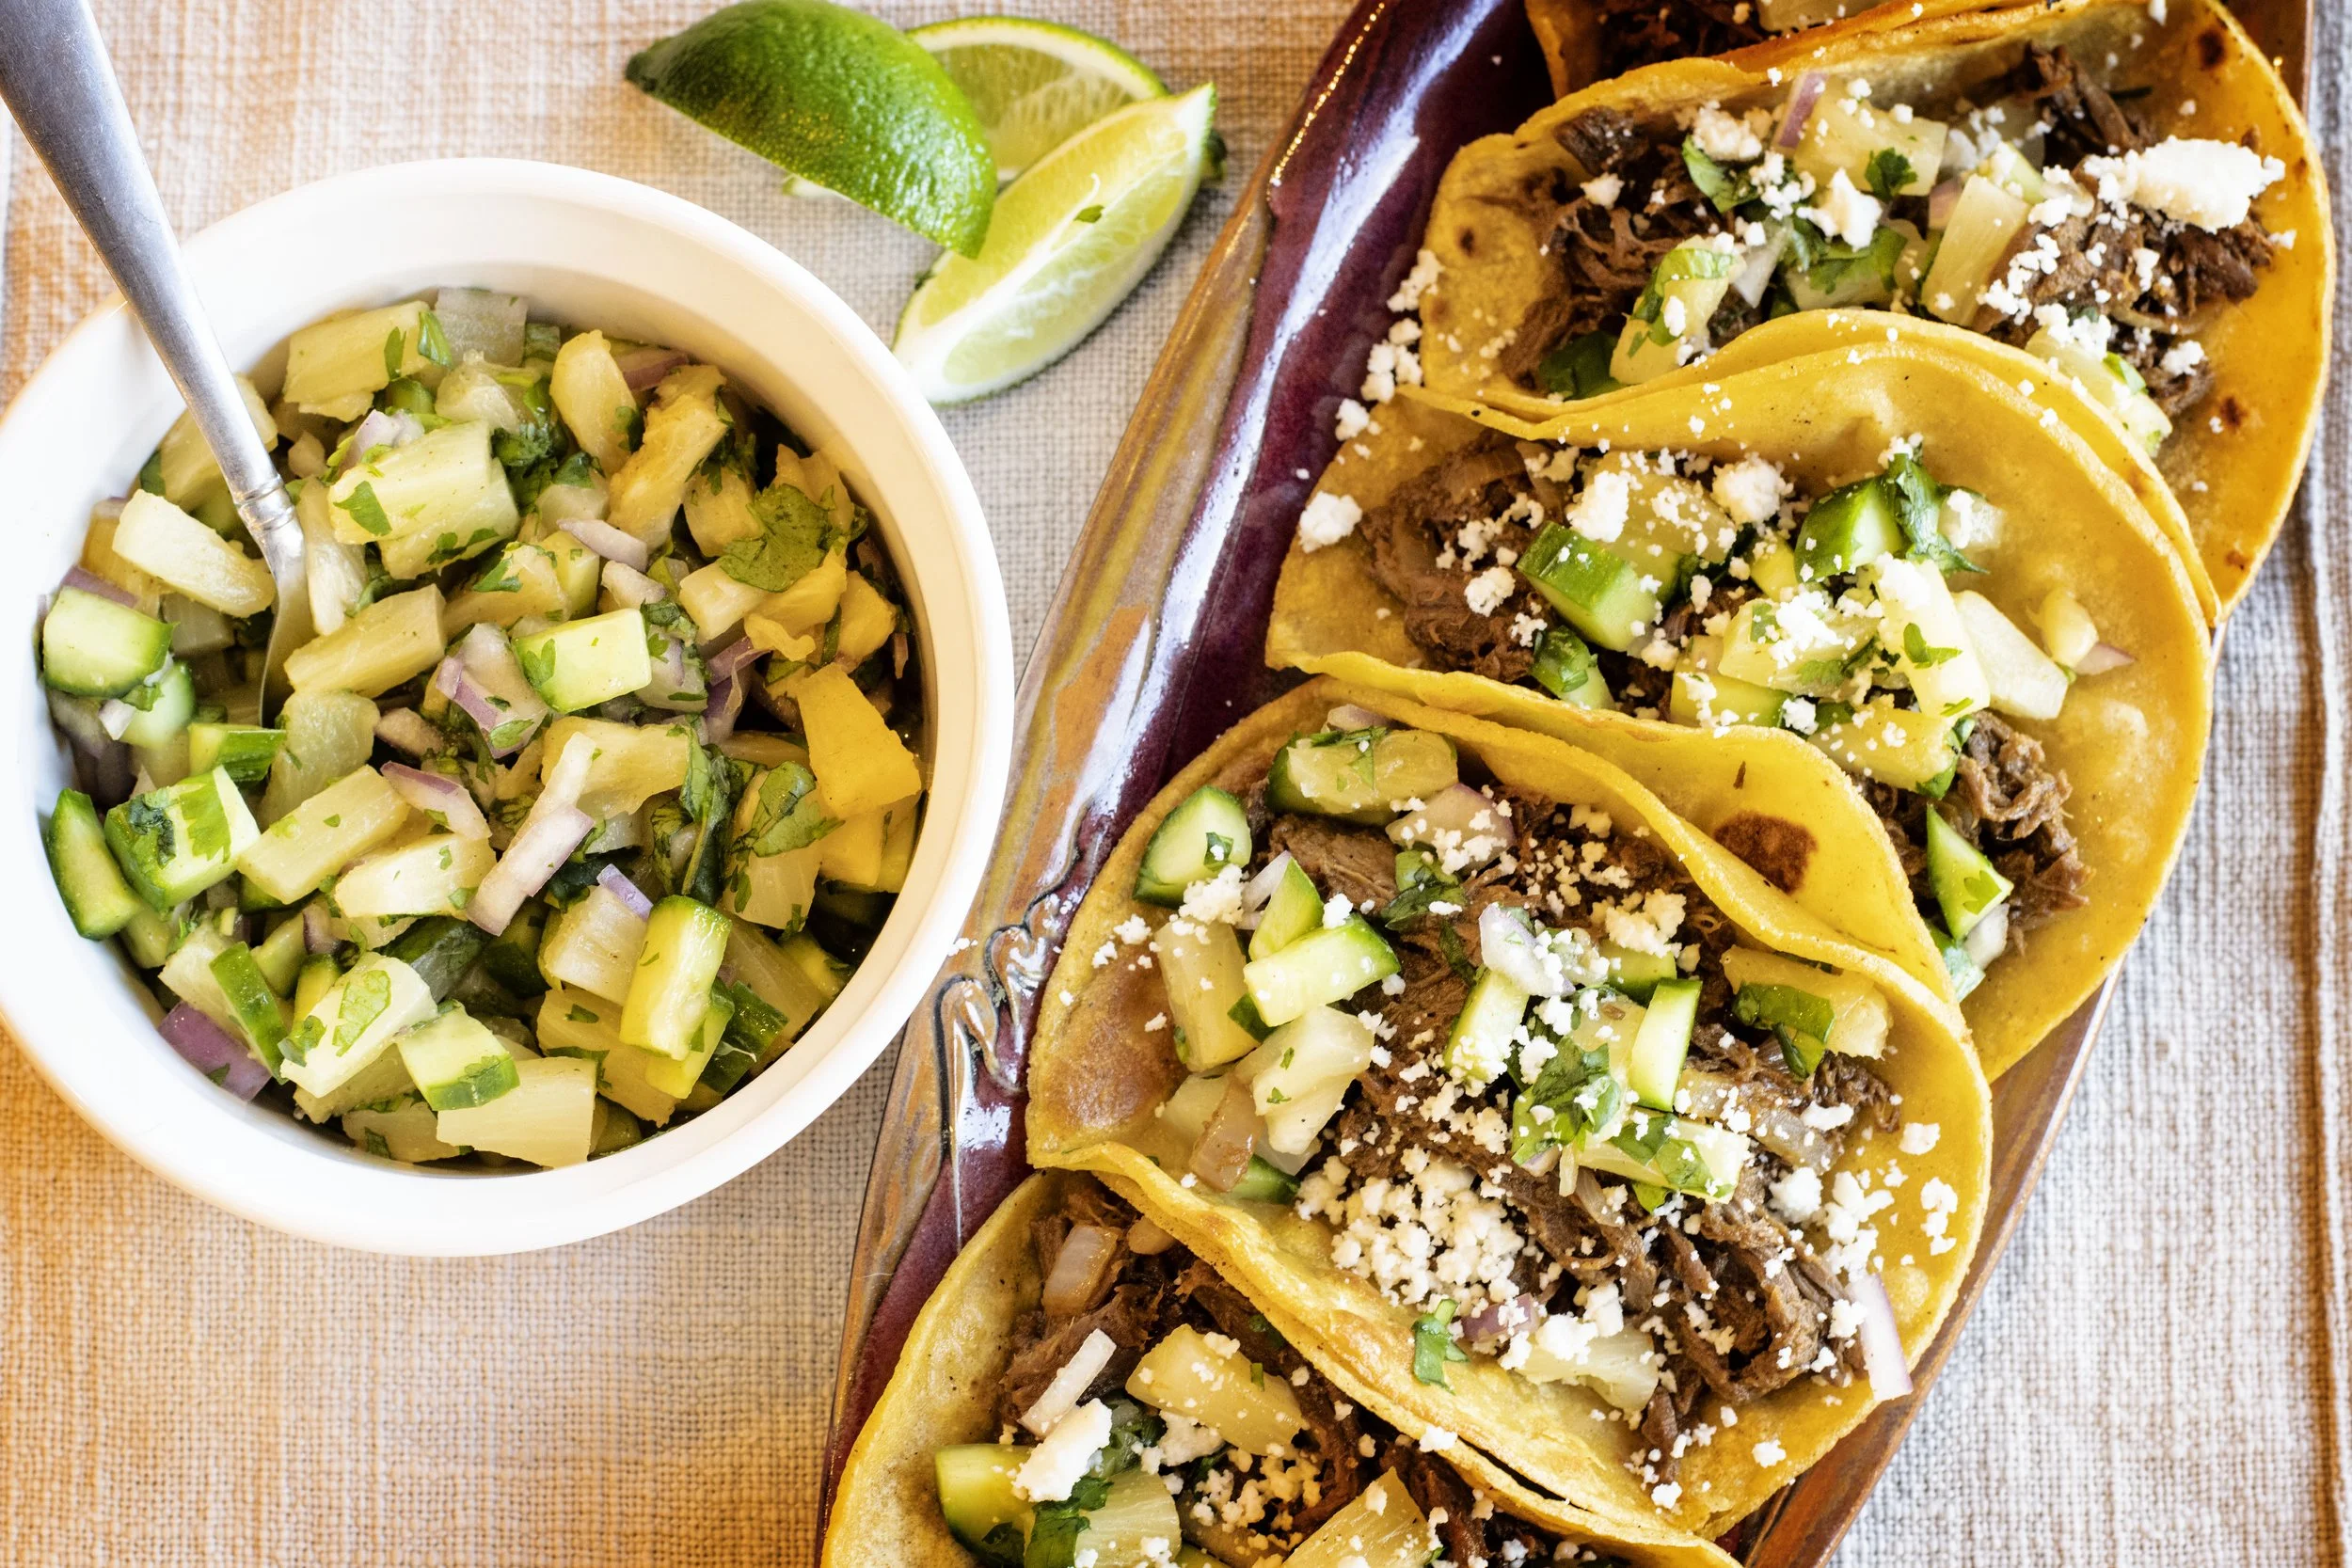
While your apricot juice is reducing, it’s time to knock out the pineapple salsa. This topping comes together fast, and it pairs beautifully with the rich apricot venison. The candy-sweet pineapple tidbits and crisp, cool cucumber bring a fresh crunch that cuts right through the tanginess of the apricots in a very tastebud pleasing way.

To get started on the salsa, dice your cucumber into tiny pieces—just a bit smaller than standard bite-size. Next, grab that remaining half of the large red onion you saved from the venison prep, and give it a fine dice, too. You want gentle hints of raw red onion here, not a sharp, biting chunk that overwhelms the whole palate.

Bowl of fresh, crunchy, sweet pineapple salsa with cucumber, red onion, and cilantro.

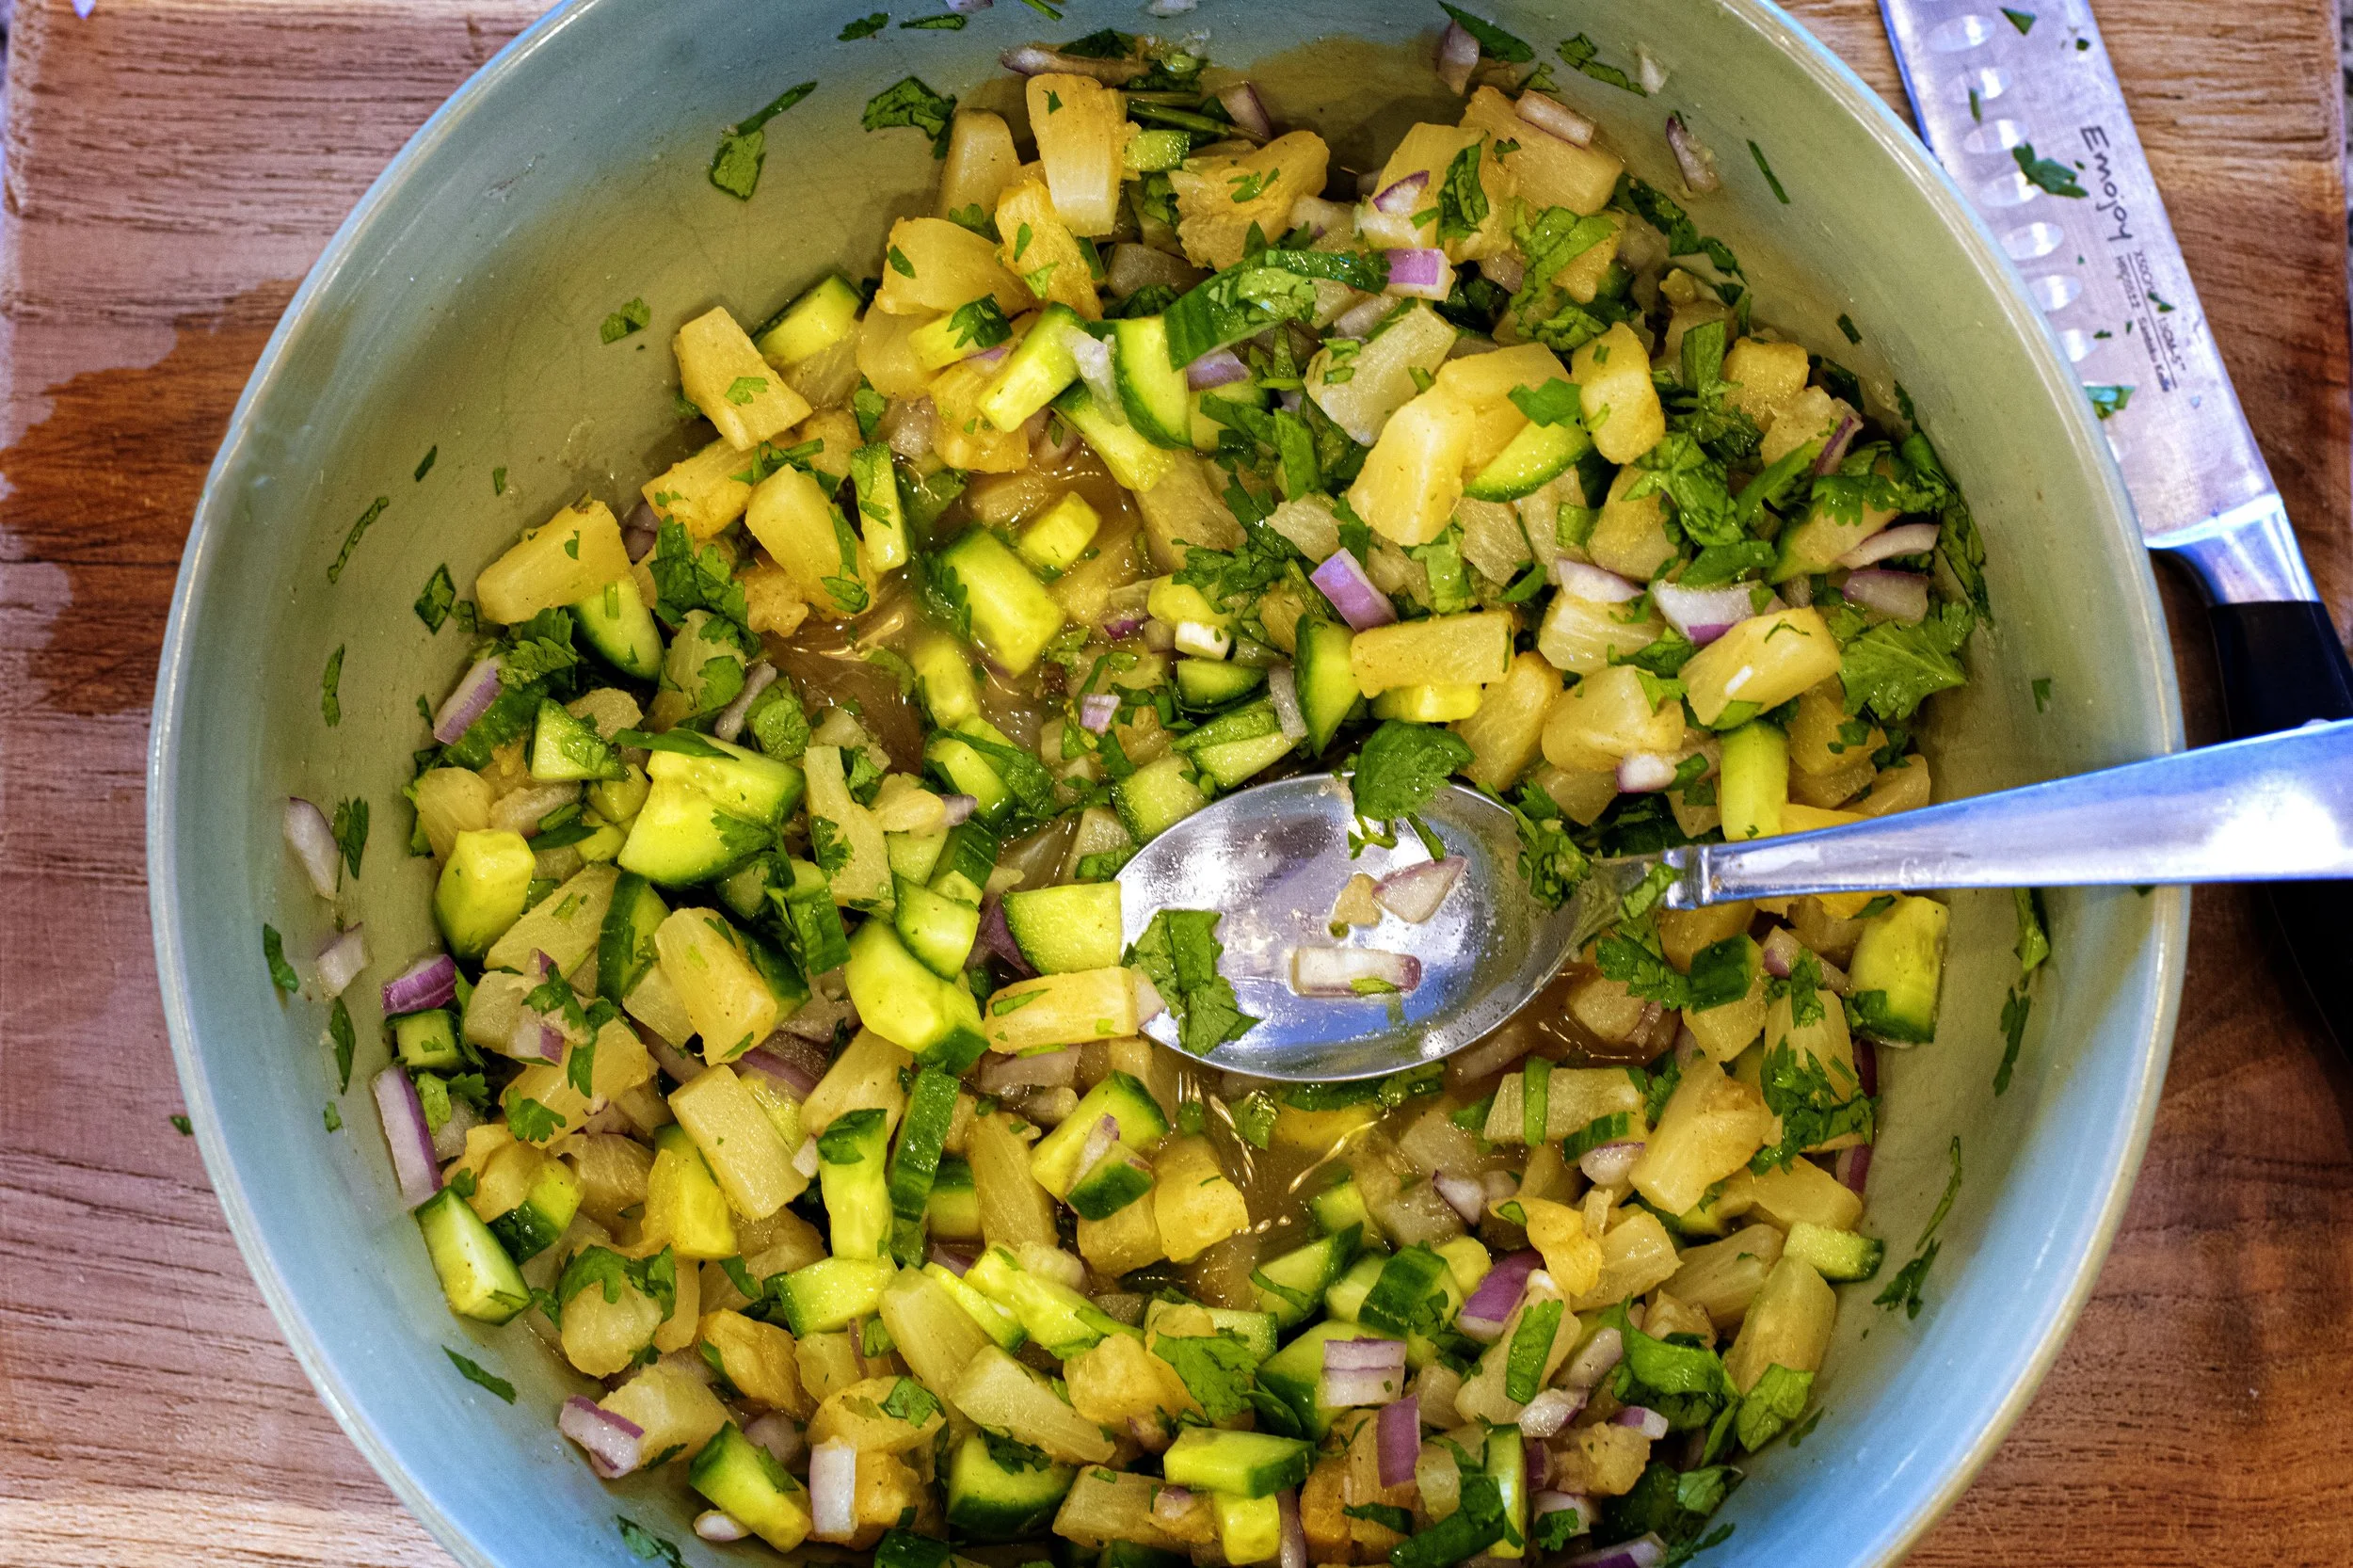
Toss the drained pineapple tidbits, cucumber, and red onion into a small bowl. Season everything with a teaspoon of earthy ground cumin and a pinch of salt. Mince up your fresh cilantro, stir it in, and finish it all off with a generous squeeze of fresh lime juice. Give everything a good mix, then set it aside. Letting those flavors marinate for a few minutes while you finish up the taco meat is where the magic really happens.


Finishing and Assembling the Tacos

To finish up the taco meat, season the mixture with a bit of spicy chili powder, ground cumin, and earthy coriander. Let everything spend some quality time in the pan to develop and deepen in flavor. As it simmers, it creates a warm, comforting, and incredibly rich taco meat that is ready to hit those tortillas! 

Cast iron skillet sits on the stove simmering apricot venison taco meat

Simmer the apricot venison meat for about five more minutes. While you wait, start heating the tortillas. Personally, I love to use corn tortillas for my tacos, but you can absolutely use flour—I promise not to judge too much! 

Heat a light dusting of oil in a small skillet over medium heat. Warm each tortilla for a minute or two per side until they are soft and pliable.

To assemble, add a very generous scoop of the apricot venison to a warm tortilla. Top it with a big spoonful of the pineapple salsa, making sure you get a bit of every component—the sweet pineapple, crisp cucumber, and sharp red onion—in every bite. Sprinkle some fresh, crumbled cotija cheese and an extra pinch of minced cilantro. Now all that's left to do is dig in and enjoy!

Happy Hunting!

Yield: 4-6
Author: a 12 Gauge Girl
Sweet and Savory: Apricot Venison Tacos with Pineapple Salsa

Sweet and Savory: Apricot Venison Tacos with Pineapple Salsa

Learn how to easily slow cook venison with sweet apricot for the most tender shredded tacos. Finished with a vibrant pineapple salsa that anyone can make!

Cook time: 1 H & 15 MTotal time: 1 H & 15 M

Ingredients

Apricot Taco Ingredients
  • One pound venison chuck roast
  • Quart vegetable stock
  • One tablespoon cooking oil
  • One half large red onion, finely chopped
  • Large shallot, minced
  • Two cups apricot juice
  • Two tablespoons chili powder
  • One tablespoon cumin
  • One teaspoon coriander
  • Salt to taste
  • Package corn tortillas
  • Cotija cheese
Pineapple Salsa Ingredients
  • One cucumber, diced
  • One half large red onion, finely chopped
  • One bunch fresh cilantro, chopped
  • One lime, juiced
  • One can (15 oz) pineapple tidbits, drained
  • One tsp cumin
  • Salt, to taste

Instructions

  1. Step 1: Pressure Cook the Venison
  2. Roughly cut the venison chuck roast into two inch chunks and season with salt and pepper. Add the seasoned meat and the quart of vegetable stock to your pressure cooker.
  3. Secure the lid and close the pressure release valve.
  4. Set the cooker to high pressure for 45 minutes.
  5. When the timer finishes, let the cooker naturally release for 15 minutes before venting any remaining steam.
  6. Transfer the venison to a cutting board and shred the meat using two forks.
  7. Step 2: Cook the Apricot Venison Taco Meat
  8. Heat the tablespoon of cooking oil in a large cast-iron skillet over medium-high heat.
  9. Add the diced red onion and minced shallot, sautéing for three minutes until softened.
  10. Stir the shredded venison into the skillet.
  11. Pour the two cups of apricot juice over the mixture and stir to evenly coat the meat.
  12. Bring the juice to a simmer for five minutes until it begins to thicken.
  13. Season with chili powder, cumin, coriander, and salt to taste.
  14. Continue reducing the mixture for an additional five minutes until the sauce coats the meat richly.
  15. Step 3: Prepare the Pineapple Salsa
  16. While the meat finishes thickening, grab a small bowl.
  17. Mix together the diced cucumber, finely chopped red onion, and drained pineapple tidbits.
  18. Add the minced fresh cilantro, sprinkle in the cumin and salt, and squeeze the fresh lime juice over the top.
  19. Stir well to coat everything evenly.
  20. Step 4: Assemble Tacos and Serve
  21. Warm the corn tortillas in a dry skillet (or with a splash of oil) until pliable.
  22. Place a generous scoop of the warm apricot venison filling onto each tortilla.
  23. Top with a spoonful of the fresh pineapple cucumber salsa.
  24. Finish with crumbled Cotija cheese and extra minced cilantro.
  25. Serve immediately with fresh lime wedges and jalapeño slices for heat.
  26. Enjoy and happy hunting!

Nutrition Facts

Calories

620

Fat (grams)

22 g

Carbs (grams)

82 g

Fiber (grams)

10 g

Protein (grams)

30 g

 Nutritional values are rough estimates based on standard ingredients and will vary depending on your specific cut of wild game, brands used, and actual serving sizes.

Did you make this recipe?
Tag @a12gaugegirl on instagram and hashtag it #huntingandcooking


Italian Stuffed Elk Meatloaf

Italian Stuffed Elk Meatloaf

Serve up a thick slice of the loaf with roasted baby red potatoes simply dressed in olive oil, salt and pepper and crisp, steamed green beans. So delicious, your stomach's heart will melt.

Venison Stuffed Shells with Apple and Butternut Squash Sauce

I love the combination of squash and apples. The melded flavors are comforting, warm, savory, and just a little bit sweet. I think when the duo is mentioned many people think of a pie, a sweet and rich auburn pie served for Thanksgiving. But squash and apples don’t always have to be a dessert. They can create a rustic, homey dish like this Venison Stuffed Shells with Apple and Squash Sauce.

This dish takes a little bit of time to pull together, but the end result is worth the effort. To start, cook a medium sized butternut squash in oven at 400 degrees Fahrenheit for 45 minutes. I cut the squash in half and place the squash cut side down on a large baking sheet. You can also line the sheet with aluminum for easier clean-up, as sometimes the squash weeps a little when roasting.

Remove the squash from the oven and let cool slightly before handling. I like to play Russian roulette with the squash and try to pick it up before it has properly cooled, usually resulting in burned hands, but that’s just me.

While the squash is cooling, prepare the venison sausage for stuffing the shells with. In a large skillet over medium heat, add some cooking oil, I like to use olive oil for this particular recipe but work with what you have. Once the oil is heated, add a medium diced onion and cook for five to seven minutes, or until the onion is soft. Next, add in the venison Italian sausage.

I make my own sausage. I grind the venison with bacon ends at a ratio of 80% meat to 20% bacon ends. This gives the sausage a nice fat content that isn’t overly greasy or fatty, but keeps the sausage moist when cooking. I season the sausage with salt, black pepper, crushed red pepper flake, Italian seasoning, allspice, garlic and onion powder, and plenty of fennel seed. I also add touch of brown sugar to sweeten it up a bit.

This recipe requires a pound of venison Italian sausage. Add the sausage to the onions and cook thoroughly, about five to seven minutes again. Once the sausage is cooked through, add a half cup of chopped pecans, a tablespoon of fresh minced sage, and a tablespoon of fresh minced rosemary. Stir together, turn off the heat, and set aside to cool.

While the sausage mixture is cooling, cook your pasta shells. I used jumbo pasta shells for this recipe, but you could also use manicotti. If you are really ambitious, you could make these into raviolis as well. Cook the shells to al dente, where they are soft but not falling apart.

Drain the shells and set aside to cool. As with the butternut squash, I played Russian roulette with the shells and tried to stuff them before they were cool enough for handling. It didn’t feel great.

Wow there are a lot of steps here, but bear with me, it is going to be worth it. Return to the cooled sausage mixture and mix in a container of ricotta cheese. Set that aside.

Back the squash! Scoop the squash guts into a blender and add a little salt and pepper for flavor and half cup to three quarters of a cup of stock. I used a vegetable stock. You could use chicken too if that is what you have on hand. If you were really fancy, this would also be a perfect opportunity to throw in some homemade bone broth.

Blend the butternut squash into a smooth puree. It should still hold together, so add the liquid slowly until you reach a consistency similar to the applesauce. Add the butternut squash puree to a large skillet with a cup of unsweet apple sauce. Turn the heat on medium low and stir until the sauces are combined. Slowly drizzle in a quarter cup of heavy cream and stir until a smooth, creamy, orange sauce forms. Add a cup of parmesan cheese and mix until completely melted.

Stuff the shells with the sausage mixture. Spoon a quarter of the apple and butternut squash sauce into the bottom of a 9x13 baking dish. Set the stuffed shells on top of the sauce. Once all the shells are set, pour the remaining apple and butternut squash sauce over the top and then sprinkle on a layer of mozzarella cheese. Bake in a 350 degree Fahrenheit preheated oven for 30 minutes, until the cheese is gooey and the sauce is bubbling!

And now! Time to enjoy! This dish is creamy, rich, and savory. It has hints of squash and apple layered with cheesy goodness and fresh herbs. It is one of my favorite dishes to serve for a crowd because it is easy to make large batches and is incredibly filling.

Happy Hunting!

If You Like This Dish, You Might Also Like….

Wild Turkey Tagliatelle

Pheasant Carbonara

Pronghorn Pumpkin Ale Chili

Kumamoto Oyster Shots

I just finished what is quickly becoming a yearly trip to Washington state. Last year, I visited the San Juan Islands and fished Haro Straight, located along the western border of San Juan Island. This time, I stayed with my sister who just purchased a house along the shorelines of south Puget Sound. And like my last excursion to the Pacific Northwest, the fishing did not disappoint.

Kumamoto Oysters

Minds are like oysters. They spoil if you pry them open. ~Willa Gibbs

Being from the desert, Washington is like visiting a foreign country. There are monstrous trees towering over salty blue water. The weather can only be described as refreshing, and it is a much appreciated break from the arid 100 degree days of the southeastern Utah desert. Heading outdoors is an unfamiliar experience: all the animals and plants are basically strangers.

While at my sister's, we caught salt water fish, a far cry from the lake trout I am accustomed to. The first fish pulled onto the boat was a dogfish. The dogfish is definitely an inappropriately named creature, as it is actually a shark. This "fish" definitely has the teeth of a shark, so it is not a hard animal to identify. But like I said, pulling that onto the boat was a very different experience from reeling in a rainbow trout.

Washington Ocean View

As with visiting any foreign place, not only were the animals and plants different, but the food was also a completely different experience. I don't often get to experience seafood, much less fresh seafood. Sure, I have had my share of shrimp, most of which are farm raised. Our super market also carries a variety of fish, such as salmon, tilapia, and cod. As with the salmon, most of these are farm raised and have been frozen for a significant amount of time. I still partake if a sale is happening, but not often. And those frozen, farm-raised fish can not compare to the fresh, catch of the day fish I experienced while visiting Washington.

One of the more unique dishes I tried was the Kumamoto oyster. The Kumamoto oyster originated in Japan, but somehow my sister has them growing right in bay in her backyard. When the tide was low, we ventured out into the muddy bottoms and dug clams and oysters. Kumamotos, known for their surprising sweet flavor and beautifully sculpted shells, are one of the most popular oysters for eating. I have tried oysters in restaurants before, and I was very hesitant to give them another chance. I would best describe them as, well, for lack of a better word, snot. I was not a fan of the taste, texture, or even sight of the oysters from my past dining experiences.

As I am the first to admit I am not a fan of oysters, I will also be the first to admit that I have misjudged the Kumamoto based on my prior experiences. I have stereotyped all oysters to be disgusting and that was not fair of me. Kumamoto oysters are simply fantastic.

Before shucking the oysters, allow them to sit covered in salt water. You can do fresh water, but you should not soak the oyster for more than 20 minutes since the fresh water will kill them. I know that sounds counter-intuitive, as you are going to be eating the oyster so why do you care if it dies, right? In order to preserve the flavor of the oyster and to keep them from drying out, you don't want them to be dead before consuming them. So, back to cleaning the oysters! Cover them with salt water and allow to soak. I let mine soak for a couple of hours. During this time, the oysters will filter water through their bivalve system. This filtration process is how the oyster eats. He pulls in lots of sand and filters out microorganisms for dining on. This process is also why oysters and clams are very sandy. Nothing is worse than biting down on a gritty, sandy oyster!  By placing the oyster in a bucket of water, the creature will filter like it normally does but without the ocean bottom to take in, it will eventually filter all of the sand out. It works amazing and is a step worth taking when preparing clams and oysters.

Since this was my first time preparing fresh caught oysters, I had to learn how to shuck them properly. It isn't too difficult, but practice definitely makes it easier, so does a shucking knife. Having only shucked two oysters at this point in time, I think this link provides a better tutorial on how to get your oyster on the half shell for eating: How to Shuck an Oyster!

While the Kumamoto is a fantastic tasting oyster, this slightly spicy sauce was what took the culinary experience from fantastic to phenomenal! In a small bowl, mix together a tablespoon of each of the following ingredients: sriracha, lime juice, minced garlic, minced shallot, rice wine vinegar, and soy sauce. This will dress a dozen or so oysters, but you can make as much or as little of the sauce as you need, just follow the simple rule of equal proportions for each ingredient.

Kumamoto Oyster Sauce

This kumamoto oyster shooter sauce is simply sriracha, lime juice, minced garlic, minced shallot, rice wine vinegar, and soy sauce.

Drizzle the sauce over the oysters on their half shell, add a few thin slices of green onion, and slurp that baby down! The combination of the slightly spicy vinegar sauce and the sweet piece of oyster is perfection. They texture of the kumamoto is tender, but not chewy. The sauce creates this beautiful balance of spicy and sweet, but there is also a salty element created by the ocean water in the oyster. It is one delicious bite. And I followed it with just a few more!

Happy Hunting! (And Oyster Harvesting)

Yield: 12
Author:
Kumamoto Oyster Shooters

Kumamoto Oyster Shooters

Plucked directly from the sea, these kumamoto oyster shooters are spicy with a kick of lime and garlic.

Ingredients

  • 12 shucked kumamoto oysters
  • 1 Tablespoon sriracha
  • 1 Tablespoon lime juice
  • 1 Tablespoon minced garlic
  • 1 Tablespoon minced shallot
  • 1 Tablespoon rice wine vinegar
  • 1 Tablespoon soy sauce

Instructions

  1. Once oysters are shucked and cleaned, leave on shell for drizzling sauce over.
  2. In a small bowl mix together the sriracha, lime juice, garlic, shallot, rice wine vinegar, and soy sauce.
  3. Taste for desired heat level. If more heat is desired slowly add more sriracha.
  4. Drizzle sauce over oysters and enjoy!

Elk Country Fried Steak

Elk Country Fried Steak

Serve up this hearty and rustic elk country fried steak breakfast for your friends and family. Crispy and crunchy elk steaks are fried to perfection and drowned in homemade gravy. Serve with fried potatoes and eggs! Hope you're hungry!

Pronghorn Steak Sandwich with Avocado Pesto

Pronghorn Steak Sandwich with Avocado Pesto

Pronghorn steak open faced sandwich with a creamy, thick avocado pesto, fried egg, and fresh tomato slices on a slice of crispy sourdough bread.