
Meaty pike skewers are marinated in zesty lemon and aromatic fresh rosemary, resulting in a hearty and rustic grilled fish perfect for serving at the next family barbeque night.

Did I really just suggest fish on grilled cheese? Yes I did! Now wait a moment before you leave this recipe and just hear me out. I too was hesitant and distrusting of this notion of fish on a grilled cheese sandwich. Fish and cheese has never been a pairing that comes to my mind, but this Smoked Trout and Pear Grilled Cheese Sandwich is amazing!

Every summer, I smoke large batches of any fish I didn’t prepare fresh after catching. The freezer bounty has ranged from rainbow trout to kokanee and salmon to albacore tuna. Smoked fish makes a great backing snack, presents beautifully on a charcuterie, and also pairs amazingly well with pears for a grilled cheese sandwich.
I first shared this recipe on Harvesting Nature and you can find the link for the recipe here: Harvesting Nature Smoked Trout and Pear Grilled Cheese. If you haven’t checked out this website, I suggest you head over there right now. The site has a large collection of wild game recipes, a podcast, and tons of articles about hunting and fishing. It’s a great site.
I am going to share some pictures and a recipe card for my Smoked Trout and Pear Grilled Cheese right here too (Just to keep things easy for ya)!
Happy Hunting!

Butter the sourdough bread and then top with a generous smear of mascarpone cheese. Top with some pear slices and plenty of fresh dill sprigs.

Next, add the smoked trout (or smoked fish of your choice) and then a add a thin layer of horseradish on top of the mascarpone cheese for the second slice of bread.
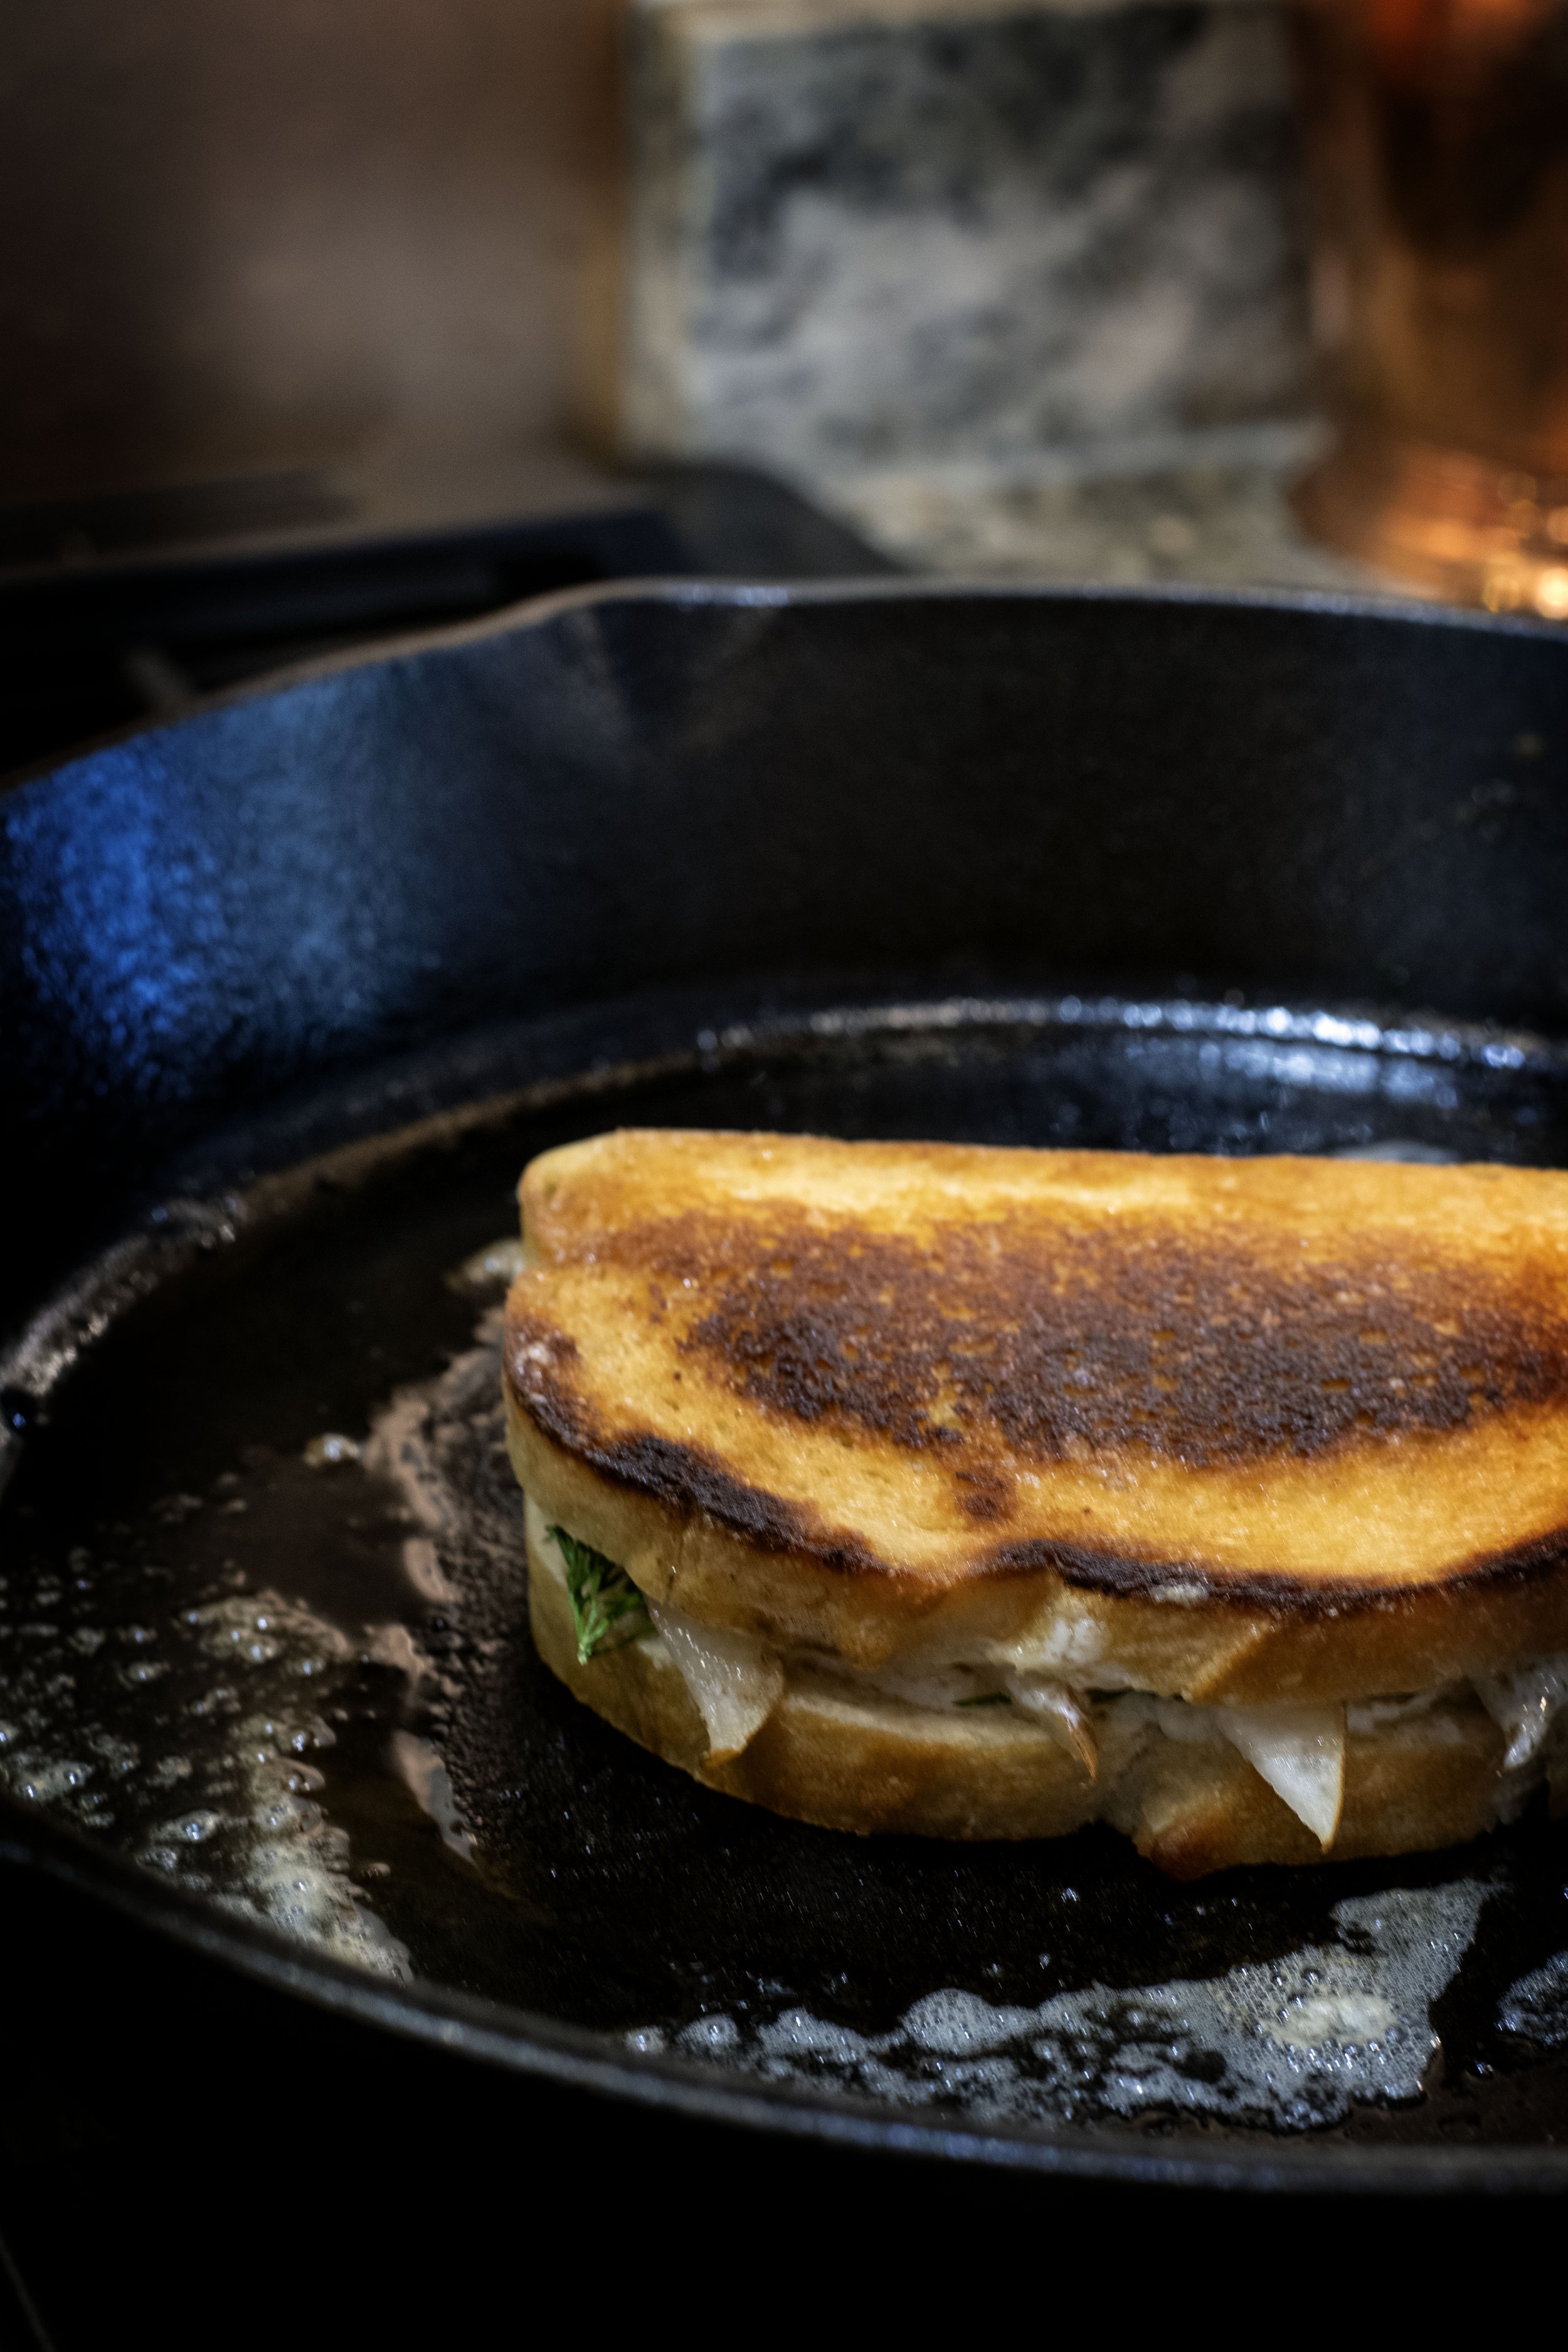
Grill the sandwich on medium high for three to four minutes per side.

And then dig in!!!!!

You never know what you are going to have on the other end of your pole when Texas bay fishing. Growing up in the Rocky Mountains, I am accustomed to catching a small handful of various fish. Typically there are rainbow or brown trout. Sometimes you find a lake someone got a wild hair while stocking and added arctic graylings. For the most part, you are certain that when the tip of your pole makes that arching dip towards the water you know what is on the other end. Not true in salt water fishing.

During my week of fishing the bays of the Gulf of Mexico in Texas I pulled up fish I had never even heard of before. Just off a pier in the shallow bays near Corpus Christi with nothing but mullets for bait, which also were foreign to me before this trip, I pulled up sheepshead, speckled trout, lady fish, croakers, gafftops, and even a sting ray. Obviously not everything is suitable for the dinner plate, but that doesn’t affect the fun had when reeling in the line, wondering what could possibly be emerging from the salty waves.
What is suitable for the dinner plate is an entirely other adventure. I created a rice dish with a groundberry and macadamia topping from the sheepshead I caught in the first few days of the trip, and for this post I am using the speckled trout I caught a few days later.
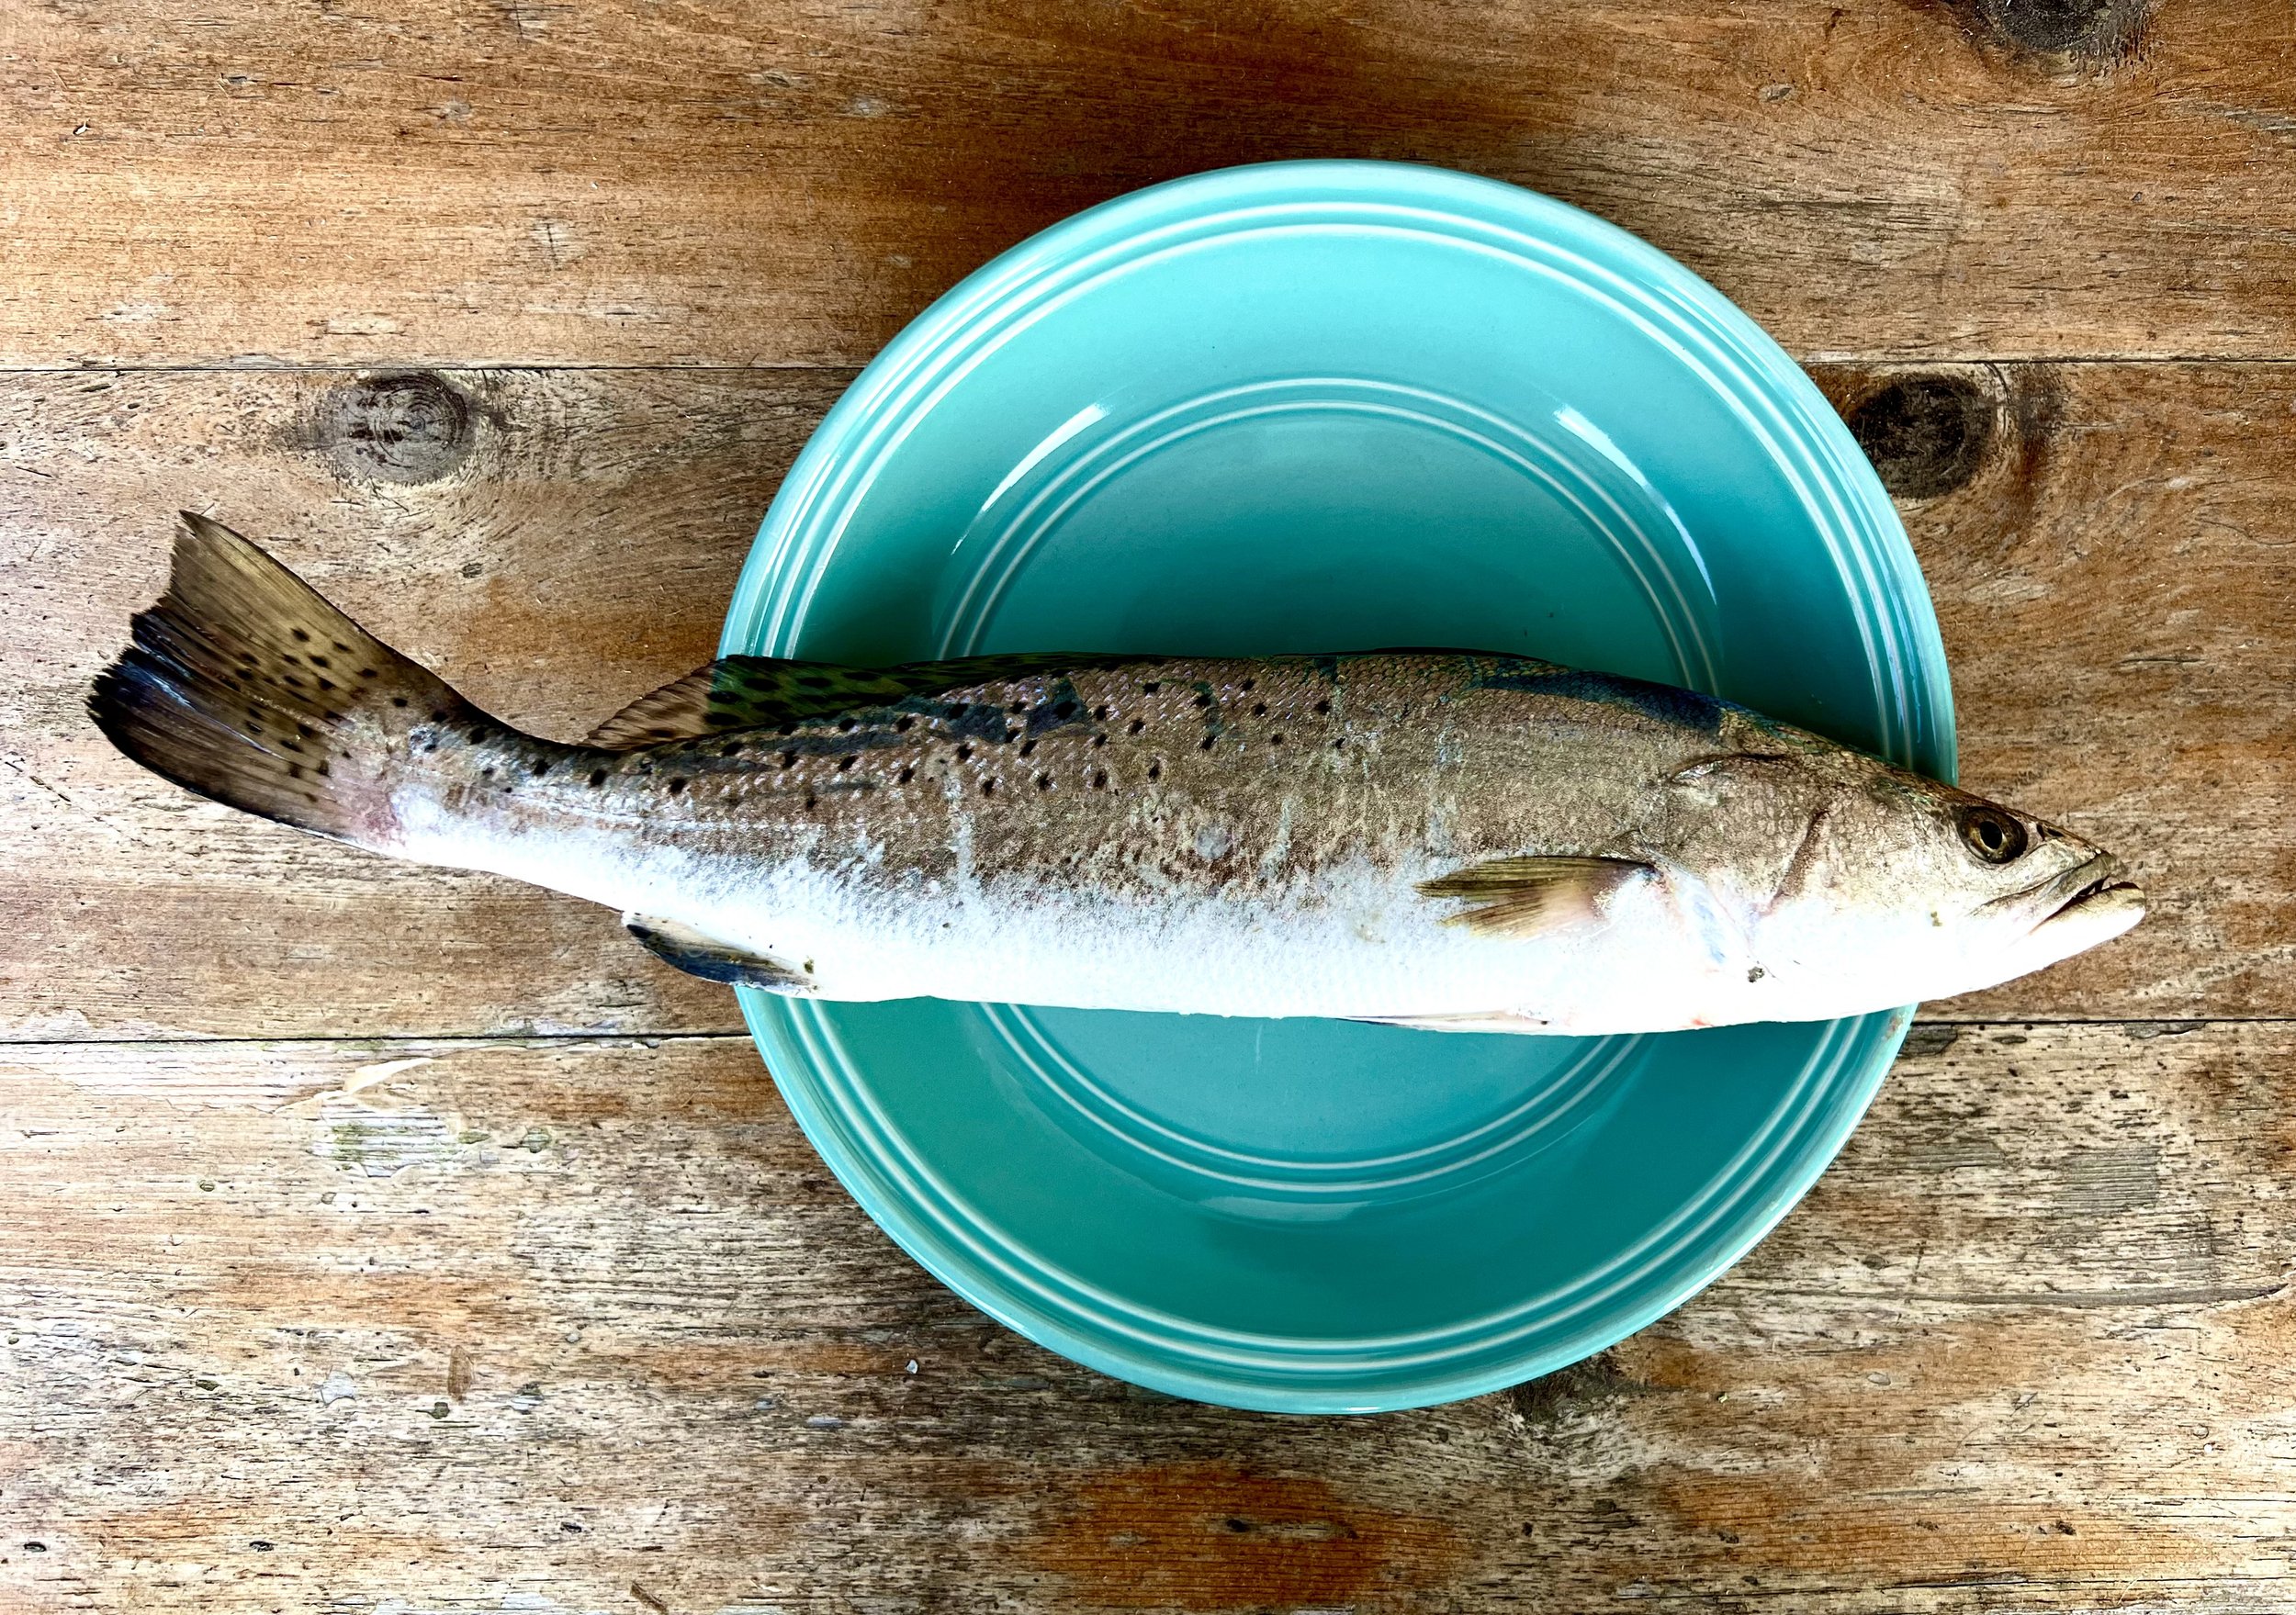
Speckled trout, or also known as spotted seatrout, are a slender bodied fish with distinguishing black spots dotting their dark grey or greenish body. They also have two very funny looking teeth. They kind of look like a vampire that went to the dentist and had all their teeth removed except the two sharp ones.
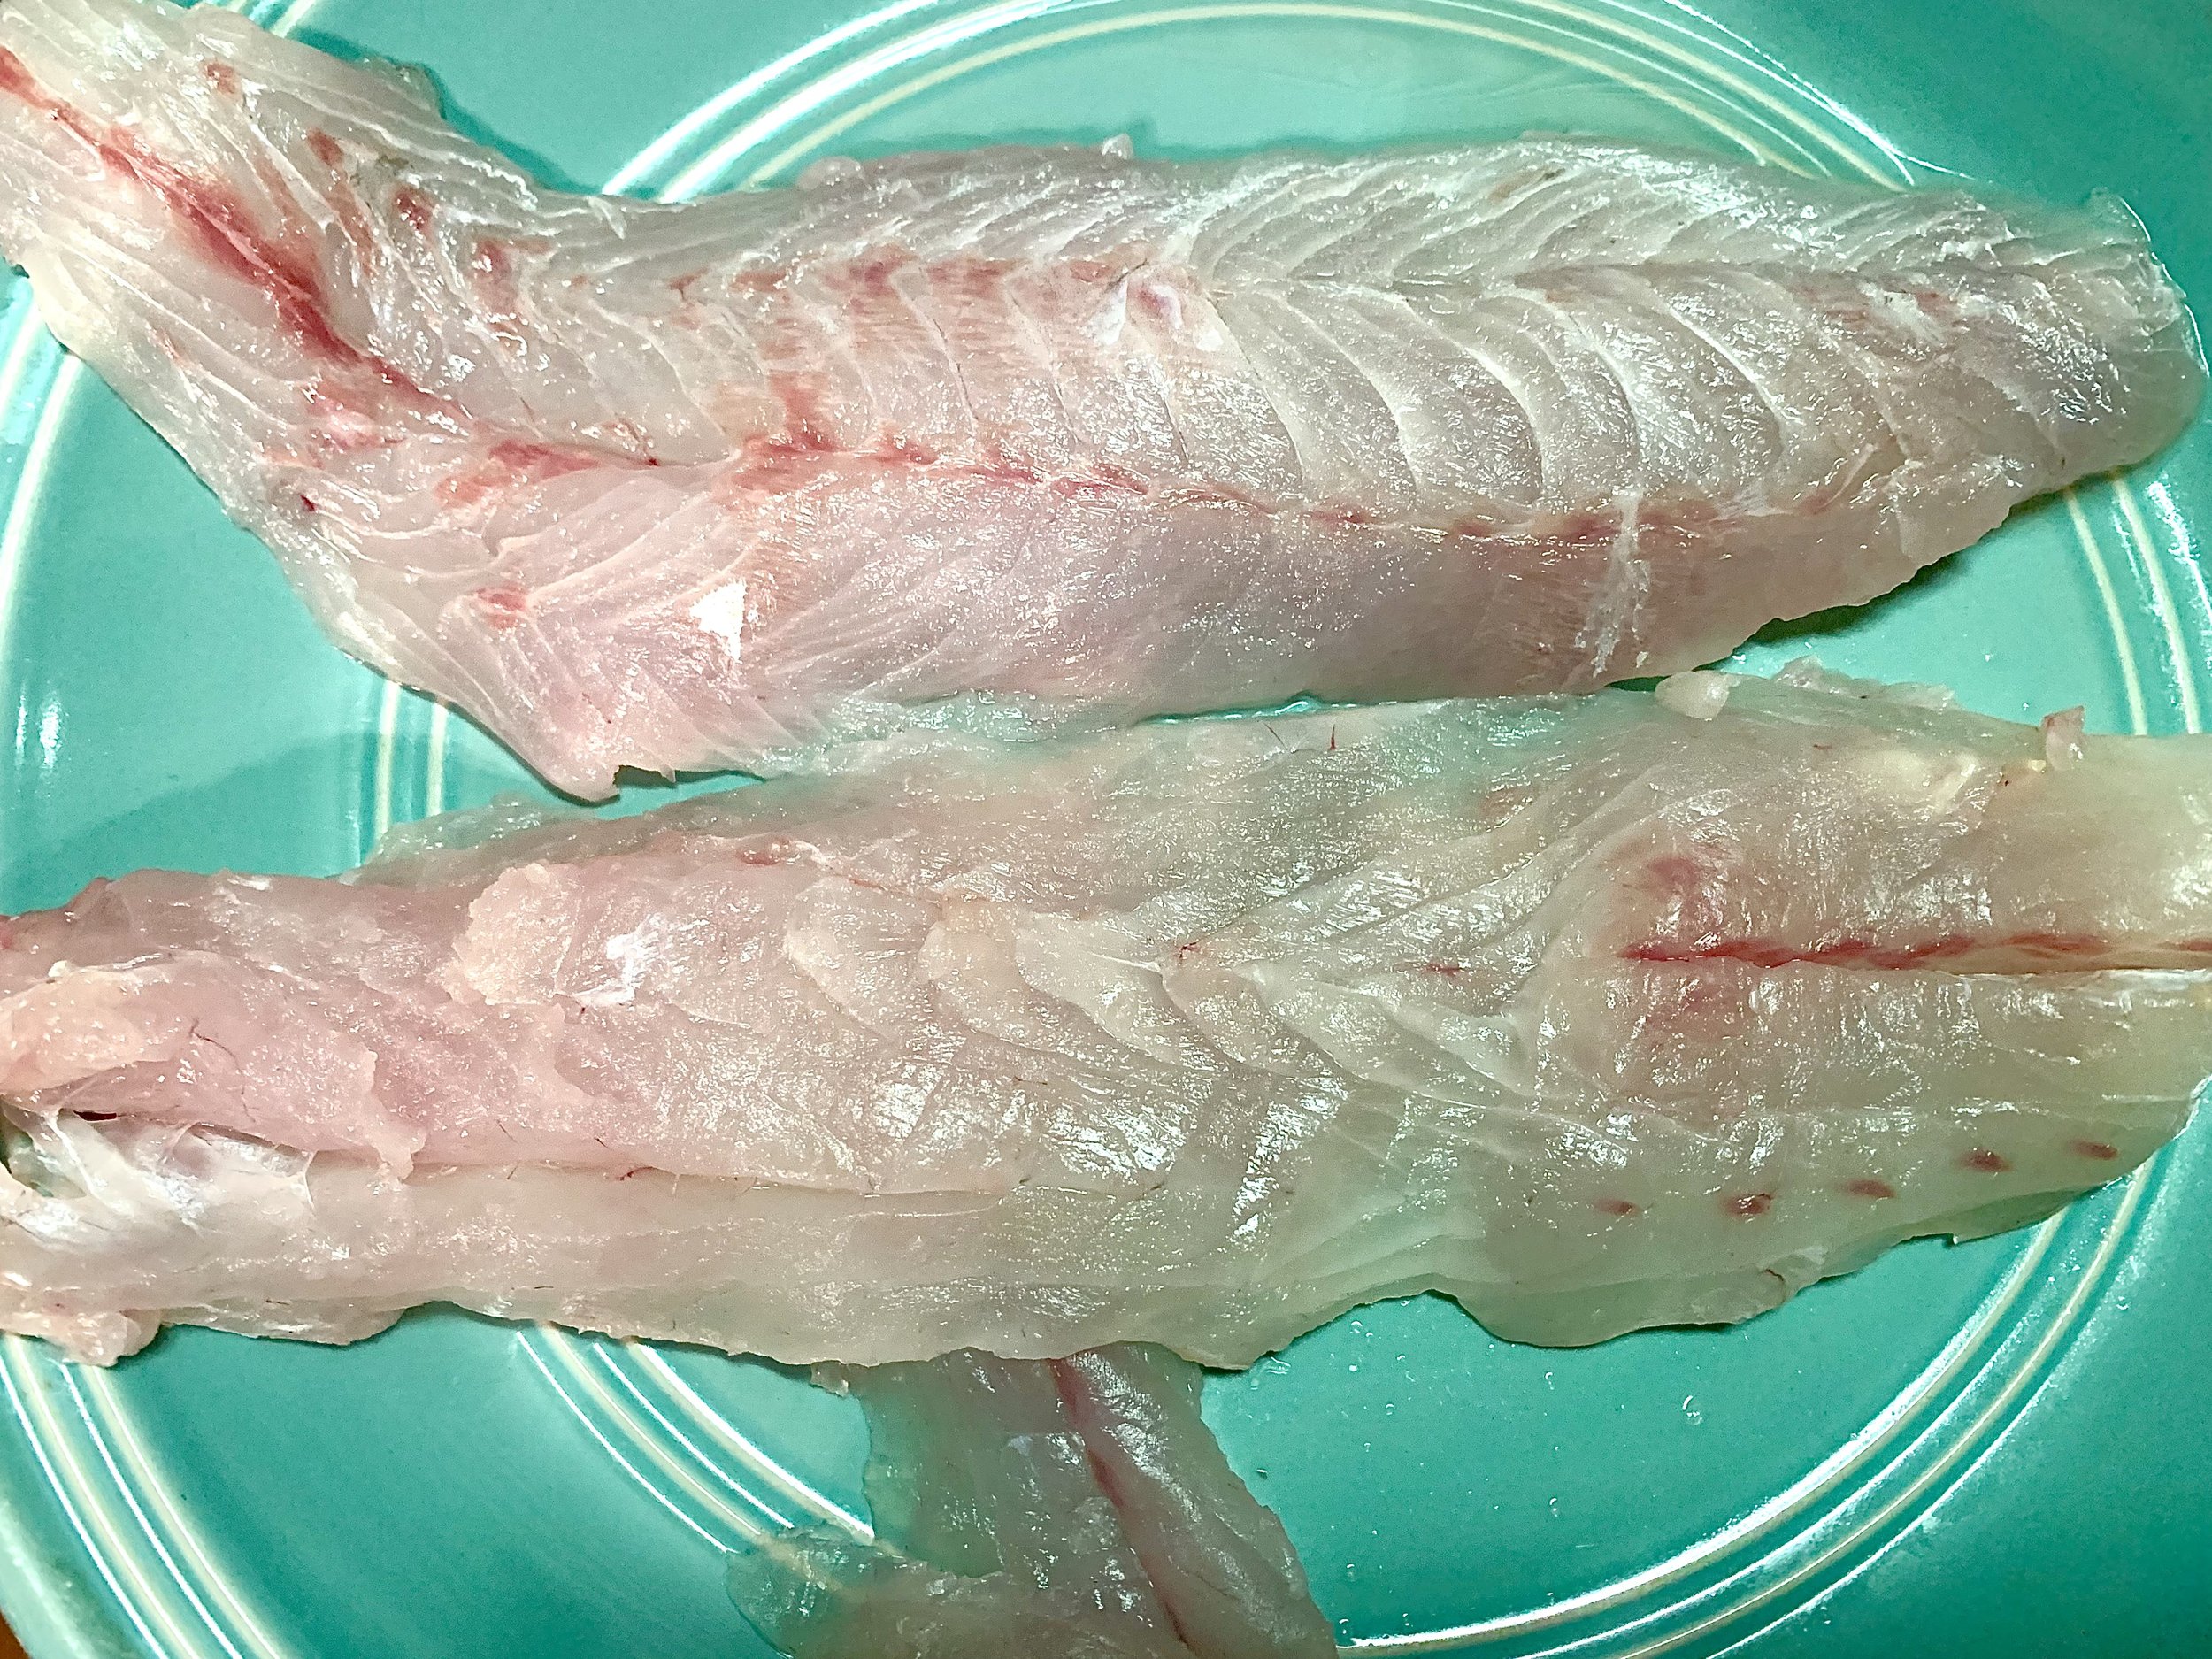
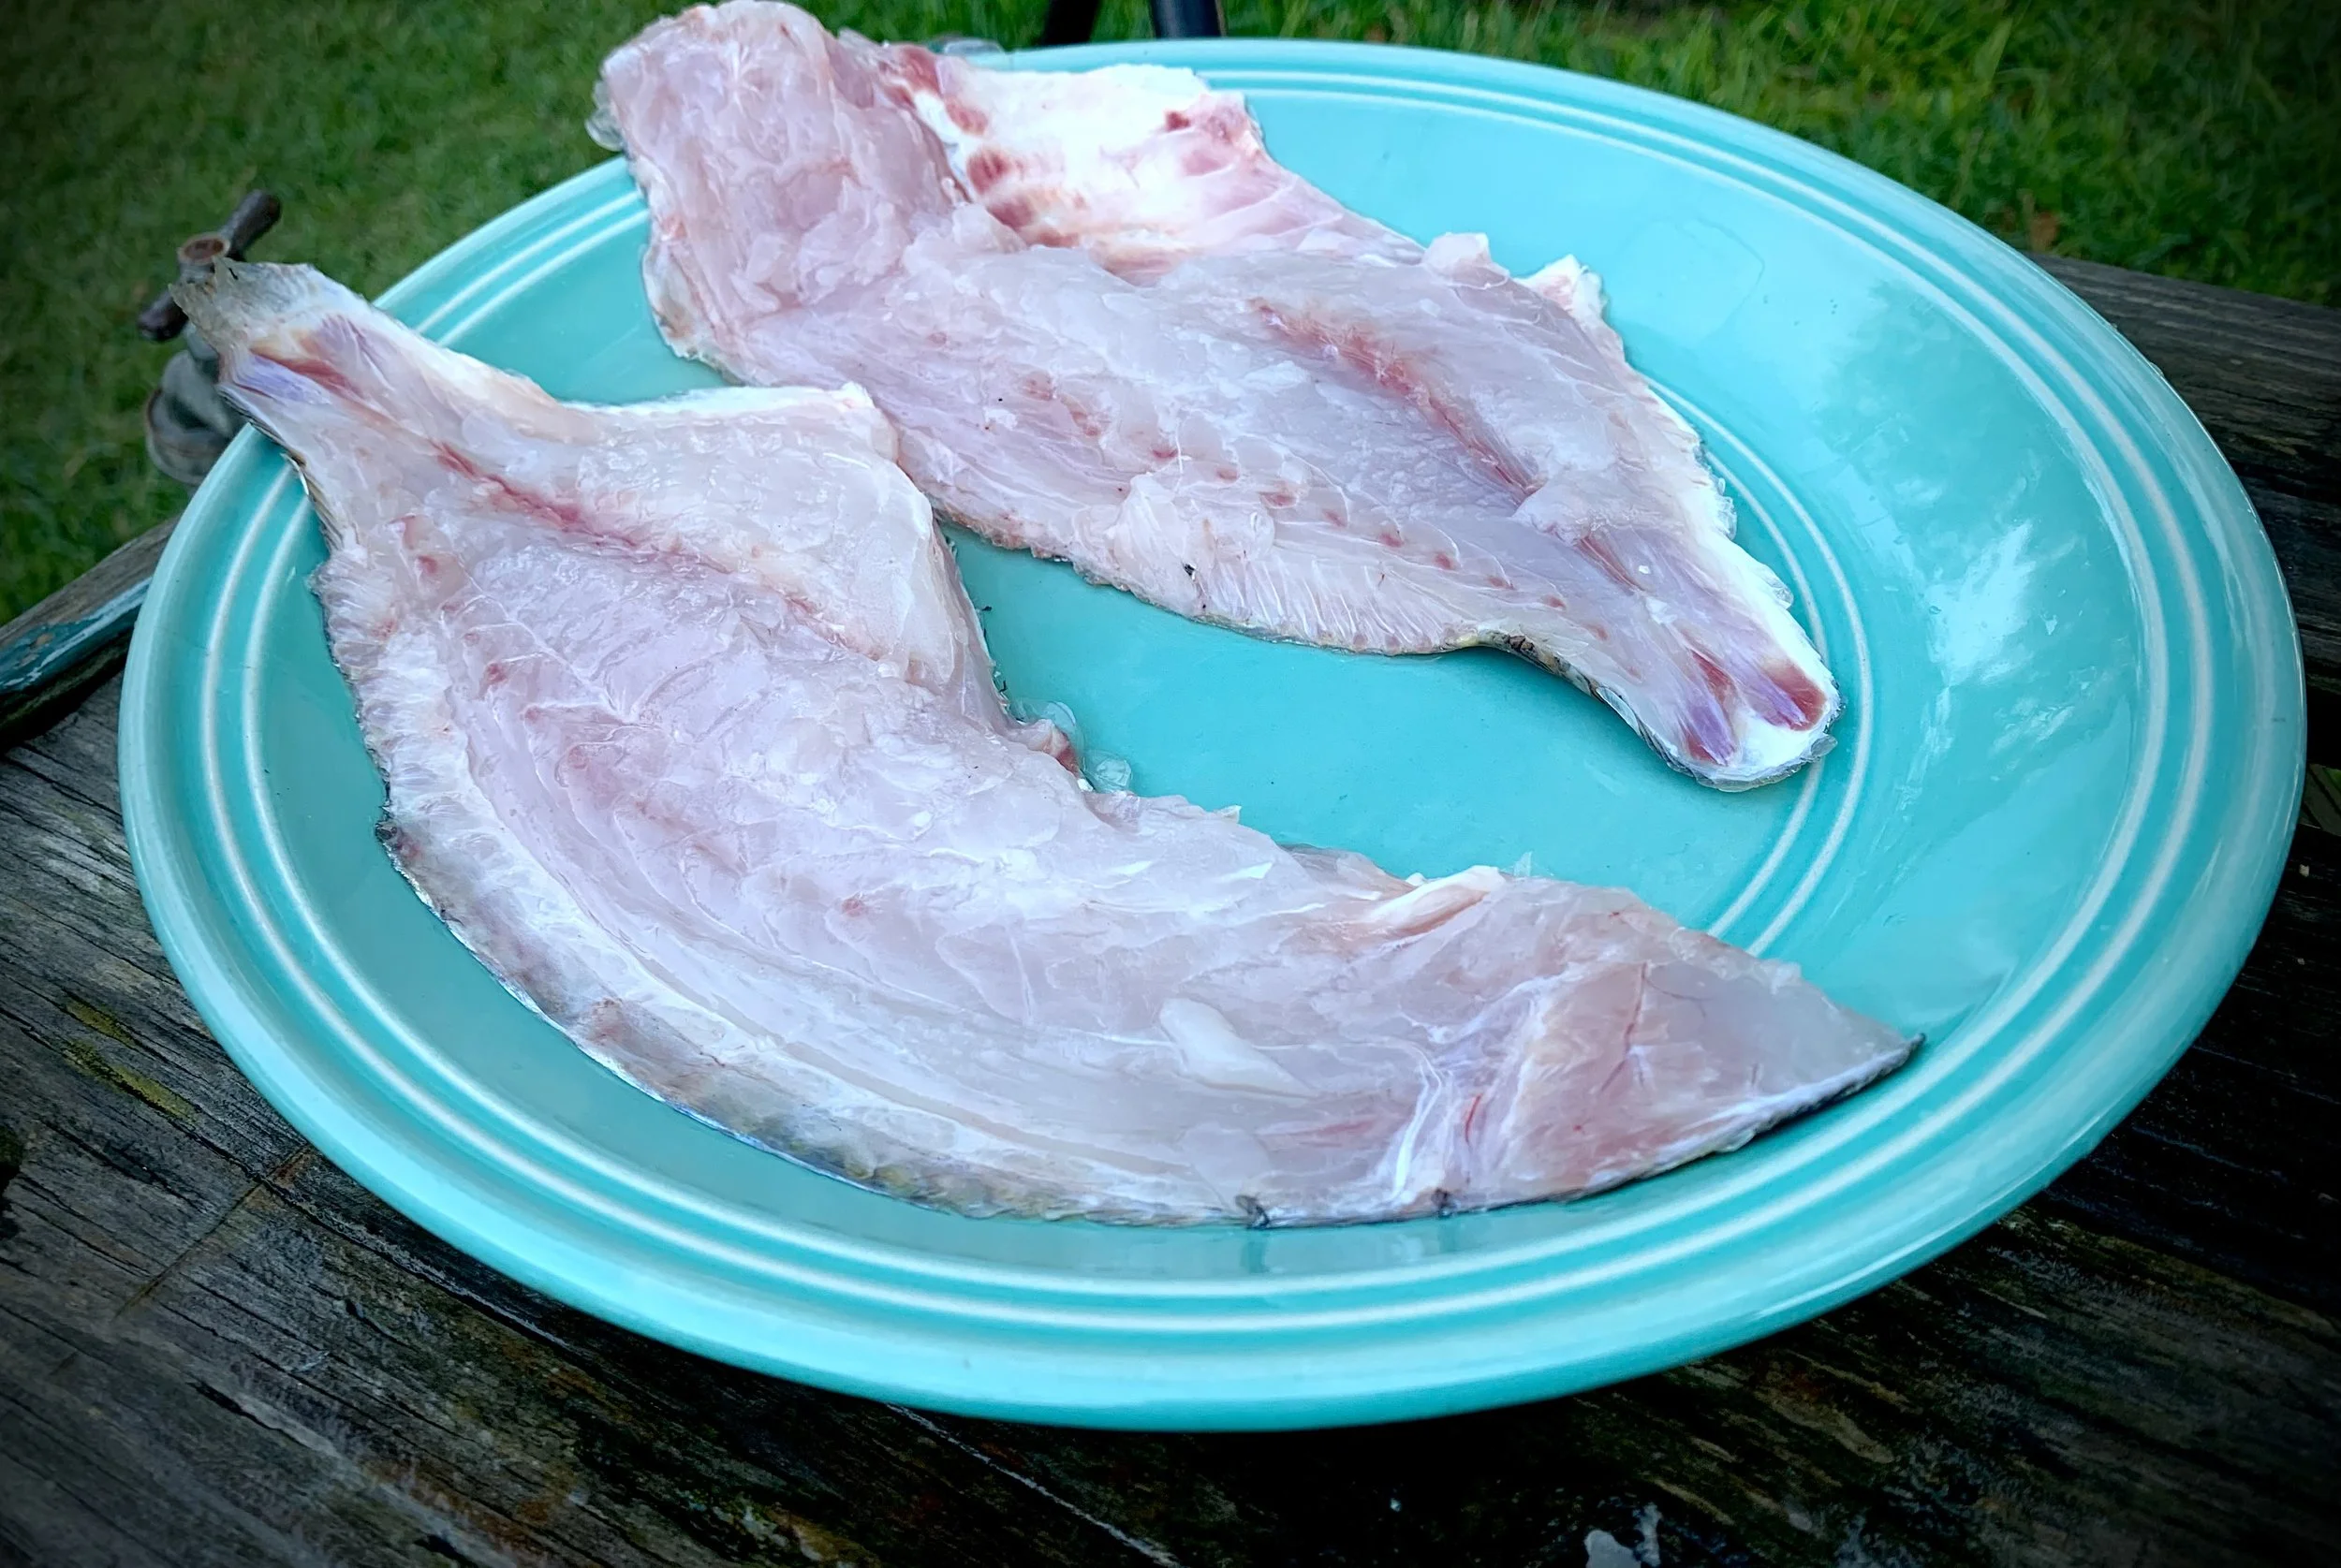
Speckled trout meat is much softer than other fish, and especially more so than freshwater fish. It is a mild flavored, white meat that is moderately flakey. I don’t want to call it a mushy fish, as that tends to be a negative term when describing meat, but it is most definitely not a firm meat that holds together in flakes when you pull it apart. It has more of the texture of a lobster tail.
Due to the tendency of developing a “mushiness,” the fish does not hold up well to being overcooked. This ruled out grilling or pan frying in my mind, as those methods can lead to easy overcooking and I wanted this fish to turn out good so badly. So, with the texture in mind, I decided to do a Speckled Trout Scampi.
For this Speckled Trout Scampi you need a lot of butter. Think Julie Child’s level of butter. Two whole sticks, or a full cup, of unsalted butter. I know, it’s a lot. This definitely isn’t a heart healthy or waist friendly meal, but it is such a fantastic use of the spotted seatrout that you should treat yourself with all that butter if you happen to be lucky enough to catch such a fish.
You want to take filets from the speckled trout, removing them from the bone and also taking off the skin. Check the filets for bones in the meat, and also remove anything that is just, I don’t know a better way to put it, yucky looking.
Set the filets in a baking dish and preheat the oven to 350 degrees.
Meanwhile, in a medium size sauce pan, add the two sticks of butter and start to melt over a medium heat. Add the chopped five cloves of garlic, a half cup of chopped scallions, the fresh chopped oregano, some dried dill, and a half teaspoon of salt. Let everything simmer lightly for a few minutes.

Remove the pot from the heat and add in a half cup of dry white wine. If you aren’t a wine person, you could also add a quarter cup of lemon juice or a few tablespoons of apple cider vinegar. You just want something to put a little acid in the sauce.
Pour the butter mixture over the fish in the baking dish and place in the oven for 15 minutes.

As mentioned before, you don’t want to over cook the fish. I checked the first at about 12 minutes to make sure things weren’t getting too mushy. At 15 minutes the fish still held together but was just starting easily pull apart with a fork.
Serve the Speckled Trout Scampi over angel hair pasta. To plate, add a pile of noodles, place a fish filet on the bed of the noodles, and then drizzle a healthy pour of the butter sauce over the fish and noodles. Sprinkle with fresh minced parsley and fresh cracked pepper.

Enjoy!
Happy Fishing!

Sheepshead. So, what is it? I had the same question when I pulled this Jurassic looking fish with its zebra striped body and sharp bladed spines from the bottoms of a Bayside, Texas ocean flat. It was about the size of a large dinner plate with large eyes and almost human like teeth. “That’s a sheepshead,” the man fishing next to me said. “They are good eatin’!”

My interest beyond the oddities of the fish’s appearance extended to how I was going to prepare this fish. Since it was my first time encountering this fish, I had to research what the guy meant by “good eatin’!”

Sheepshead fish are common in the shallow waters of the Atlantic and the Gulf of Mexico. The rows of stubby flat teeth are used for crushing its prey, which include oysters and clams. The meat is described as firm, moist, and oily. Sounds like the perfect protein to me! Let’s get started on this Sheepshead Rice Dish with a Groundberry Macadamia Topping.
I decided to grill the fish. I simply filleted this fish by taking a long, flexible, sharp knife and running it the length of the fish to remove the filet. I started a cut right above the eye and against the backbone and then cut down around the front fin to the belly. I used this cut to then pull the knife back all the way to the tail, removing a beautiful and thick filet.
The only bones you need to remove are the pin, or Y bones, from the meat. This is easy to do with a pair of needle nose pliers.
For a better description on how to clean the sheepshead, check out this website: Hunting and Fishing Depot.
Since I was grilling outdoors and grills are notoriously dirty, well not dirty but they aren’t clean like a skillet, I left the skin on the fish. I did not even bother to remove the scales for this particular fish since I was grilling it. The skin added protection to the filets from becoming burnt on the underside.
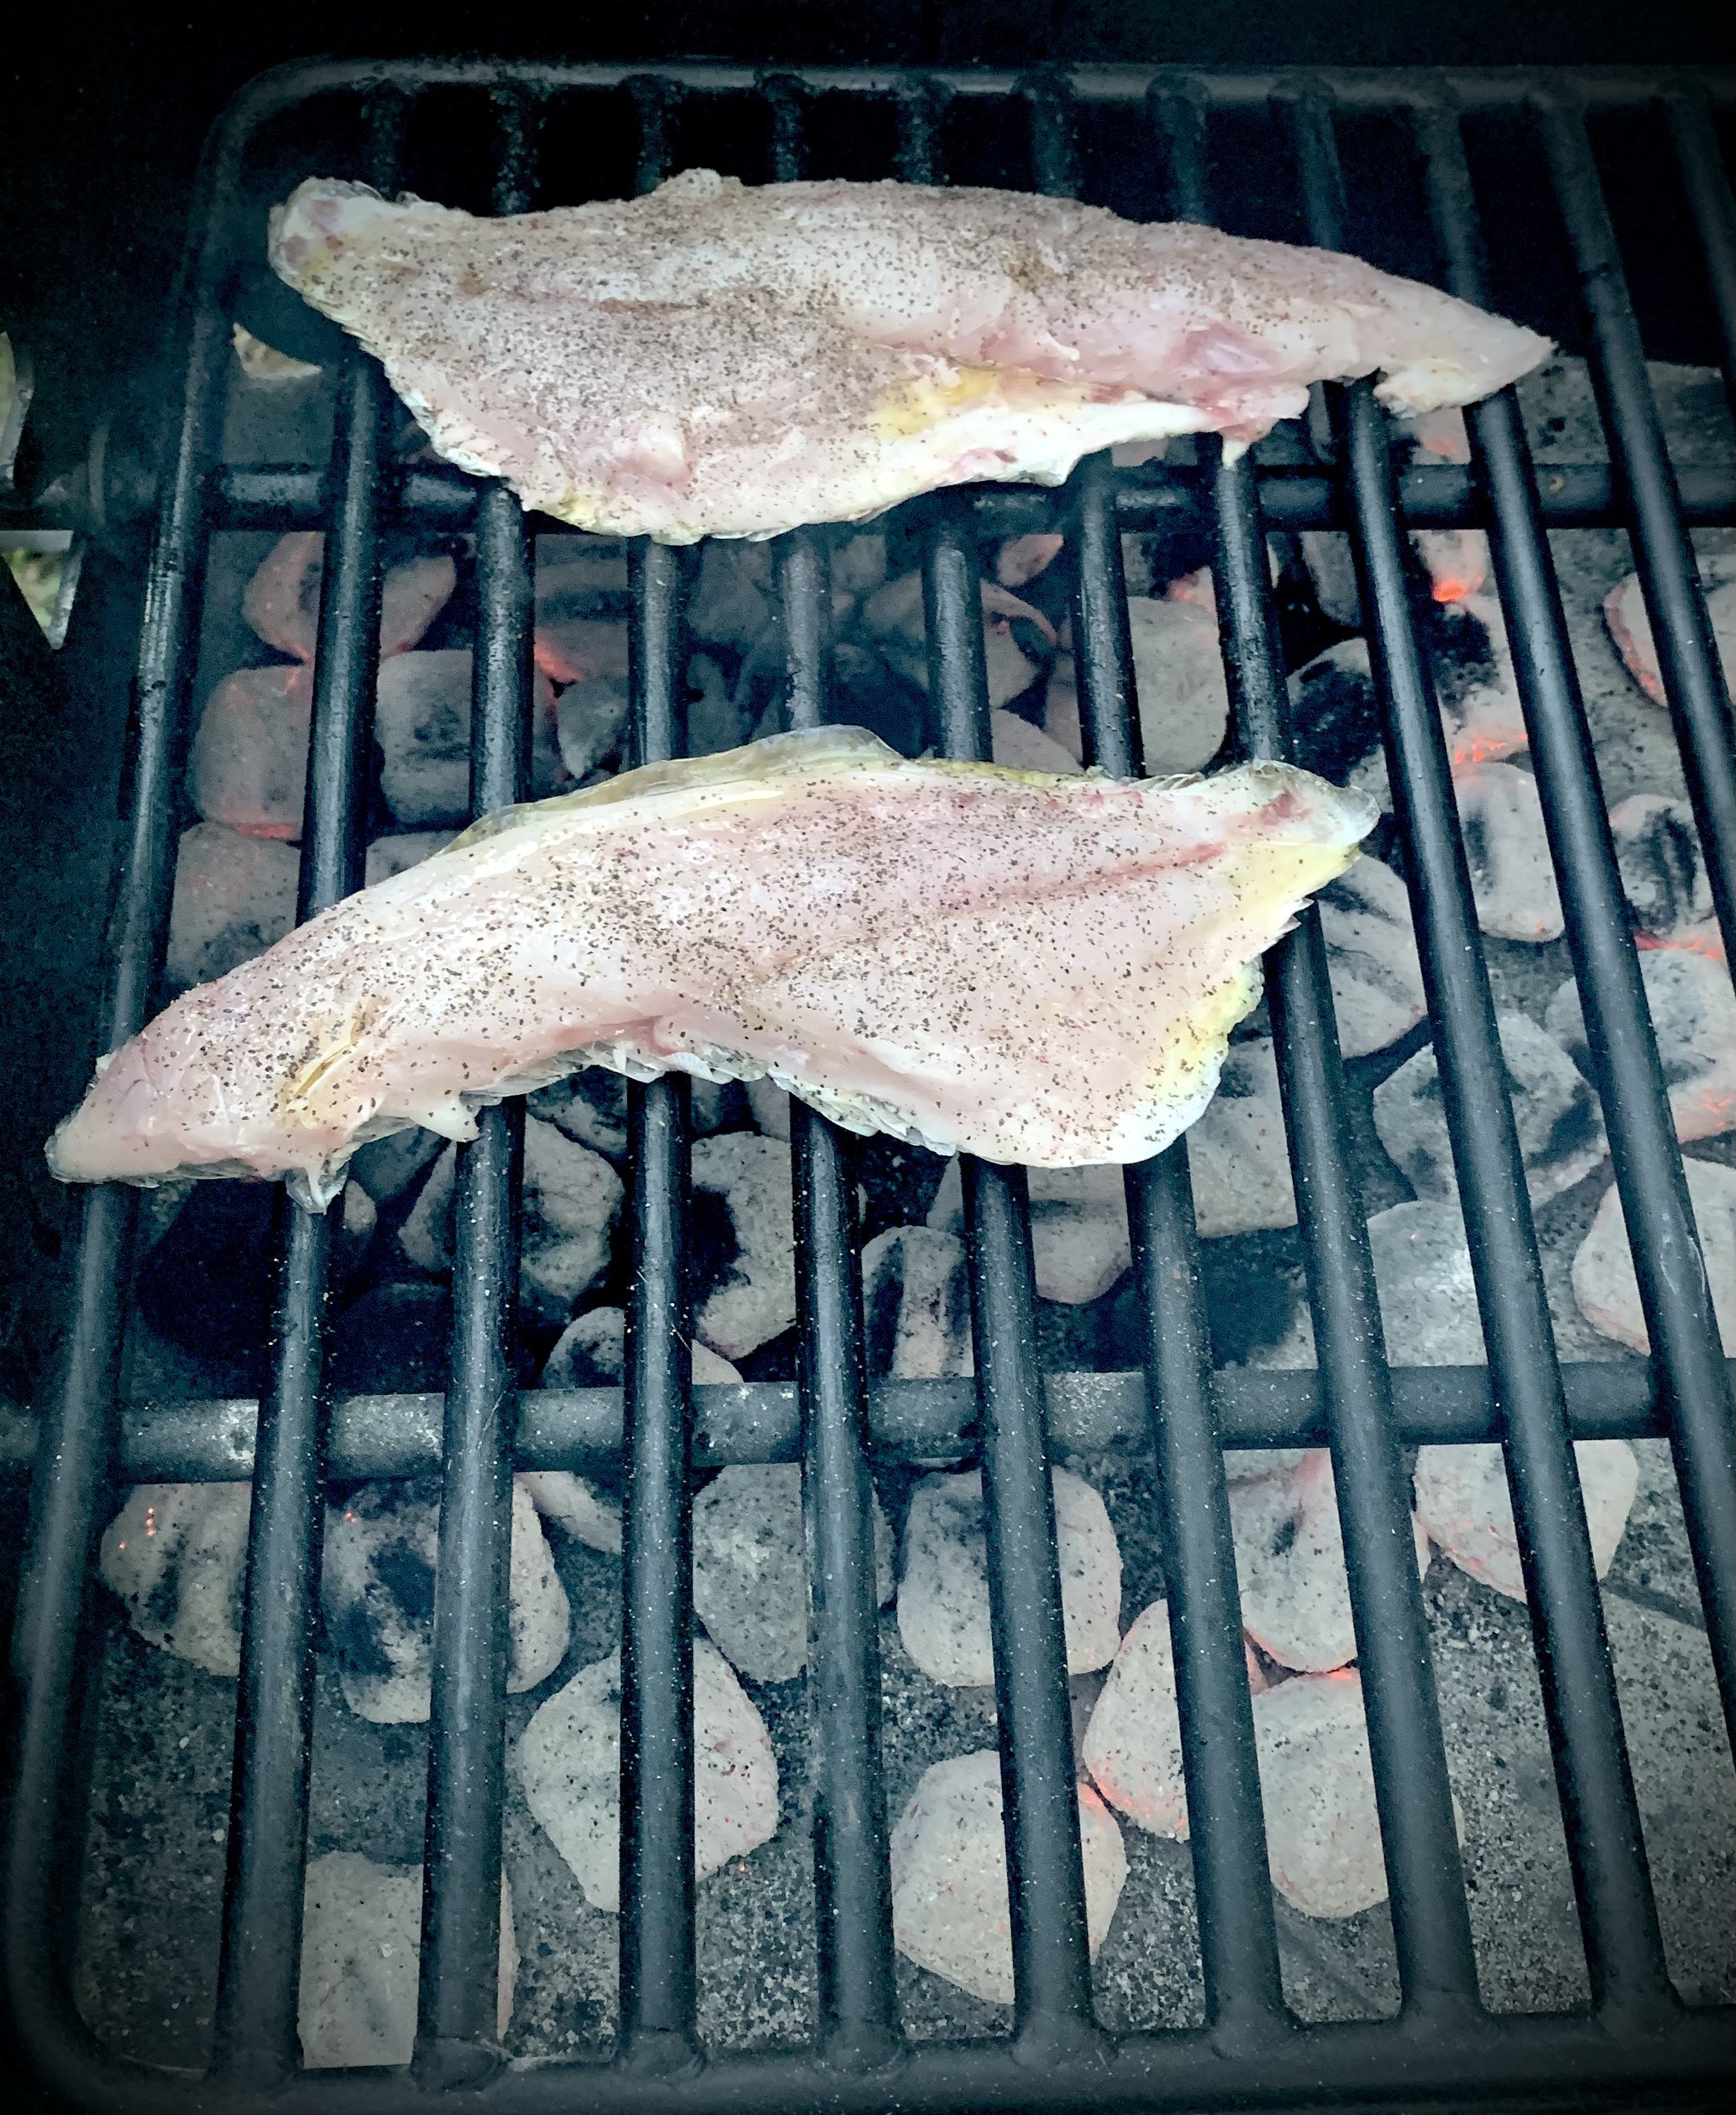

Once the grill was nice and hot I simply seasoned the sheepshead with salt and pepper, added a little dash of oil, and let them grill for 8-10 minutes, depending on the thickness of the filets. I knew they were finished when the meat was a opal white color and the edges are starting to develop that beautiful golden grilled coloring. Another test for this fish is to cook until you can easily slide a butterknife through the meat without resistance. The meat should be firm but falling apart.
In a medium bowl mix together the ingredients for the topping. I chopped the macadamia nuts and groundberries into bite size pieces for the topping, but you can leave them whole if you are so inclined. I added unsweetened coconut for added texture and body in the topping, and then a little coconut milk to hold everything together. The mixture should be the consistency of oatmeal and not too runny.
Season the topping with a little salt and some coriander.

I used groundberries to add a little sweet to this dish. Groundberries are small orange fruits originating from South America and are a member of the nightshade family. They are known by a variety of names in different parts of the world, including ground cherry, poha, aguaymanto, and pichuberry.
With a texture similar to the cherry tomato, groundberries are slightly sweet but also tart. They are popular in salsas and chutneys or over salads. They are also commonly added to desserts for not only their taste but also the aesthetic value they add to a dish.
Goundberries were perfect for topping this hearty sheepshead grilled fish with. The coconut, macadamia nuts, and groundberries give the dish a flair reminiscent of many Hawaiian dishes that are topped with pineapple. So, if you can’t find groudberries for the topping you could always substitute with pineapple, mango, or papaya.
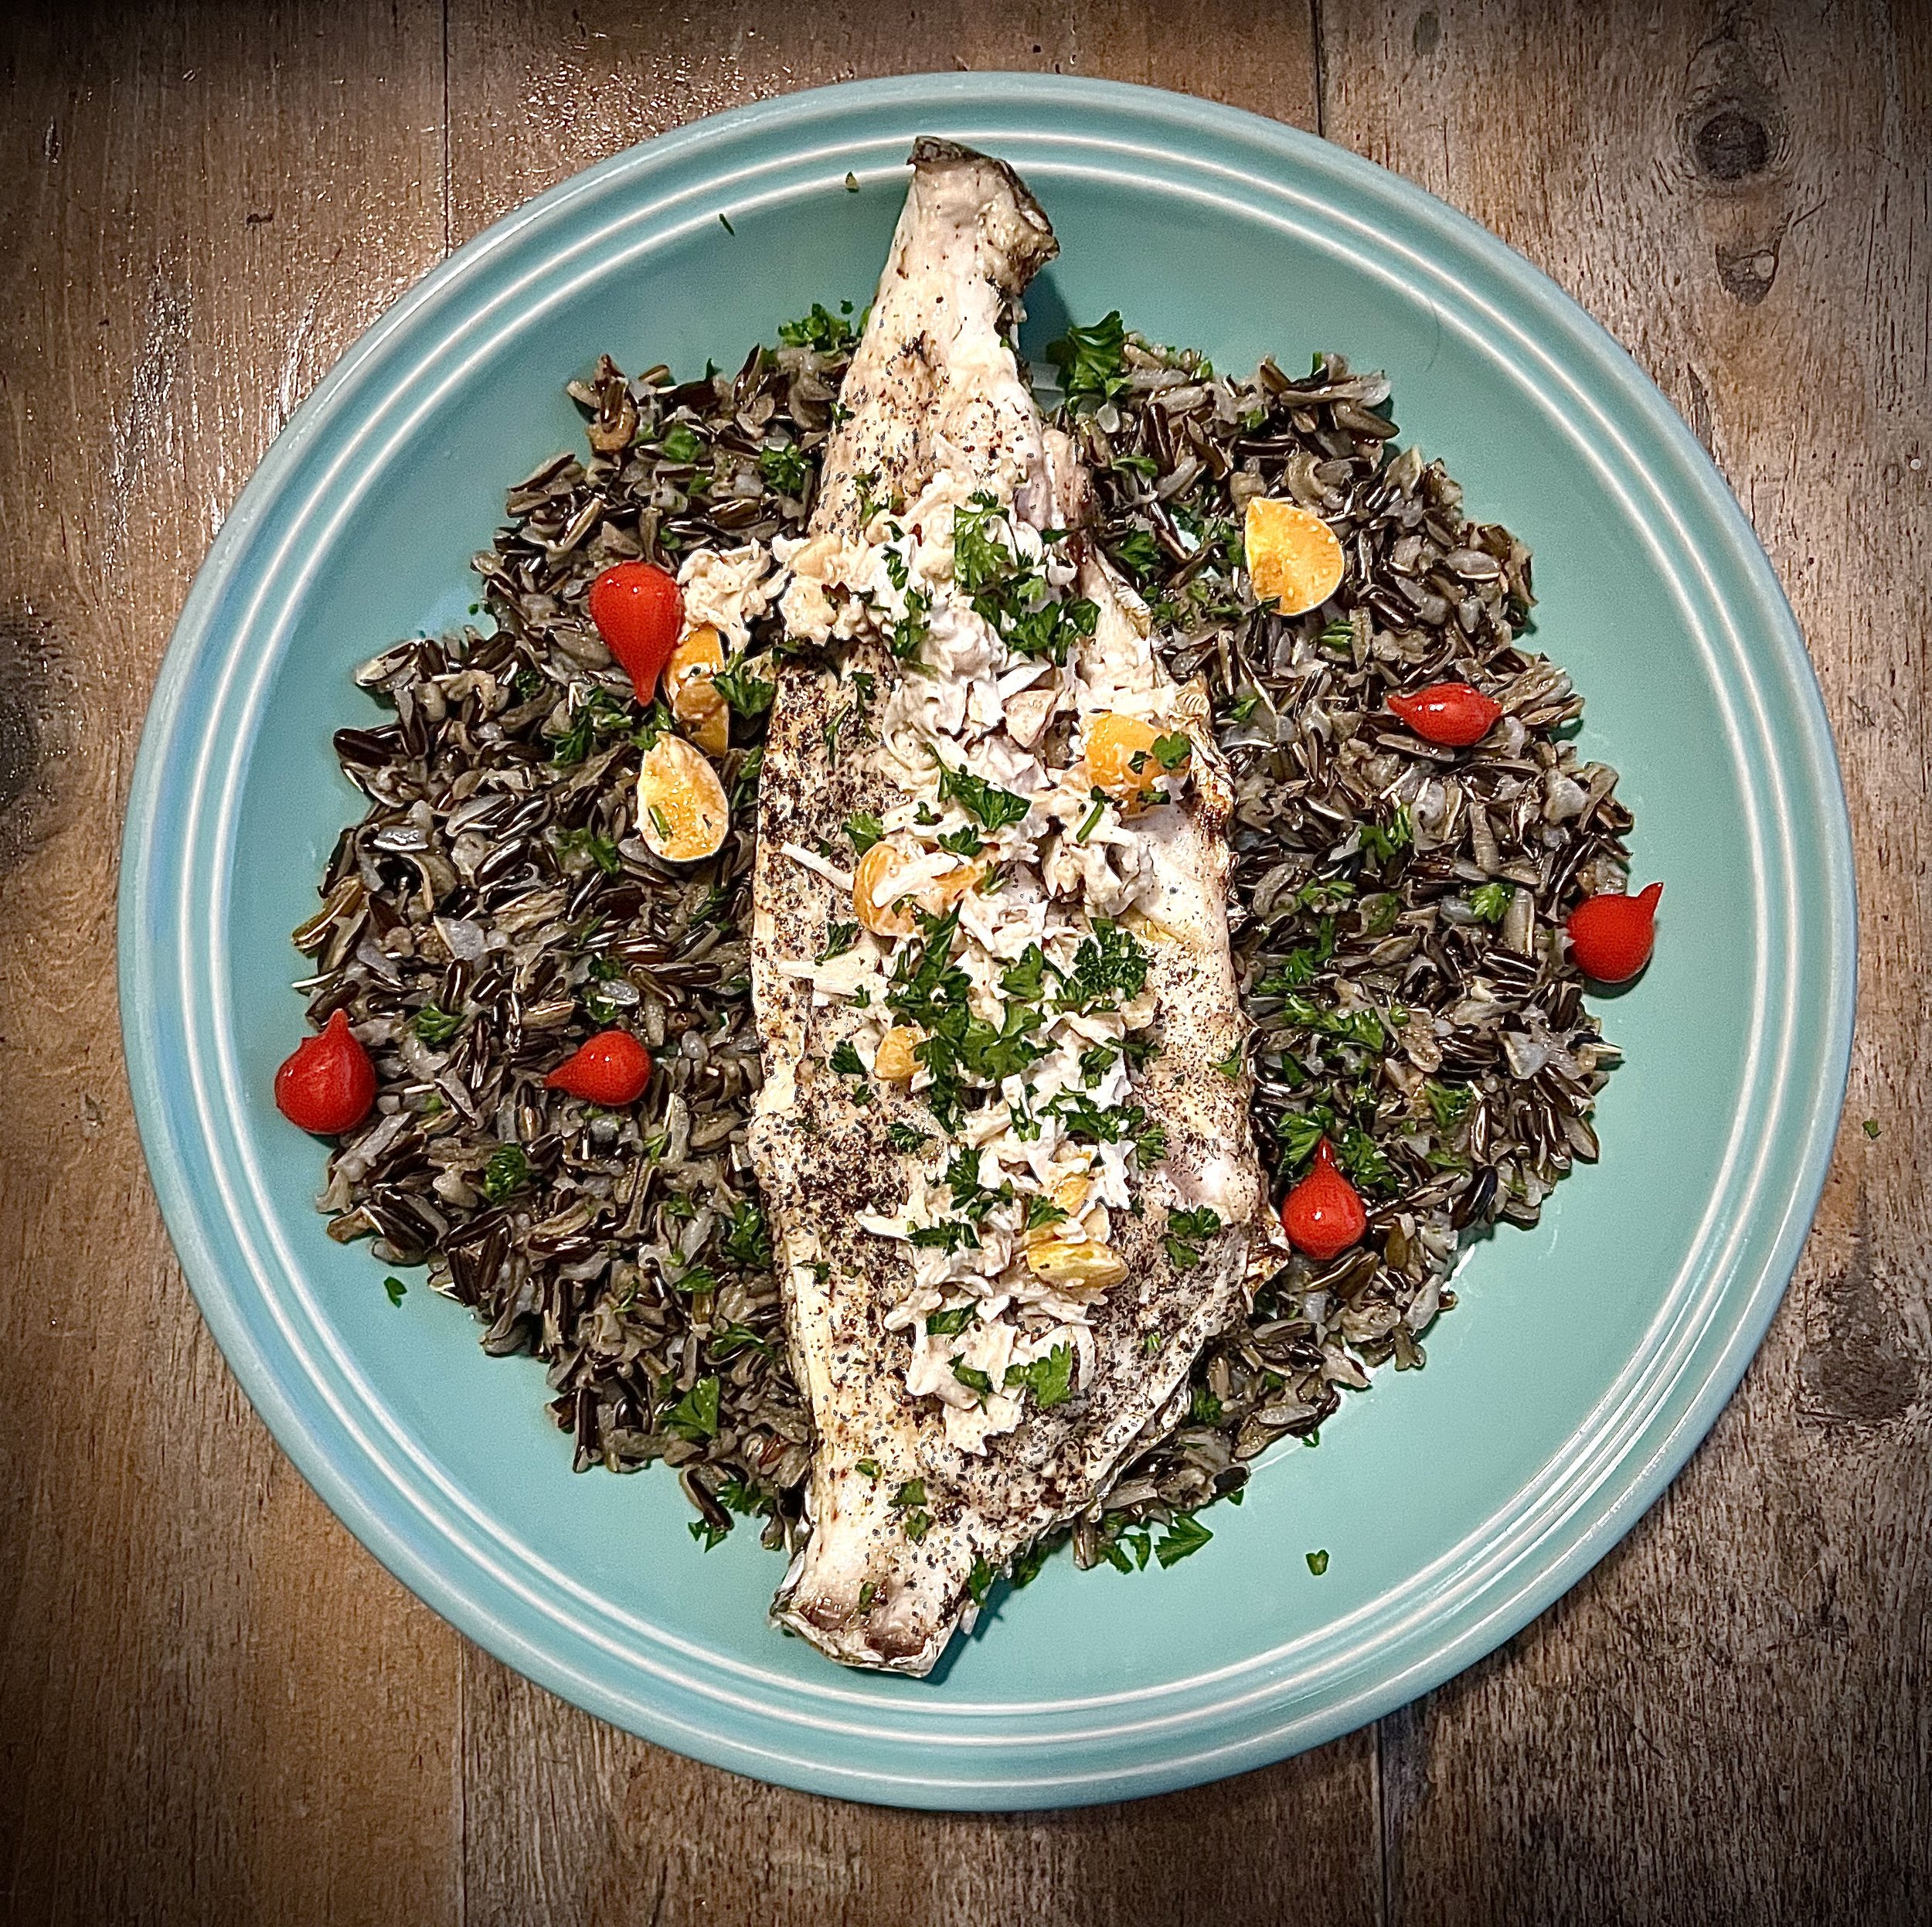
To plate, add a large scoop of wild rice to the plate and nestle the grilled sheepsheads filet on top. I decided to remove the skin for actual plating because it is somewhat fishy and I didn’t want to add that flavor to my rice. Then, top with a heaping spoonful of the groundberry macadamia topping. Sprinkle with a little fresh chopped parsley and enjoy!
Happy Fishing!

I am a planner. I like to know what lies ahead and how I am going to get there. I employ this attitude in almost everything I do in life. Stepping outside the plan is difficult for me, especially if I am not prepared for stepping outside the plan (somehow that doesn't even make sense, but if you are planner then you know what I am talking about!).

“The only real stumbling block is fear of failure. In cooking you've got to have a what-the-hell attitude.” ~ Julia Child
Camping is a planner's dream, or nightmare depending on how you look at it. I make lots of lists, trying to think of the unexpected popping up and how I will be prepared to tackle it. I try to cover everything I would could possibly need. Everything is broken down into lists, which have sub-lists, and then the lists are checked through, usually twice. For cooking, there is the master list of each meal: breakfast, lunch, dinner, dessert, and snacks. Then each meal is broken into two sub-lists: ingredients and tools. And then there is another list entirely for stocked items that I try to take everywhere. Things like cutting boards, knives that actually cut things (as opposed to most camping knives that tend to just tear things! I hate that!), extra bowls for mixing and such, spatulas, aluminum foil and Ziploc bags. The list is an ever evolving task that is added to each time a new hunting or camping trip happens.
With all that said, this past camping trip presented an unexpected. I never plan on catching fish. I consider myself a bad luck fisherman actually. Everyone around me can be reeling them in, and I will sit idly watching happy faces pull in beautiful fish. I would say it makes me sad, or jealous, or angry, or something, but I actually am used to it by now. So, you can imagine my surprise when this past weekend I limited out on rainbow trout two days in a row.
Since I never plan on catching fish, I never plan on cooking fish while at camp. This time was different. As I was cleaning the trout, I had this overwhelming urge to have fresh lake caught fish that night. I didn't know how it was going to happen, or if I had anything to prepare the fish with, but I knew it needed to happen. I needed to ditch the planned dinner and make a fish dinner.
Since supplies were limited, I decided to try and cook this fish in foil packets in the actual fire pit. I have done other meals this way before, usually ones filled with meat, potatoes, vegetables, and a gravy base. It is a quick way to make a fantastic tasting meal. It requires little preparation, little clean-up, and amazing results. I had never done fish this way before though.
Besides having no set way to cook this fish, I also had no recipe. So, this impromptu meal was going to have to be a "clean out the cupboard" type effort. I searched through bins for whatever spices and ingredients I could find. This recipe is what I came up with, and I have to say it was superb. I felt like I was eating at a five-star restaurant.
To start, you have to build a fire. This is usually a given at a campsite, but I thought I better mention it. If you aren't much a fire chef, which I can't say that I am one, you can also heat up some coals and just place the packets on top of the coals. I used my charcoal chimney for my dutch oven to heat up about ten coals and cooked over those. It worked great.

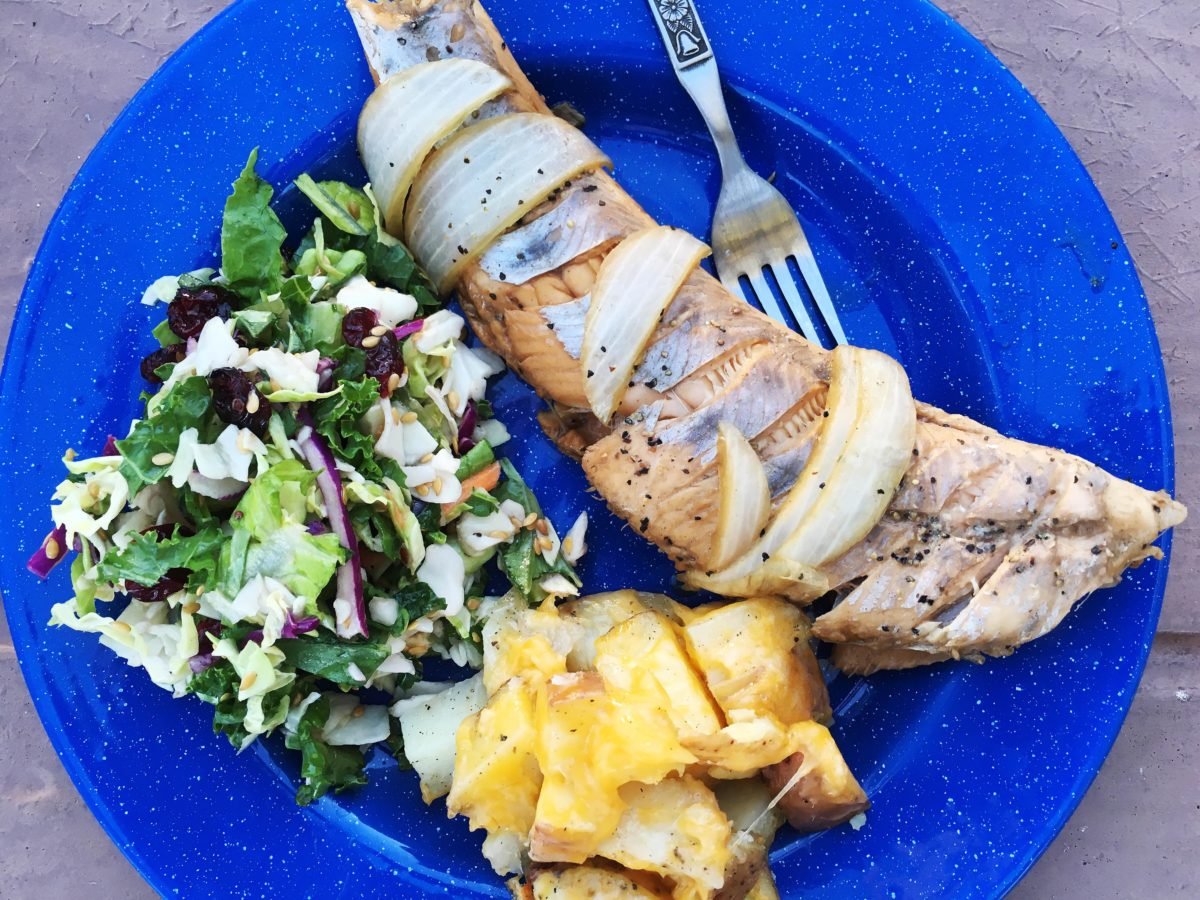
For this recipe, I left the fish on the bones. It makes for each fish cleaning, cooking, and the meat literally flakes off the bones once it is finished cooking.
To start, cut two pieces of aluminum foil about twice the size of fish. There needs to be enough foil to fold over the entire fish and other ingredients and then wrap the edges closed. The fish should be centered in the piece of foil with at least an inch of room around it. You want to use two pieces of foil to create a really good barrier between the heat of the fire and the fish. I have single layered the aluminum foil before and things tend to burn rather than steam.
Salt and pepper the fish. If you have some lemon pepper, which is a common seasoning used for fish, that would be great. You could also do my go-to favorite, Montreal Steak Seasoning. I put that on everything because I appreciate the balance of salt and pepper it has. Once the fish is seasoned, add thin slices of onion. Since this is an impromptu menu item, you might not have onions. You could also do minced garlic. Even dried onions or garlic would work, which is something many people leave stocked in their camping supplies. I tend to always take onions with me when camping because they can be added to many different dishes.
On top of the onion, places thin pats of butter. My slices were cut about a 1/16 of an inch thick. You could cut the pats thicker and just not place as many on top of the fish too. I ended up with about five mirco-thinly sliced pieces per fish. It was a good amount of butter. Oh, just a quick note. The butter I had was unsalted. If you used salted butter remember to not add more salt to packet or you could end up with a very salty dish.
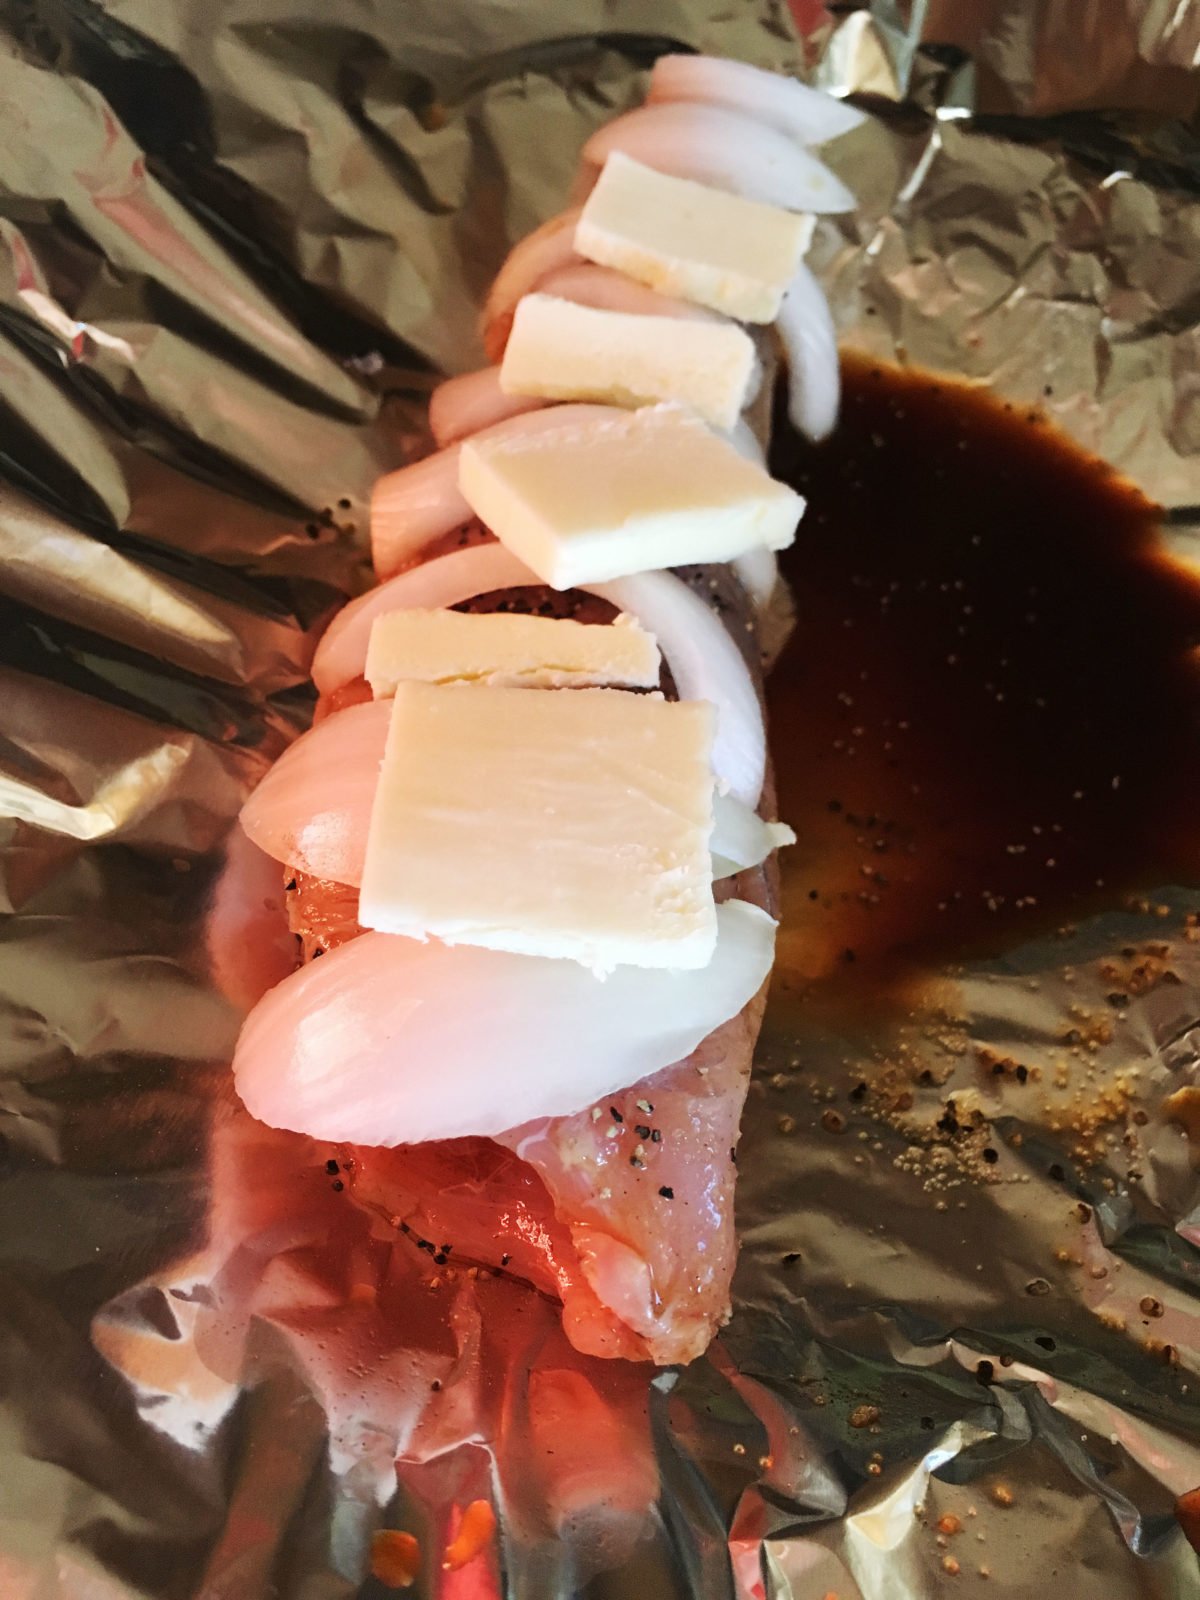
Gently pour a good drizzle of Worcestershire sauce over the fish. It is okay if it just pools up below the fish. Once sealed, the packet will steam everything and the sauce will infiltrate the fish beautifully!
To create the packet, fold the foil over the top of the fish. Gently start rolling the edges of the foil towards the fish, taking care not to puncture or rip the foil. The foil has to be completely sealed or the juices will run out and things won't cook right. If you tear a whole, grab another piece of foil and add another layer to the packet. The best way to think about making packets is to just try and keep things pretty. The prettier the packet, the better things seem to hold together.
Cook the fish about five to seven minutes per side. This will ensure the fish is flaky and pink, the onions are soft and sweet, and the butter and Worcestershire have melted into a delicate sauce. When I was cooking, the packets actually puffed up when they were finished, which was also a good indicator that things were done. However, if there are any leaks in the packets, this won't happen so I would keep an eye on the timer.

For a quick side dish, I cooked up some cheesy dutch oven potatoes. Cube the potatoes into bite size pieces, season with salt and pepper (or as I did, because like I said I am crazy, you can add Montreal Steak Seasoning. I have a problem.), and cover with cheese. You could also throw in some onion if you have left-overs from the fish packets. Cook over coals, about ten to twelve on the bottom and eight to ten on the top, for twenty to thirty minutes, or until the potatoes are soft.

Happy Hunting!

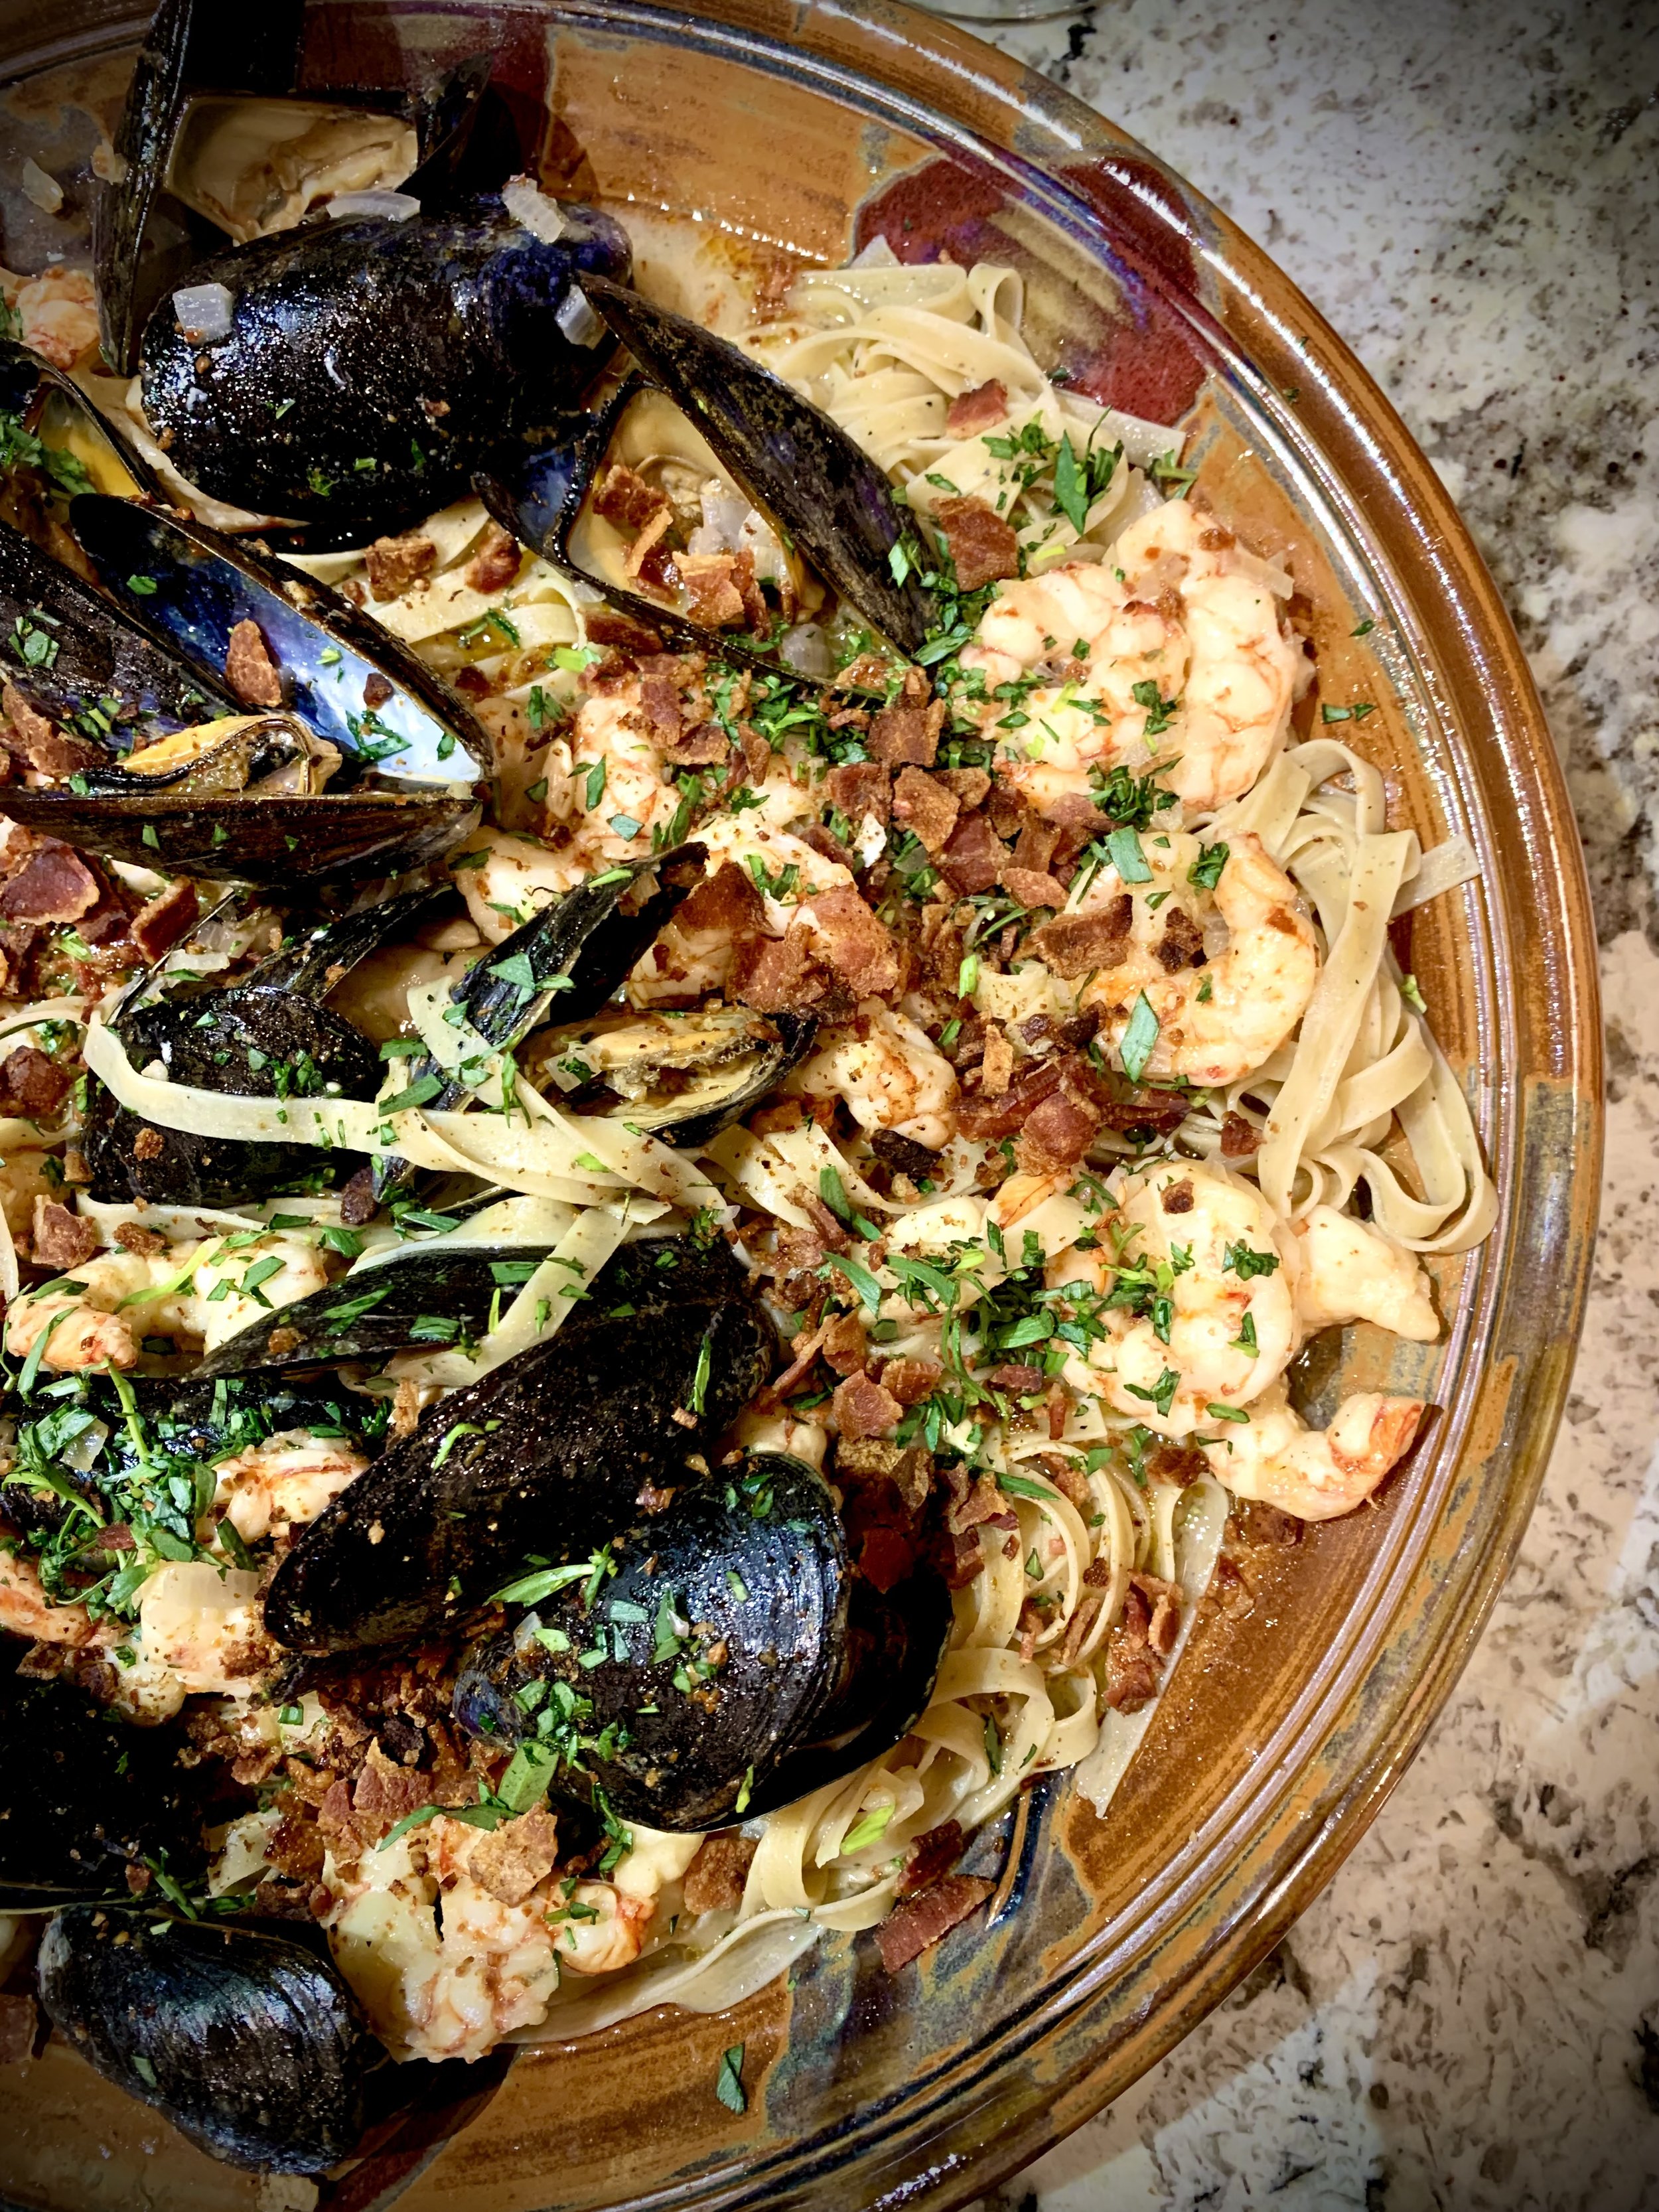
Not living next to the ocean definitely makes seafood a challenge; however, every year, our local small town butcher orders in fresh mussels, clams, and oysters during the last week of December. The mollusks arrive fresh and alive! It is a true desert treat, and I always order my fair share during that time. This year, I used the mussels to make a Mussel and Shrimp Truffle Pasta with a Tarragon Lemon Sauce.
Mussels are a bivalve found in both salt and fresh water. Evidence shows humans have consumed mussels for thousands of years, although steaming up a pot of freshwater mussels for dining on isn’t very popular anymore.
Saltwater mussels are another story. They are prepared many ways, from steaming in white wine and herbs for a seafood feast, to pickled in a salty brine and served on a toasted baguette, to floured and fried on skewers. Like other saltwater bivalves, mussels have that faintly oceanic but sweet taste to them. Their subtle flavor but robust texture makes them a great addition to many different types of meals, whether they are the star of the dish or the understudy.
For this Mussel and Shrimp Truffle Pasta, I decided to let the mussels take on the lead role and showcase all they have to offer. The sauce for dish is simple and understated, but the flavors were all selected for pairing with the mussels.
To start, preheat the smoker or your grill to 500 degrees Fahrenheit. I used a smoker for this recipe so I could impart a little smoked flavor into the mussels, but a grill works perfect for this recipe as well. I used a light wood for the smoking: Apple Wood.
Give your mussels a scrub with a brush under cold running water to remove any sand or rocks from the shells. Discard any mussels that have a broken or cracked shell.
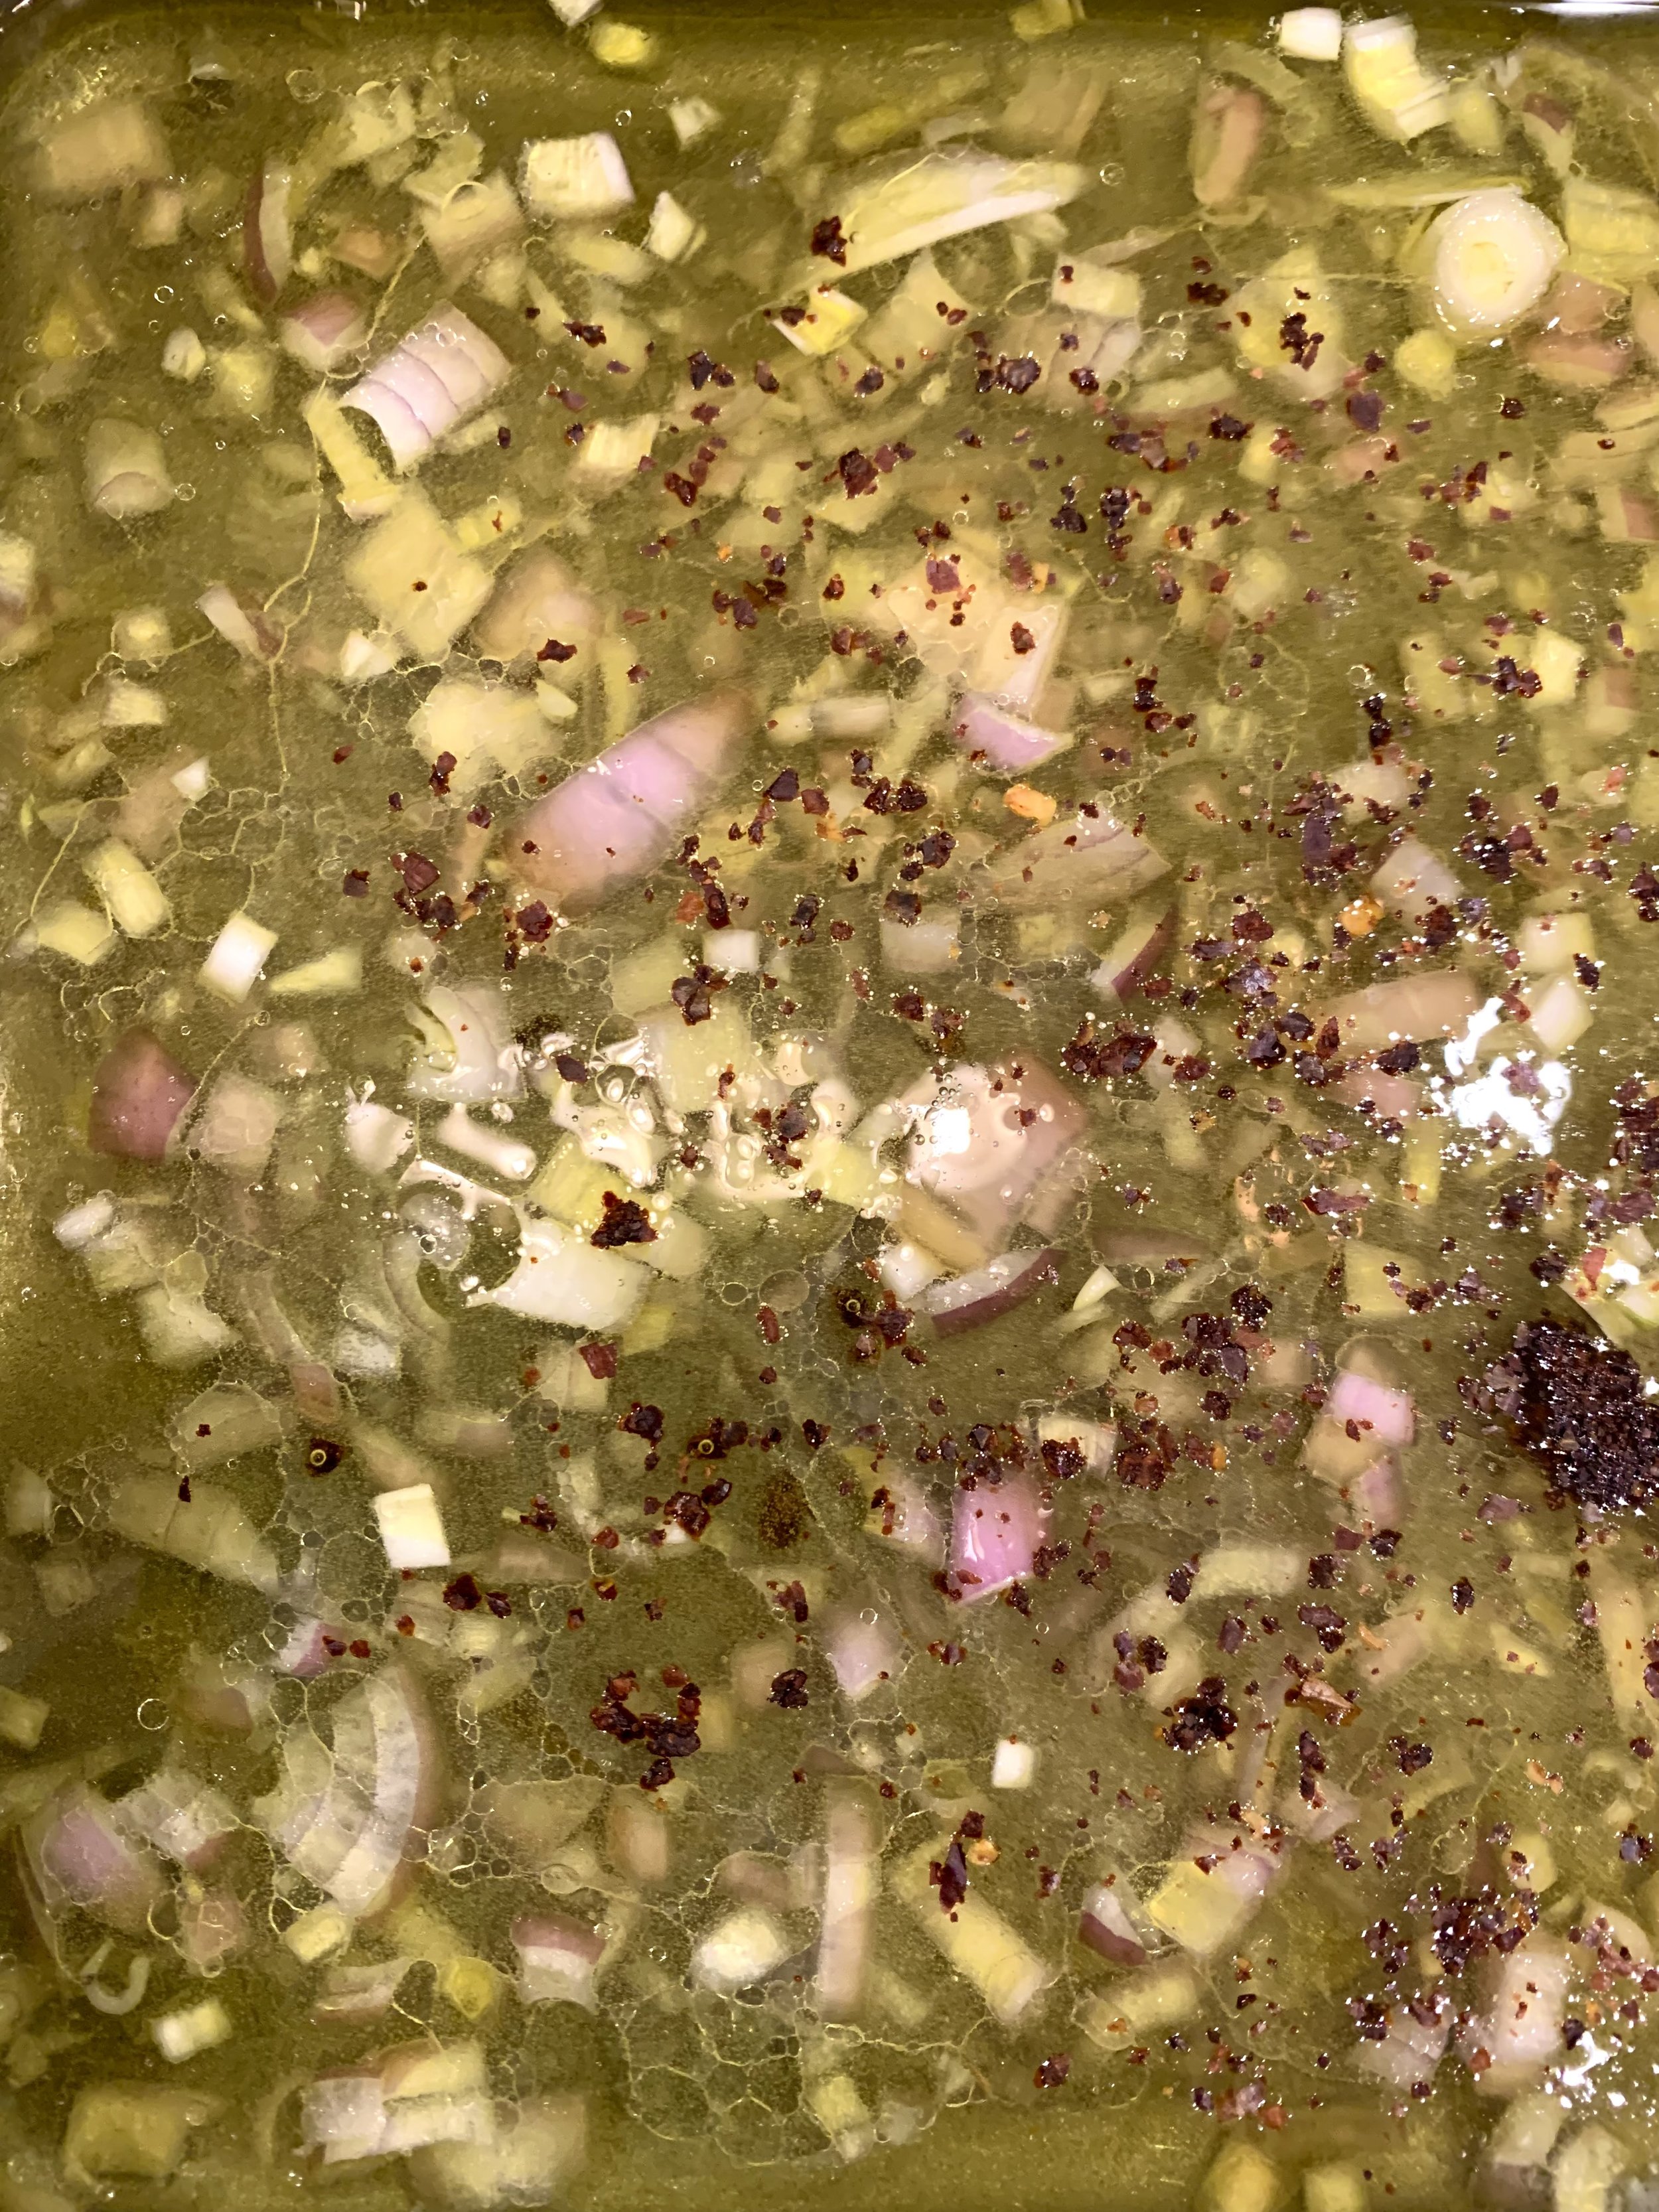
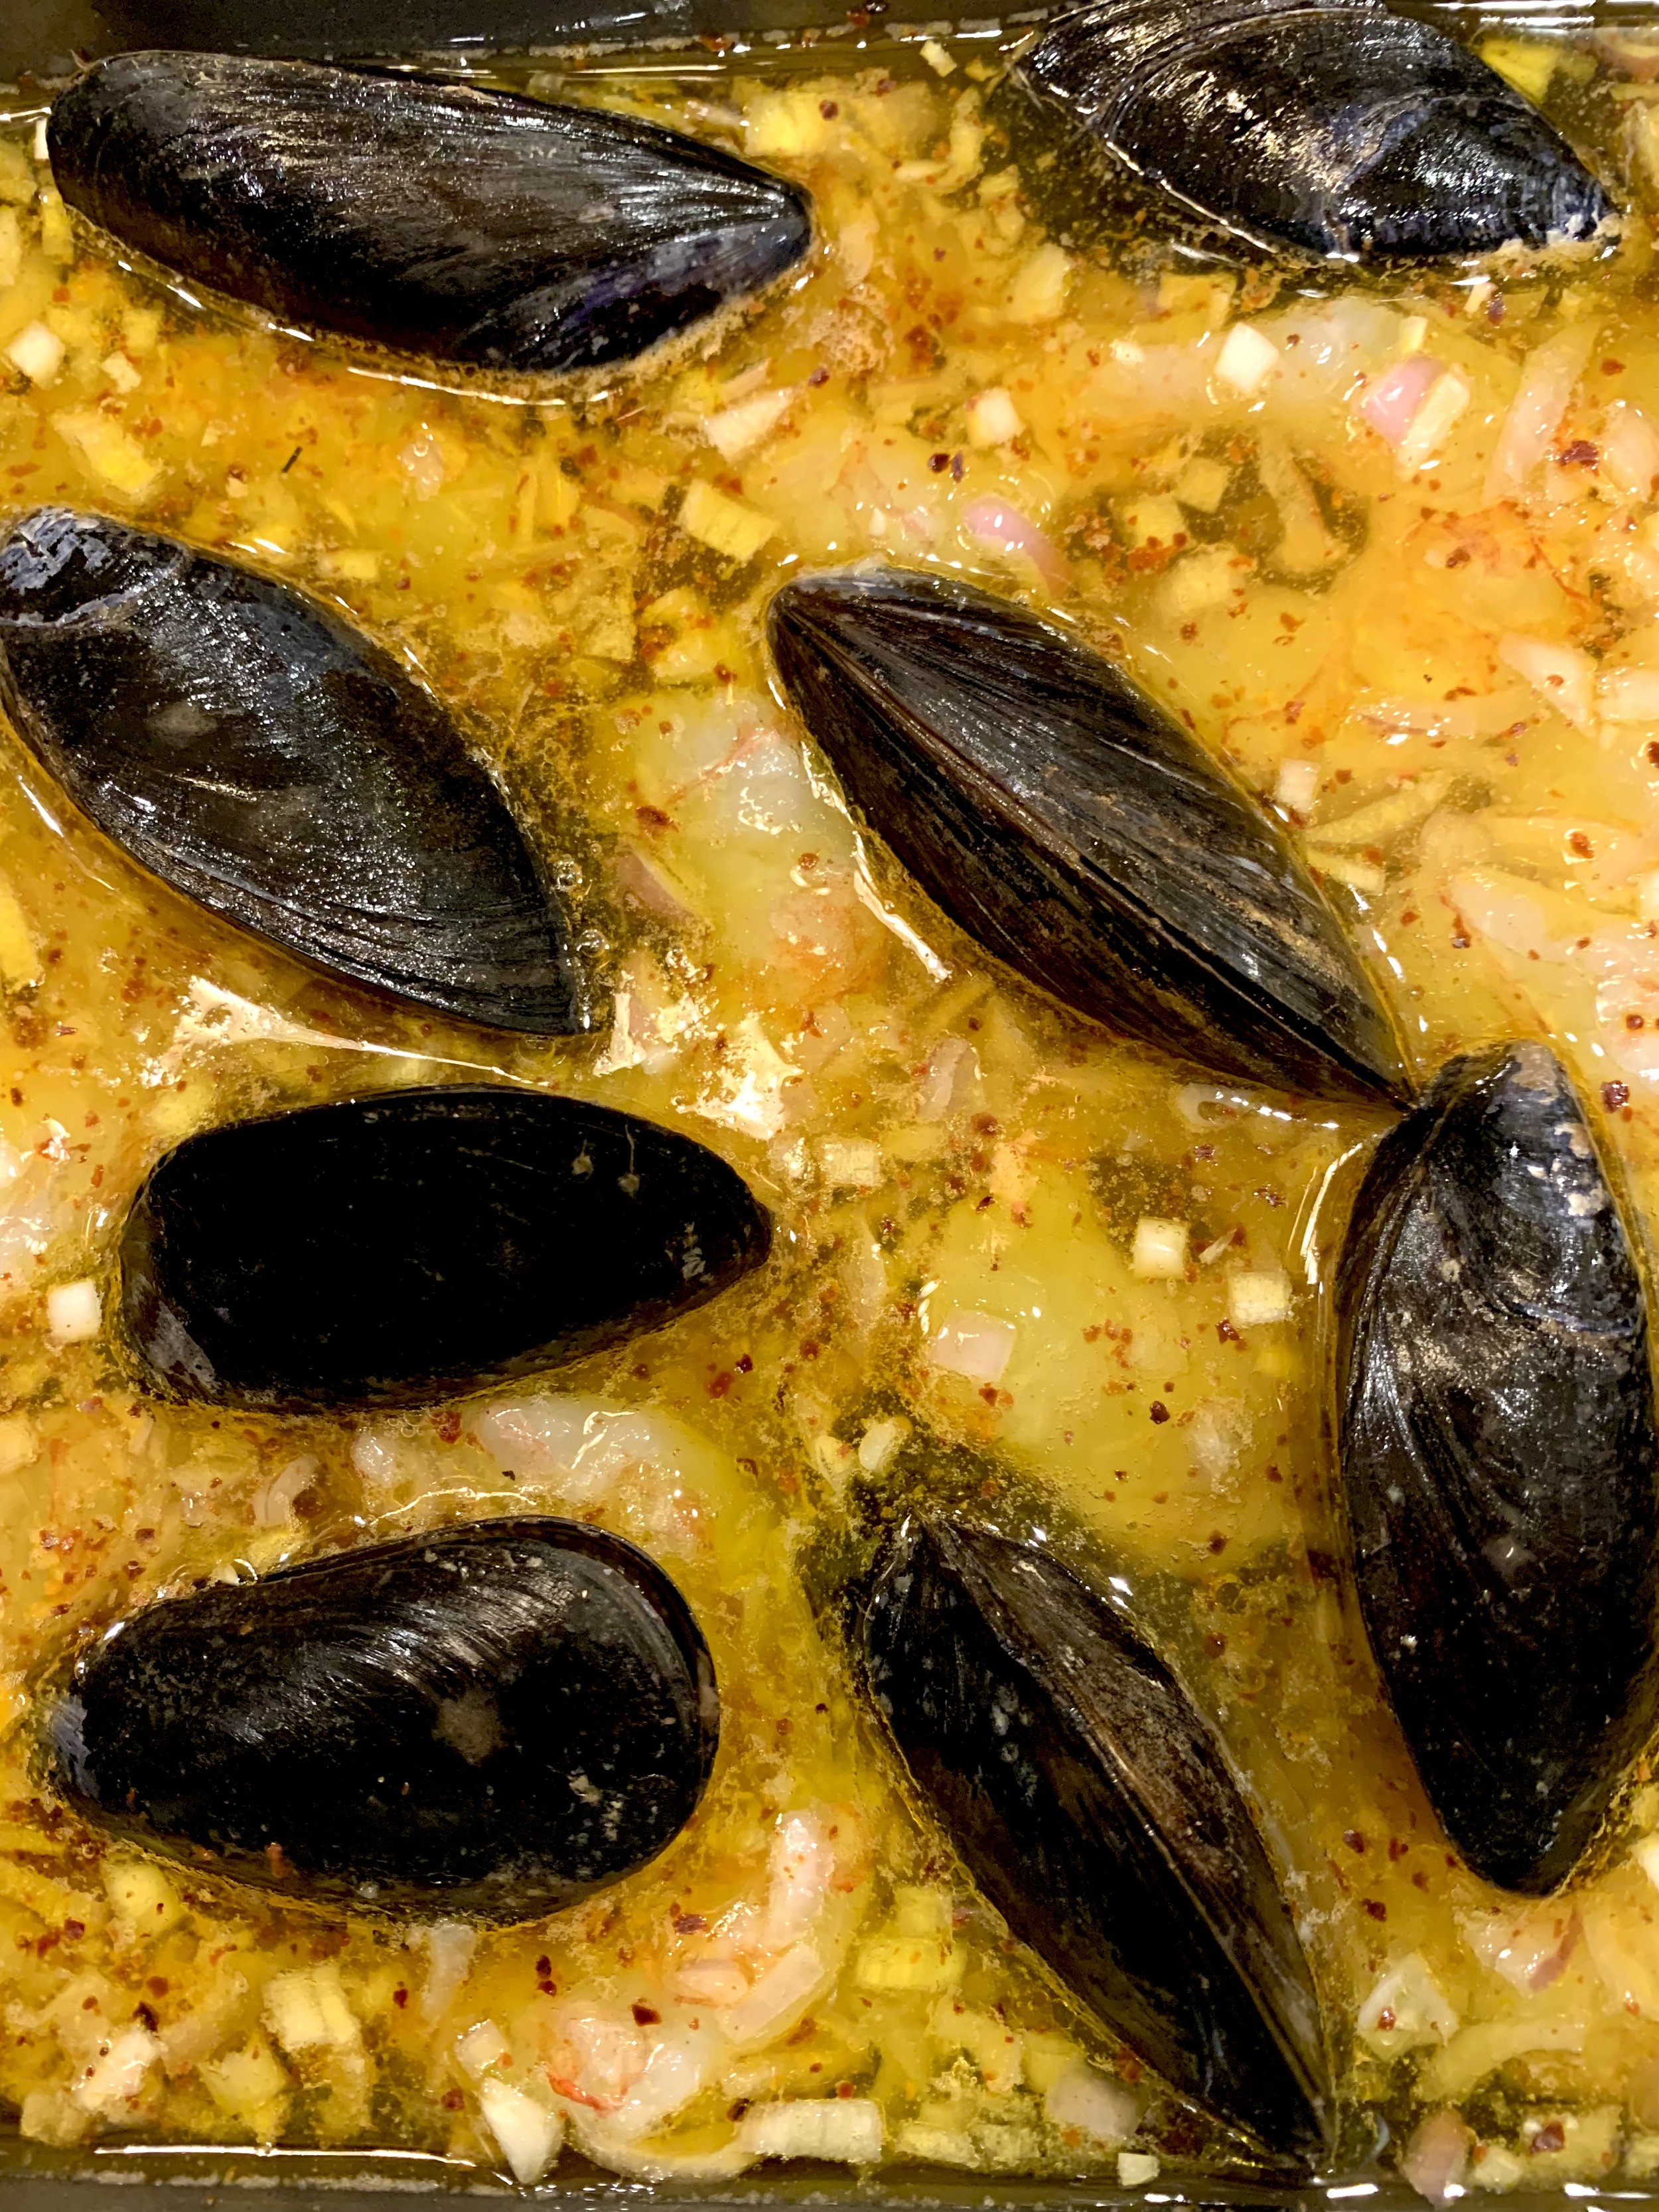
While the smoker is preheating, in a shallow roasting pan or a cake pan, add an entire minced shallot, a cup of dry white wine, half a cup of extra virgin olive oil, and two teaspoons of crushed red pepper flakes. Nestle your pound of mussels and pound of raw shrimp into the liquid.
Once the grill is preheated, place the pan of mussels and shrimp on the grate and close the lid. I didn’t cover the mussels with aluminum foil because I wanted the smoke to penetrate the meat. If you use a grill, cover the mussels with aluminum foil. Steam the mussels and shrimp for ten minutes.

While the mussels and shrimp are cooking, prepare the pasta. I used a truffle pasta. If you can’t find a truffle pasta, you could grate over some truffle or find a truffle oil to add to the dish. The truffle flavor pairs wonderfully with mussels because they also have a slight mushroom flavor.
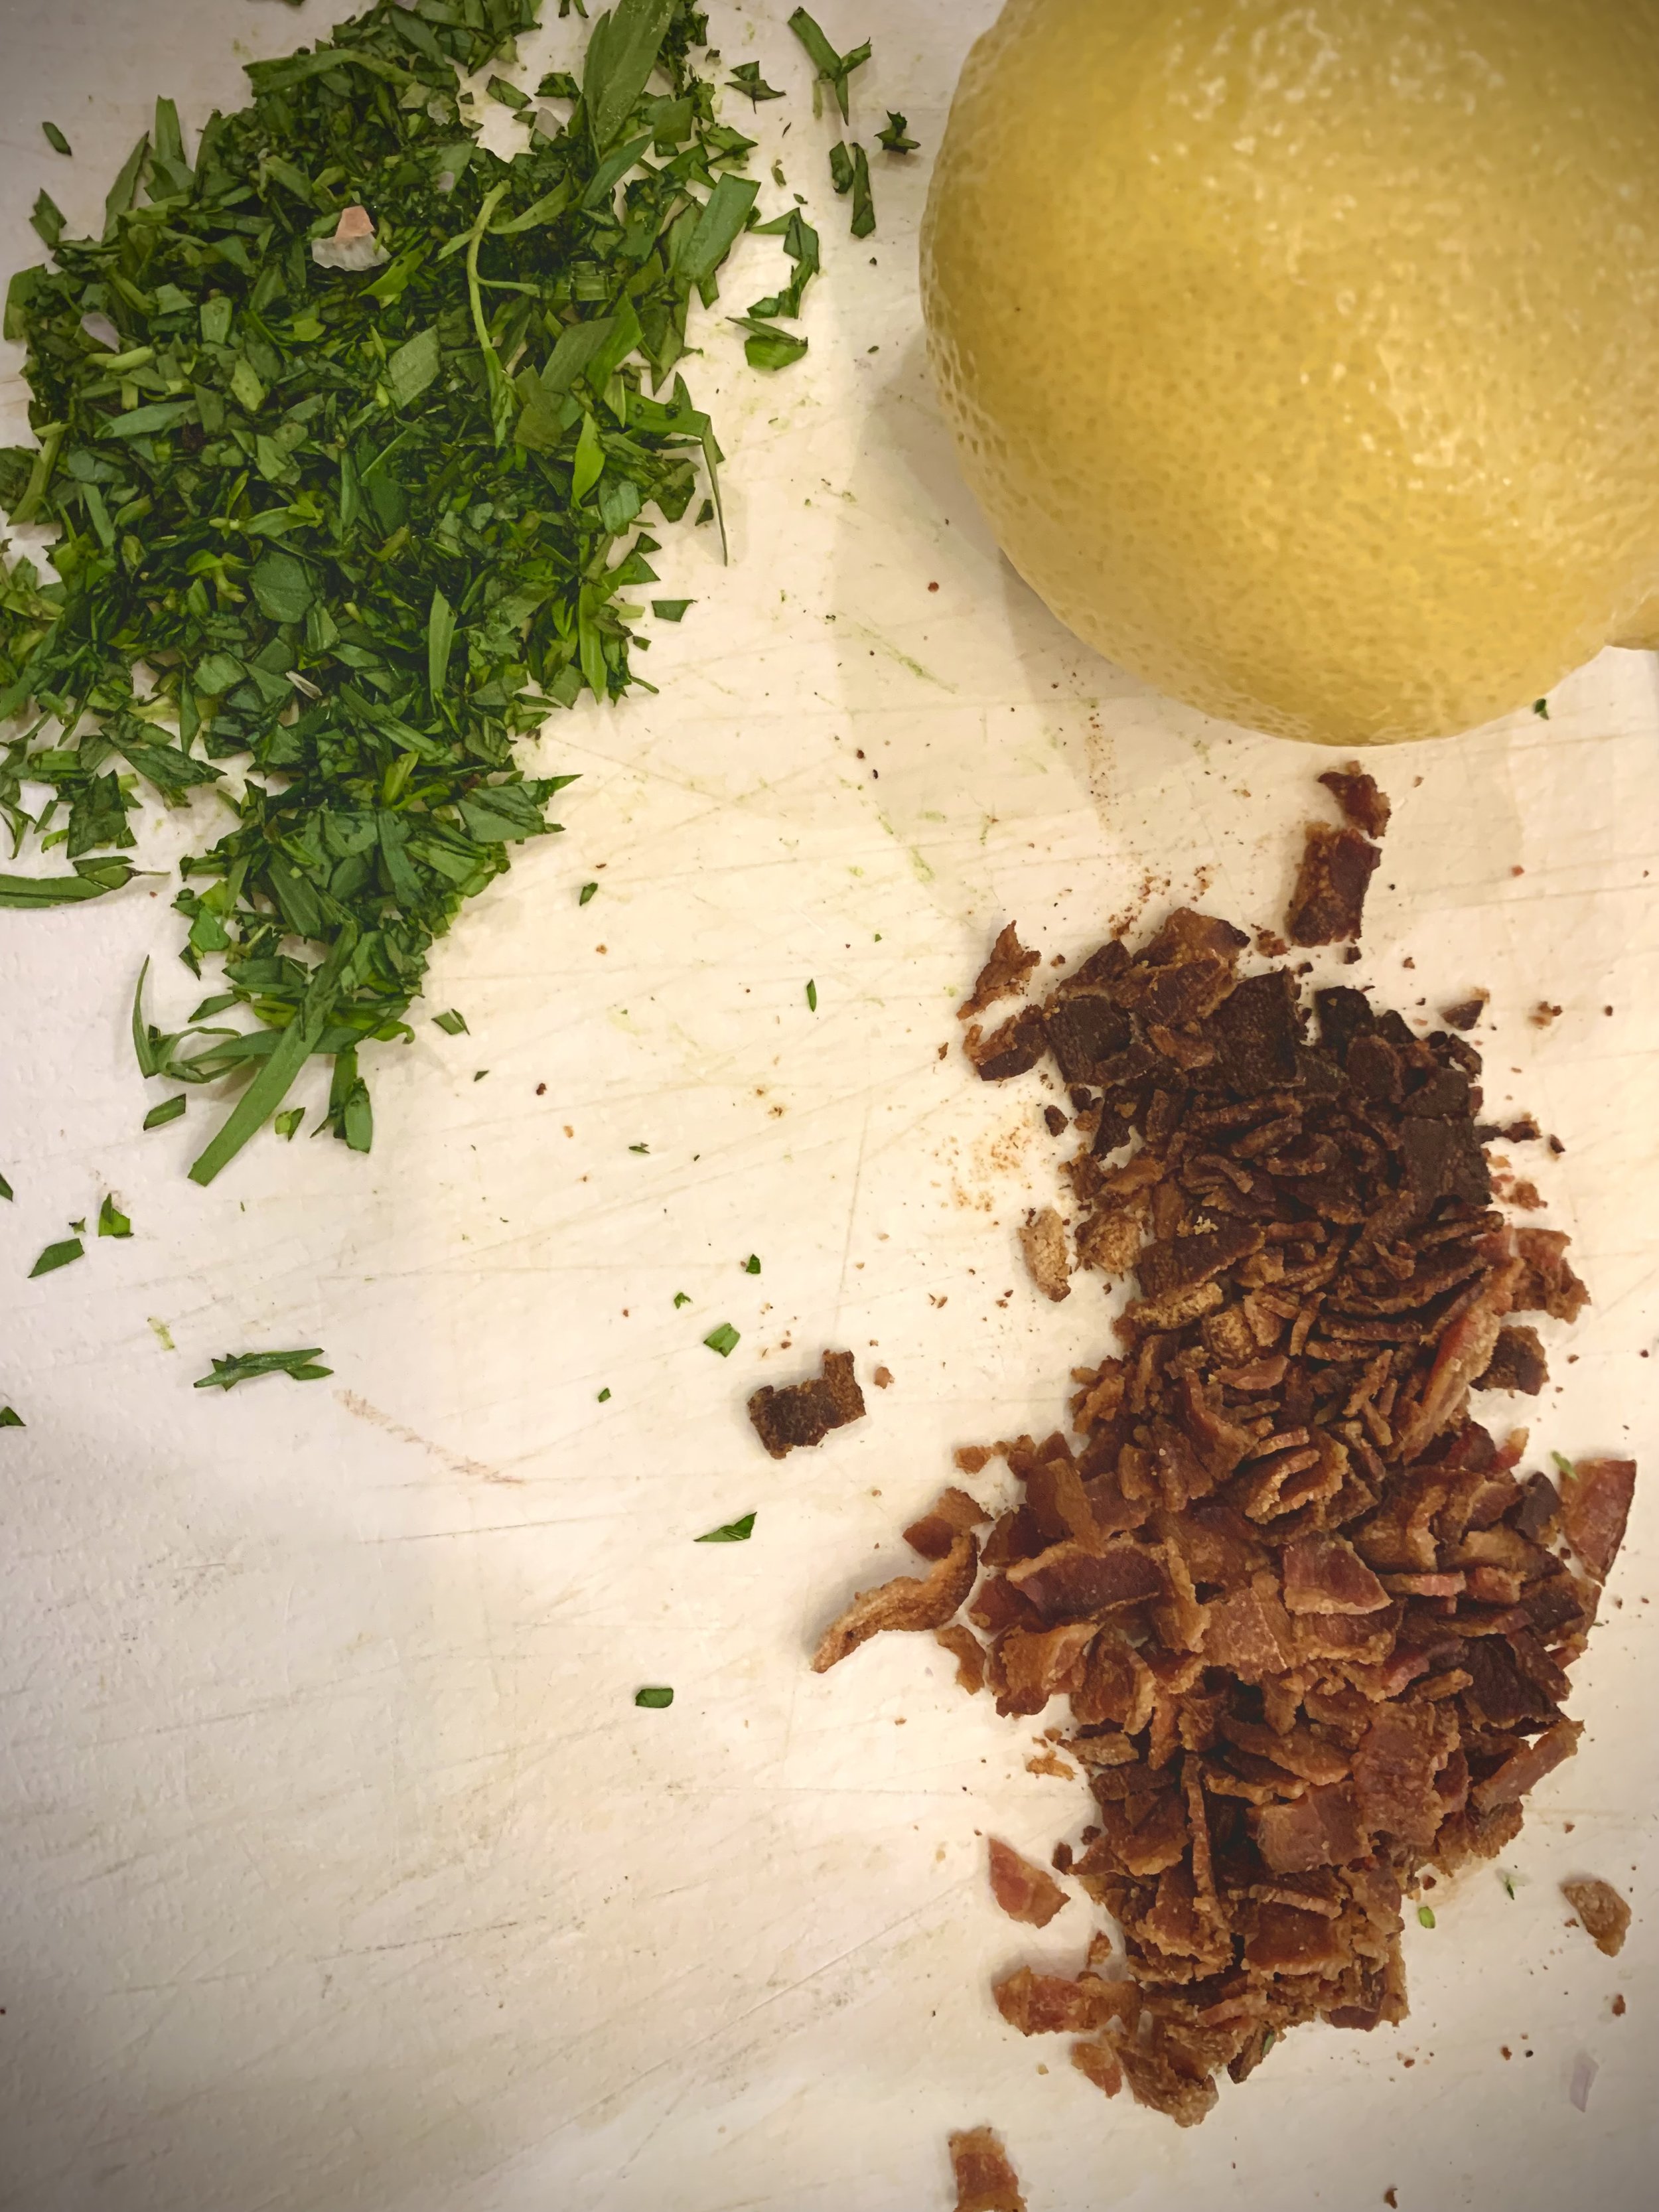
You also want to fry a up a few pieces of bacon for your finished product. When cooking several pieces of bacon, like for this recipe, I like to just place the bacon on a cookie sheet lined with aluminum foil and bake at 400 degrees Fahrenheit for 12 to 15 minutes, or until the bacon is crispy.
At ten minutes, check the mussels and shrimp. You will know the mussels are done when they are all opened. The shrimp should also be a vibrant pink color. If most of your mussels are open, pull them from the grill and discard any mussels that are still closed. If the majority are not open, close the lid on the grill and let them cook for five minutes more.
Once the mussels are ready to go, head inside to finish up the dish. Be sure to not discard your mussel cooking liquid because this is the pasta sauce. Place the al dente truffle pasta in a large bowl and drizzle the mussel cooking liquid over the warm pasta. Sprinkle on the bacon bites, two tablespoons of fresh minced tarragon, and the juice of one lemon. Toss everything together and then set the mussels and shrimp into the dish. And that’s it! Time to eat!

I love this dish because it is light, but the flavors are so well balanced. The sweet, slightly salty mussels are complimented by the mushroom flavor the truffle pasta, but also pair perfectly with the bacon pieces and fresh tarragon. The acidity from the lemon also pulls the entire dish together. Enjoy!
And Happy Fishing!
I just finished what is quickly becoming a yearly trip to Washington state. Last year, I visited the San Juan Islands and fished Haro Straight, located along the western border of San Juan Island. This time, I stayed with my sister who just purchased a house along the shorelines of south Puget Sound. And like my last excursion to the Pacific Northwest, the fishing did not disappoint.
Minds are like oysters. They spoil if you pry them open. ~Willa Gibbs
Being from the desert, Washington is like visiting a foreign country. There are monstrous trees towering over salty blue water. The weather can only be described as refreshing, and it is a much appreciated break from the arid 100 degree days of the southeastern Utah desert. Heading outdoors is an unfamiliar experience: all the animals and plants are basically strangers.
While at my sister's, we caught salt water fish, a far cry from the lake trout I am accustomed to. The first fish pulled onto the boat was a dogfish. The dogfish is definitely an inappropriately named creature, as it is actually a shark. This "fish" definitely has the teeth of a shark, so it is not a hard animal to identify. But like I said, pulling that onto the boat was a very different experience from reeling in a rainbow trout.

As with visiting any foreign place, not only were the animals and plants different, but the food was also a completely different experience. I don't often get to experience seafood, much less fresh seafood. Sure, I have had my share of shrimp, most of which are farm raised. Our super market also carries a variety of fish, such as salmon, tilapia, and cod. As with the salmon, most of these are farm raised and have been frozen for a significant amount of time. I still partake if a sale is happening, but not often. And those frozen, farm-raised fish can not compare to the fresh, catch of the day fish I experienced while visiting Washington.
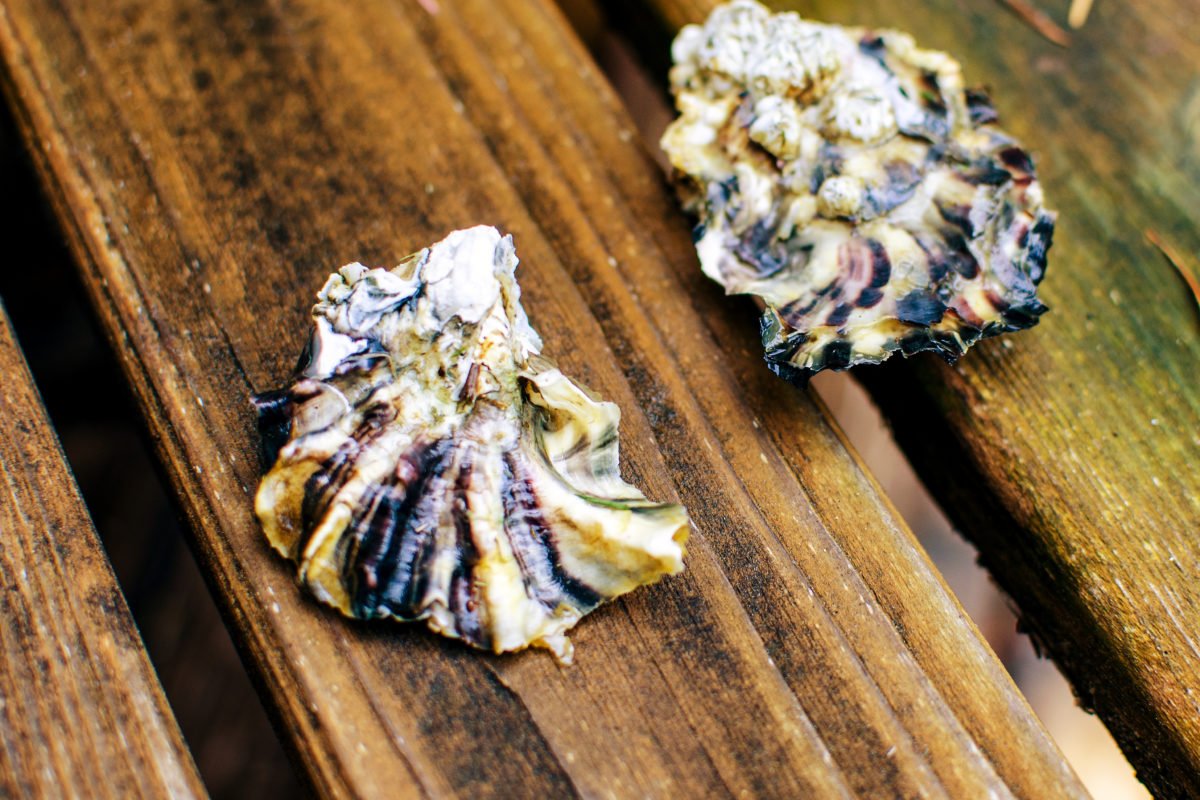
One of the more unique dishes I tried was the Kumamoto oyster. The Kumamoto oyster originated in Japan, but somehow my sister has them growing right in bay in her backyard. When the tide was low, we ventured out into the muddy bottoms and dug clams and oysters. Kumamotos, known for their surprising sweet flavor and beautifully sculpted shells, are one of the most popular oysters for eating. I have tried oysters in restaurants before, and I was very hesitant to give them another chance. I would best describe them as, well, for lack of a better word, snot. I was not a fan of the taste, texture, or even sight of the oysters from my past dining experiences.
As I am the first to admit I am not a fan of oysters, I will also be the first to admit that I have misjudged the Kumamoto based on my prior experiences. I have stereotyped all oysters to be disgusting and that was not fair of me. Kumamoto oysters are simply fantastic.
Before shucking the oysters, allow them to sit covered in salt water. You can do fresh water, but you should not soak the oyster for more than 20 minutes since the fresh water will kill them. I know that sounds counter-intuitive, as you are going to be eating the oyster so why do you care if it dies, right? In order to preserve the flavor of the oyster and to keep them from drying out, you don't want them to be dead before consuming them. So, back to cleaning the oysters! Cover them with salt water and allow to soak. I let mine soak for a couple of hours. During this time, the oysters will filter water through their bivalve system. This filtration process is how the oyster eats. He pulls in lots of sand and filters out microorganisms for dining on. This process is also why oysters and clams are very sandy. Nothing is worse than biting down on a gritty, sandy oyster! By placing the oyster in a bucket of water, the creature will filter like it normally does but without the ocean bottom to take in, it will eventually filter all of the sand out. It works amazing and is a step worth taking when preparing clams and oysters.
Since this was my first time preparing fresh caught oysters, I had to learn how to shuck them properly. It isn't too difficult, but practice definitely makes it easier, so does a shucking knife. Having only shucked two oysters at this point in time, I think this link provides a better tutorial on how to get your oyster on the half shell for eating: How to Shuck an Oyster!
While the Kumamoto is a fantastic tasting oyster, this slightly spicy sauce was what took the culinary experience from fantastic to phenomenal! In a small bowl, mix together a tablespoon of each of the following ingredients: sriracha, lime juice, minced garlic, minced shallot, rice wine vinegar, and soy sauce. This will dress a dozen or so oysters, but you can make as much or as little of the sauce as you need, just follow the simple rule of equal proportions for each ingredient.

This kumamoto oyster shooter sauce is simply sriracha, lime juice, minced garlic, minced shallot, rice wine vinegar, and soy sauce.
Drizzle the sauce over the oysters on their half shell, add a few thin slices of green onion, and slurp that baby down! The combination of the slightly spicy vinegar sauce and the sweet piece of oyster is perfection. They texture of the kumamoto is tender, but not chewy. The sauce creates this beautiful balance of spicy and sweet, but there is also a salty element created by the ocean water in the oyster. It is one delicious bite. And I followed it with just a few more!

Happy Hunting! (And Oyster Harvesting)

Anyway, every so often I will be sitting here in the middle of the Utah desert and think about those poke nachos. The craving is strong, and the struggle is real! Poke nachos in the Utah desert doesn’t sound so appetizing. The ocean is hundreds of miles away. Raw ocean fish isn’t really a thing.
This last time the craving hit, I decided to do something about it. And that is where the journey of the salmon nachos begins. I might not have access to fresh, raw tuna pulled straight from the Pacific Ocean but I do have a smoker and a large, beautiful filet of Oregon caught silver salmon.
I think I could eat smoked salmon every day for a week and not be sick of it, especially if what’s coming off the smoker is anything like this Smoked Salmon with Blueberry and Garlic Cheese Sauce. Salmon is a hearty, put meat on your ribs, kind of fish, but also has a delicate buttery flavor. It has this subtle sweetness to it that is not found in other fish.
Manila clams are actually an imposter to the Washington ocean ecosystem. They are native to Japan and were accidentally introduced to the salty seas of the Washington coast line in oyster shipments. They can be found all along the Pacific coast line of the United States, and are actually a welcome addition to the waters because they are delicious! The clams are identified by their oval shaped shells with heavy ridge lines running the horizontal length of the shell.


