

"My favorite animal to hunt is probably elk. There's nothing like the sound of a bugling bull splitting the cold air at first light. And that smell is unmistakable. Once you experience their musk in the wild there's no going back! A close second would be a varmint hunt." - Chris Pratt
If I could only have one meal for the rest of my life, this meal would be it. That is a very bold statement, but horseradish and elk are that good together. Like the deer for the gorgonzola topped tenderloin recipe I posted back in February, I did not harvest this elk. My husband did. I am getting sick of sharing his stories, and not my own. However, he ended up with the elk tag, and I, once again, did not. BUT I helped a lot.
I scouted and hiked with him for this bull, and I helped clean it after he shot it. That was my first cleaning experience, and it was very educational to say they least. I have a new respect for dad and the amount of work he put in during his elk hunts when I was little. It is easy to sit down to the table and gobble down elk steak and eggs with little appreciation for the amount of effort, sweat, and hard work someone puts in to harvesting such a large and intelligent animal.
Before you start preparing the meat for the meal, you need put together your horseradish crusts. The crusts need about thirty minutes in the fridge, so you want to make them at the beginning. The players for this crust are horseradish, fresh or prepared, grated parmesan cheese, panko bread crumbs, and an entire stick of unsalted butter. You can also use salted butter, but I use the unsalted because then you can control the amount of salt that you add to the mixture. In a medium size bowl, drop in all the ingredients. If you are using the fresh horseradish, you will need to grate it before adding.
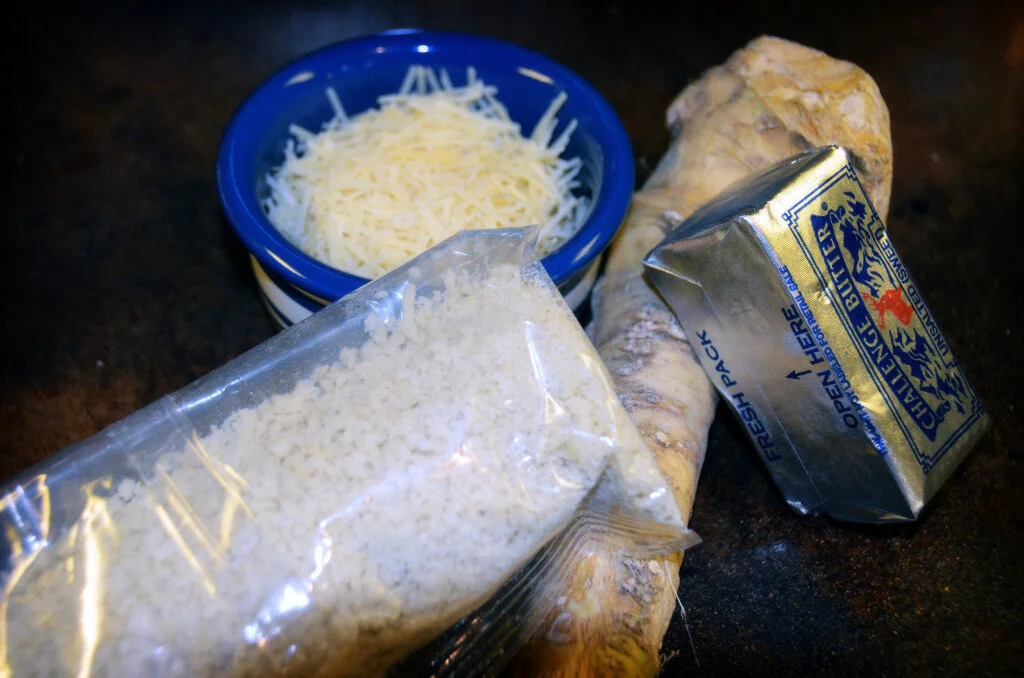
I would start with a cup of the panko bread crumbs and then you can add more if you think you want more crunch once you have mixed everything together. I use about a cup of the parmesan cheese, a cup of the bread crumbs, and a couple of tablespoons of the horseradish. Like with the bread crumbs, I would start with a smaller amount, like two tablespoons, and then add more if you want more heat. I am a big fan of the heat from horseradish, so I end up with about three and half tablespoons in this mixture. It is much easier to mix up the crust ingredients if you let the butter sit at room temperature before you start, but I always forget to do that. I wouldn't recommend microwaving the butter in this case because you don't want your butter melted, just soft. You can use a spoon to mix all this together, which is what most people would probably say, but let's be honest here: mixing butter with a spoon never works and you just end up crushing your panko bread crumbs into dust. Use your hands! It is much easier.
Once you have the amount of panko, horseradish, and salt you want, it is time to start forming the crust patties. Line a cookie sheet with a piece of wax or parchment paper and make some room in your fridge where the sheet can sit flat.

I make my crust patties about a quarter inch thick and the diameter of the steak you are going to use. Stick the patties in the fridge for about thirty minutes so they can set, and now it is time to get started on preparing the steaks! Usually when I prepare elk steak, I cut the tenderloin or back strap in thin, butterflied steaks. I do this for two reasons: first, it is a force of habit because that is how my dad cooked his elk the entire time I was growing up. Second, you get a WHOLE lot more meals from the limited amount of meat. While I still do a lot of meals with the thinner cuts, I decided to try something new with this bull, which was to cut the tenderloin into much thicker steaks, and it made for some amazing steaks.
For this recipe, I cut the tenderloin steaks about two or two and a half inches thick. Another way to quickly measure is cut the meat the thickness of a slice of bacon, since that is what you are going to wrap the meat in. You could use either tenderloin or back strap for this recipe. I think this would also be great with deer.

After I cut the steaks, I wrap them with a slice of bacon, using two toothpicks to hold the bacon in place, and season them with a little salt and pepper. I let the meat sit out for about fifteen minutes, however thirty is the recommended amount of time to take the chill off them. Taking the chill off helps the meat to cook more thoroughly than when you just throw a piece of cold meat into a hot pan.

While the meat is coming to room temperature, I make the sauce. I LOVE this sauce, and would probably dunk any steak in it, but it is especially great with this recipe because it just adds to the heat of the horseradish in the panko crust. The ingredients for the sauce are very simple: sour cream, mayonnaise, and prepared wasabi horseradish. I put equal portions of sour cream and mayonnaise, which for two people is about half a cup of each, into the bowl and then add the wasabi horseradish to taste. Like the crust, I like it HOT! In this case it works out to about a tablespoon plus a little extra. A good starting point would be two teaspoons and add more from there. If you can't find the wasabi horseradish, you could also substitute prepared horseradish, plain wasabi, a wasabi sauce, or even the hot oriental mustard. Anything with a little heat will work, but if you can find the wasabi horseradish I would recommend giving it a try. It is delicious.

With the sauce ready and crusts chilling in the fridge, there is only one thing left to do: start cooking those steaks! Okay, so the process for cooking these steaks is a little different from what I am used to, but it works really well. For this, you need a stovetop pan that you can also put into the oven. For the most part, you are going to be safe if your pan has a metal handle. You might need to check if your pan can do both the stove top and the oven, because you don't want to ruin your pan. To get started, heat your broiler on high. Also, preheat your pan on the stove top on medium-high. Once you can feel the heat coming off the pan you are ready to start cooking some steak. So, I actually get out a timer for this, and it has resulted in perfectly cooked meat for me. If you don't have a timer you could guess on the times, but a timer really does help. So, to start you want to cook the bacon along the outside of the steaks. I rotate the steak FOUR times in order to cook the bacon. I cook each rotation for 30 seconds. Since the steaks are a bit thicker, you can get them to balance on their side during cooking. I use tongs when I do this, because there is a lot of hot grease bouncing around from the bacon. Once you have cooked all the bacon, you can start to sear the steak itself. I do the first side for three minutes, and then flip it and do the second side for another three minutes. Remember, once the steak has touched the pan do not mess with it until you are ready to flip it. You don't want to tear your meat. Three minutes per side will give you a medium rare finish on this thick of a steak. Elk tastes MUCH better if you don't over cook it. A well-done elk steak will be tough and it really exacerbates the "gamey" flavor of the meat. If you want your steak cooked more, you can increase the time to four or even five minutes per side. If you like things a little more on the rare side, drop the cooking time to two minutes per side. After you have seared both sides of the steak, drop your horseradish crusts on top of the steak and stick the entire pan in the oven under the broiler.

You are only trying to brown your horseradish crust and melt the butter and cheese in the crust, so you don't want to walk away during this part of the process. Things can change VERY quickly under the broiler. I find that it takes about a minute and half in my oven for the crusts to start looking a beautiful, and very delicious, golden brown. This is with the pan on the middle rack of the oven. I would expect this to last anywhere from thirty seconds to two minutes, depending on your oven's personal temperament. Keep on eye on things is the best advice. Once the crust is bubbly and perfect, pull your pan and it is time to start plating! I served the steak with a side of asparagus I grilled on the stove with olive oil, a little garlic, and some salt and pepper. I dropped a bit of parmesan cheese over the top at the end. I also poured a glass of cabernet sauvignon, which pairs really wonderfully with a dark, red meat like elk. And don't forget to get yourself a serving of that sauce for dipping your meat in! Seriously, like I said before, if there was only one meal I could have for the rest of my life this would be it!
Recipe
Steaks
*tenderloin or back strap cut into two inch thick steaks (one per person)
*bacon (one slice per steak)
*salt and pepper to taste
Horseradish Crust
*one stick unsalted butter
*two tablespoons horseradish, prepared or fresh
*3/4 cup parmesan cheese, grated *one cup panko bread crumbs
*salt to taste
Horseradish Sauce*
*half cup sour cream
*half cup mayonnaise
*tablespoon wasabi horseradish
Begin by preparing horseradish crusts. Combine softened butter, horseradish, parmesan cheese, panko bread crumbs, and salt. Form into 1/4 inch disks and refrigerate for thirty minutes. Prepare steaks by seasoning with salt and pepper and wrapping in bacon. Let rest at room temperature for up to thirty minutes. Prepare the dipping sauce by combining sour cream, mayonnaise, and wasabi horseradish. Preheat broiler on high and a pan on the stove top on medium high heat. Once pan is preheated, place steak on side in order to cook bacon. Cook bacon for thirty seconds, and then rotate meat. Perform this three more times, for a total cook time of two minutes. Sear steak for three minutes and flip to second side for additional three minutes. Place chilled horseradish crust on top of steaks and place entire pan in oven broiler for up to two minutes, or until crust is bubbly and golden brown. Serve with horseradish dipping sauce.


