Serrano Margarita Oyster Shots

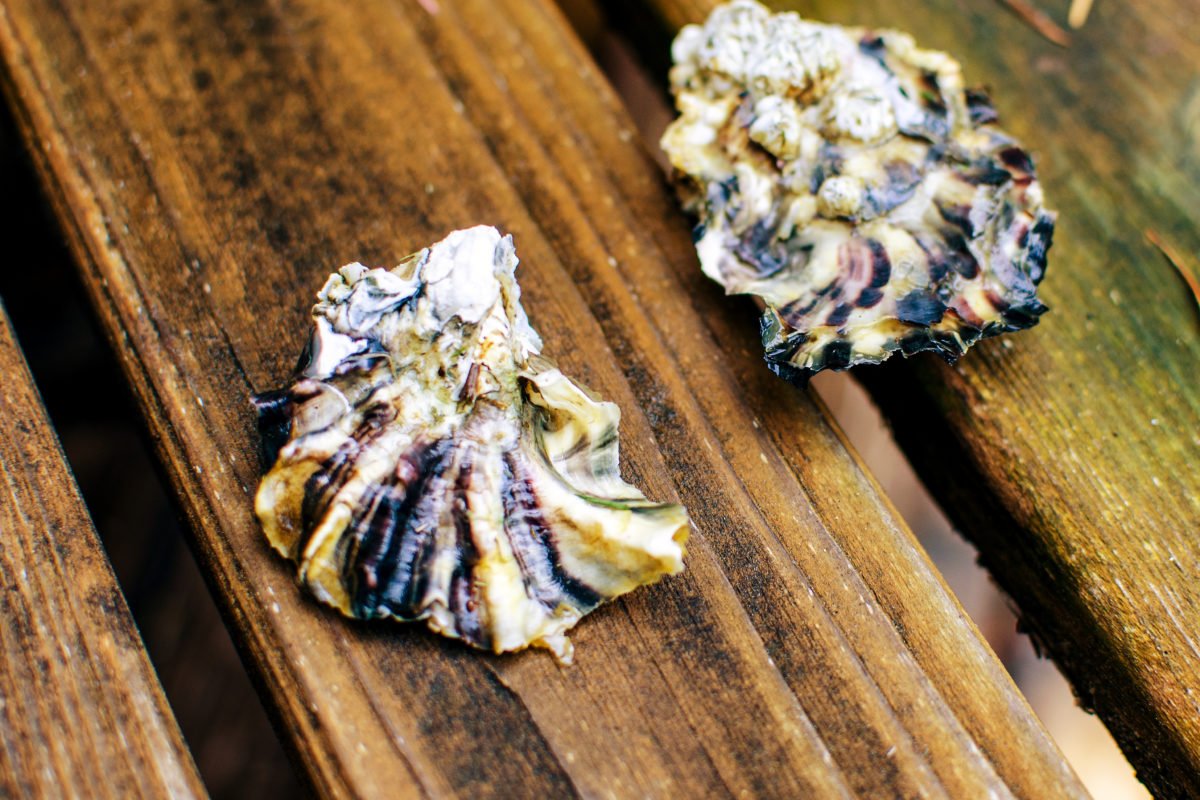
Oysters. They’re a lot. They’re not for everyone. But I think this recipe for a serrano margarita oyster shot definitely helps make oyster eating a little easier on everyone.

Not growing up near a coastline definitely made oysters seem like a completely foreign food item. The only time I saw oysters growing up was the oblong shaped cans of smoked oysters on the tuna shelf in the supermarket. I never ate them. Just saw them.

The first time I tried an oyster was at a Chinese buffet off the highway in Delaware. I definitely made it into a big deal. It was very dramatic. I needed the other restaurant patrons to hear how this was my very first oyster, and how skeptical I was about eating it. It was a lot like when young children try a food for the first time and need everyone to know the importance of the monumental occasion.

After filling my buffet plate with chilled crab pieces and shrimp cocktail, I took a single shucked oyster from its icy bed and placed it almost ceremoniously in the center of the plate. Back at the table, I picked the lone oyster from the plate, clinked it with a quick “cheers” with friends, and attempted to slurp it down.

In the movies, everyone always looks good eating an oyster. It’s almost equivalent to how people make smoking look cool in movies. They take a long, slow drag from their cigarette, roll the smoke around in their mouth, close their eyes in a small moment of bliss, and puff out beautiful smoke rings. Watch people smoke in real life and there is a lot of coughing and smoke kind of billows randomly about. Oyster eating is just like this.

In the movies, oysters are picked up delicately with the thumb and a single finger and then effortlessly, and more importantly cleanly, and quickly slurped, and mind you it is a soundless slurp, from their shell. They disappear quickly with a small swallow and then are followed by that closed eye small moment of bliss.

Real life oyster eating, especially the first time, is not at all like that. First, figuring out how to hold the oyster is a challenge. Every grip feels awkward. Do you clutch it? Do you palm it like a ball? Cradle it? And how do you keep your fingers out of the way of the meat?

After you get your grip, it’s time to slurp. It’s loud. And it’s actually a little embarrassing. Getting the meat out of the shell isn’t as easy as it looks. So you slurp harder and louder. All the liquid usually comes out first, and you choke on that a bit, and then the meat will break loose suddenly. It’s kind of like when you are trying to get the last bit of an icy drink from the bottom of a cup. You shake the cup a few times and eventually the entire block of ice breaks loose and unexpectedly falls all over your face.

My first oyster eating experience was very textbook. I couldn’t find my grip on the shell, and once I did the rest of was loud, a little embarrassing, and awkward. Things only got worse from there. Once I finally got the oyster out of the shell and started swallowing things went from bad to worse. The oyster hit the back of my throat and the texture was just all wrong.

All I could think about was how big, and gooey, and flat-out booger-esque the whole experience was. My mind kept thinking: “Just get it over with. Swallow faster.” Swallowing faster didn’t help. The foreign blob started working its way back up.

So the entire swallowing ordeal started all over. There was more gulping, a little bit of gasping, possibly some swearing. And it finally went down.

It took years for me to eat an oyster again. My second experience corrected all the mistakes I had made with my first oyster and I actually started to even like them a little bit. I learned you have to make sure the oyster meat is completely separated from the shell. Even the littlest section still attached makes that slurping part much more difficult. Second, the mignonette is everything. Don’t go dry oyster. Spice it up. You can make a single oyster into a complete and full flavor experience with the right mignonette. And it’s delicious! Finally, be brave and confident. Slurp like you’ve been slurping oysters all your life!

So, now that I feel like an accomplished oyster shooter, I am ready to share with you some of my favorite mignonettes. Today I am going to start with a serrano margarita themed oyster shot. This mignonette is spicy, tangy, and has a little kick from the tequila.

There isn’t really much to making the mignonette. In a small bowl, add about a tablespoon of finely minced shallot, a finely diced up serrano pepper, a shot of good tequila, a tablespoon of champagne vinegar, and ¾ cup of lime juice. Zest in some of the lime to get that pinch of freshness.

If you aren’t much for the heat, remove the seeds from the serrano before dicing it up. If you are someone who LOVES the heat, leave the seeds in.

I had to play around a bit with the ratio for the tequila and lime juice. So after adding my initial shot of tequila I drizzled in a bit more until it cut the tartness of the lime to a level of my liking.

This recipe makes a lot of mignonette. You could easily serve it on a dozen or even two dozen oysters. You should properly shuck the oysters and rest them on ice before serving. Here is a great video for properly shucking oysters: Oyster Shucking by America’s Test Kitchen.

Well, Happy Oyster Eating!

Deer Liver Whiskey Apple Pate

So, I did an offal thing. It was completely out of character for me. I made deer liver pate. Every year while people are cleaning their deer I comment how “someday” I am going to use the organs from a harvest and make…something.

JUMP TO RECIPE

“When the blood in your veins returns to the sea, and the earth in your bones returns to the ground, perhaps then you will remember that this land does not belong to you, it is you who belongs to this land.” ~ Native American quote

I have had deer heart once before. But it wasn’t mine. And I didn’t prepare it. It was surprisingly good. That is about all of the adventure I have embarked on when it comes to organ meat, but I have read a lot about keeping organs and the benefits of their consumption.

Traditionally, hunters never discarded the organs. Organs were harvested and prepared for their nutritional benefits. They are excellent sources of minerals and vitamins. But don’t take my word for it. Here’s an article with lots of information about the benefits of organs.

I heard this thing recently, and this could all be rumor but I am going to share it anyway, that James Blunt, you know the celebrity, went on an all meat diet and ended up developing scurvy, the “sailor’s disease.” Scurvy is incredibly rare, but one way to develop it is to become a carnivore.

Scurvy is basically when your body becomes depleted of Vitamin C and you develop a vast collection of issues such as weakness, fatigue, wounds that don’t heal up properly, and other stuff. It doesn’t sound fun. James Blunt cured his scurvy by consuming orange juice until he developed acid reflux.

So, the moral of the story seems to be that being a carnivore doesn’t work if you’re a human. Or does it? Historically, there are groups of humans who survived solely eating meat. The best example is the Arctic Native American tribes the Inuit. The arctic tundra is not a suitable landscape for growing crops, so the Inuit diet consisted of fish and the mammals they hunt, including seals, walruses, and whales.

Obviously they do not develop scurvy or the other illnesses associated with being a carnivore. How is this possible? While many things most likely factor into the equation, there are two habits the Inuit engage in that researchers believe keep them healthy and able to survive of a solely meat-based diet.

First, the Inuit eat most of their meat raw, both mammals and fish, and this is thought to sustain more of the vitamins and minerals contained within the meat. Second, they eat the organs.  If you want to know more about the Inuit and their all meat diet, this is a great book: My Life with the Eskimo.

So, in conclusion, I would like to send a message out to James Blunt. Next time you go full carnivore eat your organs!

Now that’s out of the way, let’s make this venison liver pate.

Pate was much easier to make than I initially thought. There are lots of different ways to make your liver concoction. You can vary which type of liver you use, what type of spices or vegetables you mix in, and even the fat you add at the end can be different. It’s basically a choose your own adventure with pate.

The key to a successful pate is to remove some of the rich “bloody” taste that liver is known for. Just to give you an idea if you haven’t tried liver, it has a strong iron taste.  It is very distinct and lies somewhere between metal and blood.  It is so distinct, you will always recognize it in a dish no matter how little is used.  If you asked me what iron tasted like, I don’t know that I could find the words to accurately describe it, but if you had me taste something that is rich in iron, like liver, I could immediately pick that flavor out. While you can’t fully remove this definable characteristic of liver, you can lighten it. You want a pate that is reminiscent of the liver flavor. Achieving this is quite easy. I soaked the liver overnight in a mixture of salt and water. I used four cups of water and two tablespoons of salt.

In the morning, the liver had a more muted color. I thoroughly washed the liver, removing any access blood from it, and then cleaned off any thing that didn’t look edible, such as arteries or connective tissues. Just make it pretty.

Heat up a large, heavy bottomed skillet or a dutch oven. I used a very large cast iron skillet for my pate. Cook up five or six slices of bacon until crispy. Pull the bacon and set aside, but reserve the fat in the pan to use for sautéing your vegetables.

To your hot bacon grease, add one diced onion, four diced carrots, and 4 diced celery stalks. Also add in one chopped apple. It isn’t important the size you dice up your vegetables to, since you will ultimately puree everything, but try to keep the size uniform so your vegetables will cook evenly.

Cook the vegetables for about five minutes and then add the chopped liver. Season with salt, pepper, and oregano. Cook until the liver is cooked through, about ten to fifteen more minutes.

Drizzle in the cup of whiskey at this point and let things reduce for five to ten minutes. The mixture should be thick and the wine along with the starches from the vegetables should create a creamy coating over everything.

Alright, it’s time to turn this pile of vegetables and liver into pate! Be careful with this next step, as things tend to be hot and steamy. Fill a food processor with the liver mixture. I had to add about half the mixture, blend until it broke down into a paste, and then add the second half. If you have a larger food processor you may be able to fit the entire pan in one large batch.

Don’t forget to add your bacon back into the pate mixture at this point. I just dropped the pieces in whole and let them blend down, much to the dismay of the dogs who were very certain the bacon was going to be theirs’.

Grind until things are smooth. Slowly drizzle in your cup of heavy cream. If you are looking for a dairy free option you can use a can of coconut cream and it works nicely too. The cream really changes the consistency of the entire dish. It creates a beautifully smooth, creamy texture that almost melts in your mouth.

Afterwards, put the pate in the fridge to cool for at least two hours. It tastes best cold. You can preserve it if you aren’t going to use it immediately, like say you are making it for your party tomorrow, by pouring melted butter over the top. This creates a nice seal on top.

Alright, let’s serve this pate up! This was my first time eating pate. It was actually my first time eating liver ever. I will admit, it took me a few bites to wrap my head around it. It is rich! It is earthy! It is…a lot.

One thing I learned is how you serve pate can change everything. Just pate on a little slice of bread isn’t my most favorite presentation. It just tasted like liver. Which isn’t a bad thing if you are a liver fan. My parents, having grown up on liver and onions, loved it just plain. I needed a little more bling for my pate.

So, to plate up your pate, first toast a thin slice of baguette. Add a little butter to your slice. Smother some pate on top. Finally, garnish with a pickled vegetable of your choice. The most popular is a cornichon pickle. My favorite was pickled red onion. Other options are pickled jalapenos, capers, cucumbers, pickled beets, or radish slices.  Another item that made it that much better was to add a drop of a mustard based hot sauce like my all-time favorite from the Caribbean island of Grenada.

I am curious, what do you like to top your pate with? And what is your favorite liver to use?

Anyway,

Happy Hunting! 

Kumamoto Oyster Shots

I just finished what is quickly becoming a yearly trip to Washington state. Last year, I visited the San Juan Islands and fished Haro Straight, located along the western border of San Juan Island. This time, I stayed with my sister who just purchased a house along the shorelines of south Puget Sound. And like my last excursion to the Pacific Northwest, the fishing did not disappoint.

Kumamoto Oysters

Minds are like oysters. They spoil if you pry them open. ~Willa Gibbs

Being from the desert, Washington is like visiting a foreign country. There are monstrous trees towering over salty blue water. The weather can only be described as refreshing, and it is a much appreciated break from the arid 100 degree days of the southeastern Utah desert. Heading outdoors is an unfamiliar experience: all the animals and plants are basically strangers.

While at my sister's, we caught salt water fish, a far cry from the lake trout I am accustomed to. The first fish pulled onto the boat was a dogfish. The dogfish is definitely an inappropriately named creature, as it is actually a shark. This "fish" definitely has the teeth of a shark, so it is not a hard animal to identify. But like I said, pulling that onto the boat was a very different experience from reeling in a rainbow trout.

Washington Ocean View

As with visiting any foreign place, not only were the animals and plants different, but the food was also a completely different experience. I don't often get to experience seafood, much less fresh seafood. Sure, I have had my share of shrimp, most of which are farm raised. Our super market also carries a variety of fish, such as salmon, tilapia, and cod. As with the salmon, most of these are farm raised and have been frozen for a significant amount of time. I still partake if a sale is happening, but not often. And those frozen, farm-raised fish can not compare to the fresh, catch of the day fish I experienced while visiting Washington.

One of the more unique dishes I tried was the Kumamoto oyster. The Kumamoto oyster originated in Japan, but somehow my sister has them growing right in bay in her backyard. When the tide was low, we ventured out into the muddy bottoms and dug clams and oysters. Kumamotos, known for their surprising sweet flavor and beautifully sculpted shells, are one of the most popular oysters for eating. I have tried oysters in restaurants before, and I was very hesitant to give them another chance. I would best describe them as, well, for lack of a better word, snot. I was not a fan of the taste, texture, or even sight of the oysters from my past dining experiences.

As I am the first to admit I am not a fan of oysters, I will also be the first to admit that I have misjudged the Kumamoto based on my prior experiences. I have stereotyped all oysters to be disgusting and that was not fair of me. Kumamoto oysters are simply fantastic.

Before shucking the oysters, allow them to sit covered in salt water. You can do fresh water, but you should not soak the oyster for more than 20 minutes since the fresh water will kill them. I know that sounds counter-intuitive, as you are going to be eating the oyster so why do you care if it dies, right? In order to preserve the flavor of the oyster and to keep them from drying out, you don't want them to be dead before consuming them. So, back to cleaning the oysters! Cover them with salt water and allow to soak. I let mine soak for a couple of hours. During this time, the oysters will filter water through their bivalve system. This filtration process is how the oyster eats. He pulls in lots of sand and filters out microorganisms for dining on. This process is also why oysters and clams are very sandy. Nothing is worse than biting down on a gritty, sandy oyster!  By placing the oyster in a bucket of water, the creature will filter like it normally does but without the ocean bottom to take in, it will eventually filter all of the sand out. It works amazing and is a step worth taking when preparing clams and oysters.

Since this was my first time preparing fresh caught oysters, I had to learn how to shuck them properly. It isn't too difficult, but practice definitely makes it easier, so does a shucking knife. Having only shucked two oysters at this point in time, I think this link provides a better tutorial on how to get your oyster on the half shell for eating: How to Shuck an Oyster!

While the Kumamoto is a fantastic tasting oyster, this slightly spicy sauce was what took the culinary experience from fantastic to phenomenal! In a small bowl, mix together a tablespoon of each of the following ingredients: sriracha, lime juice, minced garlic, minced shallot, rice wine vinegar, and soy sauce. This will dress a dozen or so oysters, but you can make as much or as little of the sauce as you need, just follow the simple rule of equal proportions for each ingredient.

Kumamoto Oyster Sauce

This kumamoto oyster shooter sauce is simply sriracha, lime juice, minced garlic, minced shallot, rice wine vinegar, and soy sauce.

Drizzle the sauce over the oysters on their half shell, add a few thin slices of green onion, and slurp that baby down! The combination of the slightly spicy vinegar sauce and the sweet piece of oyster is perfection. They texture of the kumamoto is tender, but not chewy. The sauce creates this beautiful balance of spicy and sweet, but there is also a salty element created by the ocean water in the oyster. It is one delicious bite. And I followed it with just a few more!

Happy Hunting! (And Oyster Harvesting)

Yield: 12
Author:
Kumamoto Oyster Shooters

Kumamoto Oyster Shooters

Plucked directly from the sea, these kumamoto oyster shooters are spicy with a kick of lime and garlic.

Ingredients

  • 12 shucked kumamoto oysters
  • 1 Tablespoon sriracha
  • 1 Tablespoon lime juice
  • 1 Tablespoon minced garlic
  • 1 Tablespoon minced shallot
  • 1 Tablespoon rice wine vinegar
  • 1 Tablespoon soy sauce

Instructions

  1. Once oysters are shucked and cleaned, leave on shell for drizzling sauce over.
  2. In a small bowl mix together the sriracha, lime juice, garlic, shallot, rice wine vinegar, and soy sauce.
  3. Taste for desired heat level. If more heat is desired slowly add more sriracha.
  4. Drizzle sauce over oysters and enjoy!

Elk Tenderloin with Chimichurri

Elk Tenderloin with Chimichurri

Fresh and tangy chimichurri sauce is generously poured over salt and peppered elk tenderloin. A simple recipe that is quick and easy but tastes complex! A wonderful dish for introducing friends and family to wild game dishes.

Coca-Cola Serrano Elk Jerky

Coca-Cola Serrano Elk Jerky

Spicy and sweet homemade smoked jerky! Enjoy this easy recipe for smoking your own elk jerky with Coca-Cola, Serrano peppers, and Worcestershire sauce. It’s the perfect snack.

Elk Country Fried Steak

Elk Country Fried Steak

Serve up this hearty and rustic elk country fried steak breakfast for your friends and family. Crispy and crunchy elk steaks are fried to perfection and drowned in homemade gravy. Serve with fried potatoes and eggs! Hope you're hungry!

Wild Turkey Birria Tacos

Wild Turkey Birria Tacos

Birria tacos were born in Jalisco, Mexico around the 16th century. Spanish and Mexican cultures were intertwined heavily at this time and many new spices, animals, and cooking techniques were introduced. Goats were one of the new animals introduced to the Mexican landscape, but few people were interested in domesticating this animal and wild populations roamed around ruining crops and, frankly, were just a nuisance.

Salmon Nachos

Salmon Nachos

Anyway, every so often I will be sitting here in the middle of the Utah desert and think about those poke nachos. The craving is strong, and the struggle is real! Poke nachos in the Utah desert doesn’t sound so appetizing. The ocean is hundreds of miles away. Raw ocean fish isn’t really a thing.

This last time the craving hit, I decided to do something about it. And that is where the journey of the salmon nachos begins. I might not have access to fresh, raw tuna pulled straight from the Pacific Ocean but I do have a smoker and a large, beautiful filet of Oregon caught silver salmon.

Bomb Bear Burrito

For the past few weeks I have been thinking over and over in my head how to best describe bear meat. I have made a couple recipes with the intention of sharing with family and friends as an introduction to bear meat, and have felt their palpable resistance to giving it a try. Offer up a slice of deer or elk steak, people will most likely grab it from the plate with little hesitation. Share a new pronghorn recipe with a wild game greenhorn, and the pause is brief before they bite in. Say you’re latest recipe has bear meat, and you’re likely to hear crickets.  

JUMP TO RECIPE

BearBurritoFinal.jpg

Once people’s initial shock has passed, the first question is usually: “Well, what does it taste like?” And that is a hard question to answer.

My gut reaction to the question is to simple say: “Pork.” And as soon as the word leaves my mouth it feels incorrect. So I go into correction mode.

“Well, it kind of tastes like pork. But the texture is nothing like pork. And actually it doesn’t taste like pork.”

So, that answers no one’s questions and we are back to square one. What does bear meat taste like?

Some of it depends on the region and time of year the bear is harvested in. The diet of a bear varies not only by the season, but also the terrain. At certain times of the year, bears’ diets can be up to 90% vegetation based from shrubs, brush, grasses, to berries, roots, and bulbs. They also fancy insects, fish, and other meats. So, needless to say, what they are eating is highly varied and this can affect the way the meat tastes.

The other factor affecting the meat’s taste and texture is the fat content of the animal. Bears in general are a fatty animal, and their meat is often described as greasy or oily.  A spring bear emerging from winter’s hibernation is obviously much leaner than a fall bear ready for the big nap, so the season a bear is harvested can also affect the taste and texture of the bear.

With those factors set aside, the most basic way to describe the taste of bear meat is it tastes like bear meat. It’s a unique experience. It slightly similar to domesticated beef in texture, but the meat grains are longer and a bit coarser.

Bear meat has a relatively mild flavor but also a touch of sweetness you won’t find in any other meat. It is a darker meat than beef or even deer or elk, but doesn’t have the slight iron taste you experience with dark red meats like from duck or geese.

Starting to sound like a meat you would like to experience? Here is a recipe for a Bomb Bear Burrito that is the perfect introduction to bear meat.

Preparing the Bear Meat

While there are many cooking methods available for wild game that conclude with delicious results, my favorite method for bear is low and slow. Slow cooking bear meat allows the flavors to really meld together but also results in a delightfully tender texture.

BearBurritoSeasoning.jpg
BearBurritoMeat.jpg

For this Bomb Bear Burrito, I rubbed the bear with a very simple spice blend: cumin, coriander, chili powder, cayenne, oregano, salt, garlic powder, and onion powder. I used a tablespoon of each and rubbed it on both sides of my chucks of bear. From we head to the crock pot.

Place the seasoned bear chunks in the crock pot and pour over about two cups of vegetable stock. You could also use chicken or beef stock if that is what you have on hand. Water would also work, things just might be a little less flavorful.  Cover the pot, set it to low, and let the crock pot work its magic for seven hours.

BearBurritoCrockpot.jpg

During the seven hour wait for my crock pot bear meat, I usually do things like go to work, clean the bathroom, go grocery shopping, work in the yard, eat snacks (but not so many snacks I get to full for dinner), and watch Netflix marathons of long forgotten TV series from my childhood. Basically, the nice thing about the crock pot is it frees you up for the other important things going on in your life.

Fast forward to seven hours in the future and the bear meat should be tender, juicy, and flavor soaked. Pull the meat from the crock pot and place on a cutting board. Remove the liquid from the crock pot. Shred the bear meat into bite size pieces and return to the crock pot.

The Guava Barbeque Sauce

BearBurritoPaste.jpg

This sweet and tangy barbeque sauce is the perfect pairing for bear meat. Like bear meat, it has this subtle sweetness to it that you can taste but it doesn’t overwhelm the entire profile of the dish. It is also extremely easy to pull together and would be great over pork or shredded beef as well in other eating situations.

To start, in a medium sauce pan over medium heat add a cup of diced up guava paste. To the paste, pour over a 1/3 cup of apple cider vinegar and a quarter cup of whiskey (your choice there on the brand). Also add in three tablespoons of tomato paste. Stir everything the best you can, it might be a bit difficult at this point since it takes a bit for the guava paste to break down, but just do your best.

BearBurritoGuavaSauce.jpg

Mix in a tablespoon of Worcestershire sauce, a tablespoon of coconut aminos (or soy sauce if you don’t have coconut aminos and aren’t interested in adding them to your pantry), two teaspoons of ground ginger and cinnamon, a teaspoon of garlic powder, a teaspoon of ground mustard, and salt and pepper to taste.

Let the guava barbeque sauce simmer for five minutes so it will breakdown the guava paste and everything can be mixed to a smooth texture. Then, pour the sauce over the shredded bear meat in the crock pot, turn the pot to high, and let things warm while you prepare the rest of the ingredients for this Bomb Bear Burrito.

The Caramelized Onions

Continuing with the theme of slightly sweet, next on the agenda is to make some caramelized onions. Before we go through the very simple task of caramelizing onions I want to first say that I love them. They are fantastic! Sweet and just a little bit salty, caramelized onions make everything better. Having a bad day? Boss getting ya down? Kids climbing the walls? Make some caramelized onions and things will suddenly be better. Life can suddenly be viewed through rose colored glasses, and all it took was some slow cooked, caramelized onions.

BearBurritoOnions.jpg

Okay, so enough on that weird tangent, in a decent sized pan over medium heat add a few tablespoons of olive oil. While the oil is heating, thinly slice two large yellow onions. Place the onions in the pan, coat them in the oil, sprinkle with a teaspoon or so of salt, and let them slow cook, stirring occasionally for five minutes.

At the five minute mark, sprinkle over a tablespoon of sugar and add a quarter cup of balsamic vinegar. Stir everything and let them continue to slow cook. You want the onions to be slowly cooking but the heat to not be so high they are burning. They should start to brown because of time, not too much heat. After another five minutes or possibly a little more, you should have a beautiful, browned pile of caramelized onions.

The Cheese Sauce

This creamy, silky cheese sauce is quick and easy to make. In a medium sauce pan, add two tablespoons of olive oil and a tablespoon of butter. Over medium heat, melt the butter. Once it is melted down add a minced shallot to the pan.

BearBurritoSauce.jpg

Cook the shallots for three to four minutes then sprinkle three tablespoons of flour over the butter and shallot. Whisk the flour into the oils until a mellow yellow paste is formed. Slowly whisk in two cups of vegetable (or chicken if that is what you have on hand) into the paste. Whisk until the paste has completely broken down and dissolved into the liquid.

Bring the liquid to a low boil so it will thicken. Once the sauce has started to thicken it is time to season the sauce. Add a teaspoon cumin, garlic powder, and half a teaspoon of salt. Also add in the half cup of sour cream.

For this recipe I used a quesadilla melting cheese. Quesadilla melting cheese is usually a little more dense in texture than other cheeses and less salty. It makes for a cheesy but creamy sauce. Diced up about a cup of the melting cheese and continue to stir the sauce until the cheese is fully incorporated and the sauce is thick and silky.

Compiling the Bomb Bear Burrito

Pile a large helping, I am thinking it probably works out to about a cup, of the guava barbeque sauce shredded bear meat onto the burrito size flour tortilla. Add a few spoonful scoops of the caramelized onions on top of the bear meat. Now, burrito fold that bear up.

Heat the skillet used for the caramelized onions to high heat. Place the burrito into the skillet seam side down and cook for one minute. Flip the burrito and cook the other side of another minute.

Plate the burrito and pour a healthy serving of the sour cream cheese sauce over the burrito.

And that is it for this Bomb Bear Burrito! Time to dig in for a sweet, savory, and cheesy burrito. Enjoy!

Happy Hunting!

Looking for other fun bear recipes to try? Check out this Barbacoa Bear Bowl!

Hello, World!

Yield: 8
Author: a 12 Gauge Girl
Bomb Bear Burrito

Bomb Bear Burrito

Hearty, slow cooked shredded bear is drenched in sweet and savory guava barbeque sauce with caramelized onions. The burrito is topped with a light and creamy cheese sauce.
Prep time: 15 MinCook time: 8 HourTotal time: 8 H & 15 M

Ingredients

Guava Barbeque Sauce and Bear Meat Ingredients
  • 2 to three pounds of bear meat chunks (or deer, elk, pronghorn, moose, beef, extra)
  • 1 tablespoon cumin
  • 1 tablespoon coriander
  • 1 tablespoon chili powder
  • 1 tablespoon cayenne
  • 1 tablespoon oregano
  • 1 tablespoon garlic powder
  • 1 tablespoon onion powder
  • 1 tablespoon salt
  • 2 cups vegetable stock
  • 1 cup guava paste, diced
  • 1/3 cup apple cider vinegar
  • 1/4 cup whiskey
  • 1 tablespoon Worcestershire sauce
  • 1 tablespoon coconut aminos
  • 1 teaspoon ground ginger
  • 1 teaspoon garlic powder
  • 1 teaspoon cinnamon
  • 1 teaspoon ground mustard seed
  • Salt and pepper to taste
Caramelized Onions Ingredients
  • 2 large yellow onions, thinly sliced
  • 3 tablespoons olive oil
  • 1 teaspoon salt
  • 1/4 cup balsamic vinegar
  • 1 teaspoon sugar
Sour Cream Cheese Sauce Ingredients
  • 1 tablespoon butter
  • 2 tablespoons olive oil
  • 1 medium shallot, minced
  • 3 tablespoons flour
  • 2 cups vegetable stock
  • 1 teaspoon cumin
  • 1 teaspoon garlic powder
  • 1/2 teaspoon salt
  • 1/2 cup sour cream
  • 1 cup quesadilla melting cheese

Instructions

Guava Barbeque Sauce and Bear Meat
  1. Rub the bear chunks in the seasoning spices: the tablespoon of cumin, coriander, chili powder, cayenne, oregano, garlic powder, onion powder, and salt.
  2. Place the seasoned bear chunks in a crock pot and pour in two cups of vegetable stock.
  3. Place the lid over the pot and set to low. Allow to slow cook for seven hours. 
  4. Once the bear meat is tender and cooked through, remove from pot and shred. Discard cooking liquid and return shredded bear to the crock pot.
  5. To make the guava barbeque sauce, in a medium sauce pan, add the diced guava paste.
  6. Heat the paste over medium heat and add in apple cider vinegar and quarter cup of whiskey. Stir to break down the guava paste.
  7. Once the paste has incorporated with the vinegar and whiskey, add in a tablespoon of Worcestershire sauce, tablespoon of coconut aminos, and teaspoon each of ground ginger, garlic powder, cinnamon, and ground mustard seed.
  8. Season to taste with the salt and black pepper.
  9. Pour the finished guava barbeque sauce over the shredded bear meat and allow the meat to heat up in crock pot until the rest of the burrito ingredients are finished.
Caramelized Onions
  1. In a large skillet over medium heat, add three tablespoons of olive oil and the two large thinly sliced onions. Allow the cook down five minutes, stirring to keep the onions from burning.
  2. At the five minute mark, add the sugar and balsamic vinegar. Continue cooking and stirring for at least five more minutes, longer if the onions are not as caramelized as you desire.
Sour Cream Cheese Sauce
  1. In a medium saucepan over medium heat, melt a tablespoon of butter with two tablespoons of olive oil. Add the minced shallot and cook for three to four minutes.
  2. Sprinkle the flour over the shallots, and whisk until a light paste forms. Add in the two cups of vegetable stock and whisk until paste is completely dissolved.
  3. Let mixture come to a light boil and slightly thicken.
  4. Add in the cumin, garlic powder, and salt.
  5. Stir in the half cup of sour cream and the cup of quesadilla melting cheese. Stir until everything is melted together and smooth.
  6. To plate the burrito, add a cup or two of the guava bear meat to the tortilla. Top with the caramelized onions and fold closed. 
  7. In the onion skillet over high heat, place the burrito seam side down and cook for one minute. Flip and cook a minute more. 
  8. Drench the burrito in the sour cream cheese sauce and dig in to this Bomb Bear Burrito. 
Created using The Recipes Generator


Smoked Salmon with Blueberry and Garlic Cheese Sauce

Smoked Salmon with Blueberry and Garlic Cheese Sauce

I think I could eat smoked salmon every day for a week and not be sick of it, especially if what’s coming off the smoker is anything like this Smoked Salmon with Blueberry and Garlic Cheese Sauce. Salmon is a hearty, put meat on your ribs, kind of fish, but also has a delicate buttery flavor. It has this subtle sweetness to it that is not found in other fish.

Wild Turkey Leg Cheesy Gordita

For this Wild Turkey Leg Cheesy Gordita recipe, I placed a large turkey leg, bone and all, into a crockpot. I poured in two cups of vegetable stock. This step could be changed up by creating your own “vegetable stock” concoction of adding water, onions, carrots, and celery, but I cheated a little.

Elk Crunch Wrap Supreme

Elk Crunch Wrap Supreme

Lately, everywhere I look all I see are crunch wrap supremes. Instragram seemed to be filled with personalized versions of the Taco Bell treat. And I will admit, the crunch wrap supreme is my particularly favorite item when visiting this fast food establishment. So I couldn’t resist the temptation to watch video after video of people re-creating it, and I therefore also couldn’t resist creating my own wild game twist. So, here it is: the Elk Crunch Wrap Supreme.

Manila Clam Pasta on the Grill

Manila Clam Pasta on the Grill

Manila clams are actually an imposter to the Washington ocean ecosystem. They are native to Japan and were accidentally introduced to the salty seas of the Washington coast line in oyster shipments. They can be found all along the Pacific coast line of the United States, and are actually a welcome addition to the waters because they are delicious! The clams are identified by their oval shaped shells with heavy ridge lines running the horizontal length of the shell.

Pronghorn Pumpkin Beer Chili

Pronghorn Pumpkin Beer Chili

For this hearty chili, I used pronghorn, but elk or deer would be excellent as well. I took a package I had labeled as "sausage cuts" and ran it through the grinder.

Chipotle Apricot Rum Chicken: Dutch Oven Dinner

Chipotle Apricot Rum Chicken: Dutch Oven Dinner

I was so happy come Saturday evening to have a spicy, warm, rich dutch oven dinner ready to share with the hunting camp. This recipe takes a bit of time to cook, but is worth the wait and is very simple to put together. It is perfect for a chilly evening and a tired, maybe even exhausted, camp full of people.

Sweet Barbacoa Bear over Cheesy Grits

Sweet Barbacoa Bear over Cheesy Grits

Slow cooked hearty bear in a sweet sauce served over salty, cheesy grits with sweet pickled vegetables and a spicy, creamy tomatillo dressing. This dish is so good you won't be able to put your fork down.

Guinness Elk Stew

Guinness Elk Stew

Hearty Guinness elk stew served up with carrots, chunks of elk meat, and potatoes. The stew base is flavored with the malted barley sweetness of Guinness beer.

Pronghorn Steak Sandwich with Avocado Pesto

Pronghorn Steak Sandwich with Avocado Pesto

Pronghorn steak open faced sandwich with a creamy, thick avocado pesto, fried egg, and fresh tomato slices on a slice of crispy sourdough bread.

Real Texas Venison Chili

Real Texas Venison Chili

You won’t find beans or tomatoes in this Real Texas Chili! Staying true to the chili Texans love, this chili starts with a homemade chili paste base, onions, and wild game! It’s a wild game twist on a Big Bowl O’ Red.

Dutch Oven Apple Pie

Dutch Oven Apple Pie

Homemade spice-filled apple pie straight out of the dutch oven. Your camp will smell great with the scent of warm apples, spicy cinnamon, and flaky buttery crust cooking in the dutch oven.